More about Pockets | ||||||
|
| |||||
Create a Pocket
Creating a pocket consists in extruding a profile or a surface and removing the material resulting from the extrusion. The application lets you choose the limits of creation as well as the direction of extrusion.
The limits you can use are the same as those available for creating pads. To know how to use them, see Creating 'Up to Plane' Pads, Creating 'Up to Surface' Pads.
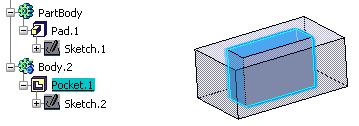
If you insert a new body and create a pocket as the first feature of
this body, the application creates material as shown below:
![]()
Pocket Definition Dialog Box
This section describes the various options available in the Pocket Definition dialog box to create a pocket.
In this dialog box, you can define a pocket using the following options:
Type
You can define a specific depth for your pocket using Dimension, or set one of following options:
- Up to next
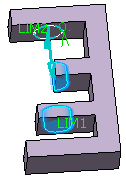
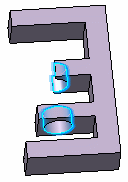
: The Up to next limit is the first
face the application detects while extruding the profile. This face
must stops the whole extrusion, not only a portion of it, and the pocket
goes through material, as shown in the figure below:
Profile
 Result
- Up to last.
- Up to plane.
- Up to surface: When using Up to surface, if the selected surface partly stops the extrusion, the application continues to extrude the profile until it meets a surface that can fully stop the operation.
If you wish to use Up to plane or Up to surface, you can then define an offset between the limit plane (or surface) and the bottom of the pocket. For more information, see Creating 'Up to Surface' Pads.
If you have chosen to work in a hybrid design environment, the geometrical elements created on the fly via the contextual commands mentioned above are aggregated into sketch-based features.
If you set the Up to plane or Up to surface option, contextual commands creating new planes or surfaces you may need are then available from the Limit box:
- Create Plane: For more information, see Generative Shape Design User's Guide: Creating Wireframe Geometry: Creating Planes..
- XY Plane: The XY plane of the current coordinate system origin (0,0,0) becomes the limit.
- YZ Plane: The YZ plane of the current coordinate system origin (0,0,0) becomes the limit.
- ZX Plane: The ZX plane of the current coordinate system origin (0,0,0) becomes the limit.
- Create Join: Joins surfaces or curves. For more information, see Generative Shape Design User's Guide: Performing Operations on Shape Geometry: Joining Surfaces or Curves.
- Create Extrapol: Extrapolates surface boundaries. For more information, see Generative Shape Design User's Guide: Performing Operations on Shape Geometry: Extrapolating Surfaces.
If you create any of these elements, the application then displays
the corresponding icon in front of the Reference box. Clicking
this icon enables you to edit the element.

Thick
The Thick option adds thickness to both sides of your profile. To know how to use Thick, see Creating Thin Solids.
![]()
About Profiles
This section provides information on the profiles used to create a pocket.
You can:
- Use profiles sketched in the Sketcher workbench or planar geometrical elements created in the Generative Shape Design workbench (except for lines).
- Create pockets from open profiles provided existing geometry can trim the pockets.
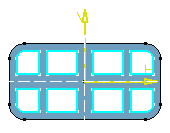
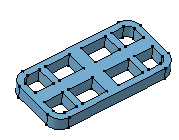
- Create pockets from sketches including several closed profiles.
These profiles must not intersect. In the following example, the initial
sketch is made of eight profiles. Applying the Pocket command
on this sketch lets you create eight pockets:
- Select diverse elements constituting a sketch. For more information, see Using the Sub-Elements of a Sketch.
- Instead of selecting profiles, you can select surfaces created in the Generative Shape Design workbench, non-planar faces and even V4. To know how to create a pocket from a surface, see Creating Pads or Pockets from Surfaces.
- If you execute the Pocket command
with no profile previously defined, just click the icon
 to access the Sketcher workbench and sketch the profile you need.
 -
If you are not satisfied with the profile you selected, note that you can:
- Click the Selection box and select another sketch.
- Use any of these creation contextual
commands available from the Selection box:
-
Insert Wireframe > Create Sketch: Opens the Sketcher workbench after selecting any plane, and lets you sketch the profile you need as explained in the Sketcher User's Guide.
-
Insert Surfaces > Create Fill: Creates fill surfaces between the boundary segments. For more information, see Generative Shape Design User's Guide: Creating Surfaces: Creating Fill Surfaces.
-
Insert Operations > Create Join: Joins surfaces or curves. For more information, see Generative Shape Design User's Guide: Performing Operations on Shape Geometry: Joining Surfaces or Curves.
-
Insert Operations > Create Extract: Generates separate elements from non-connex sub-elements. For more information, see Generative Shape Design User's Guide: Performing Operations on Shape Geometry: Extracting Geometry: Extracting Elements.
If you create any of these elements, the application then displays the corresponding icon in front of the box. Clicking this icon enables you to edit the element.
If you have chosen to work in a hybrid design environment, the elements created on the fly via the contextual commands mentioned above are aggregated into sketch-based features.
-
![]()
About Directions
You can define a direction while creating a pocket.
Note that:
-
By default, if you extrude a profile, the application extrudes normal to the plane used to create the profile. To specify another direction, click More>> to display the whole Pocket Definition dialog box, clear the Normal to profile check box and select a new creation direction in the geometry.
- When copying and pasting a pocket using the As specified in Part document option (for more information, see Handling 3D Shapes in a Multi-Representation Environment), note that if the extrusion direction used does not belong to the same body as the pocket, this direction is not taken into account by the Copy and Paste commands.
- If you extrude a surface, you need to select an element defining the direction because there is no default direction.