Generating NC Code

You can generate NC code from the Manufacturing Program.

This task shows you how to:


Before you begin:
  • Set the required NC data type( APT, CLF-3000 or CLF-15000, or ISO) in the Numerical Control tab of the machine. See Working with Generic Machine Editor.
  • For best results, check the Machining Operations of the Manufacturing Program (by replay or simulation). All Machining Operations must be up-to-date and have a defined status.
  • In order to generate the CLFile output, the PP table associated to the machine must be accessible in read mode.
  • See Syntax of Generated APT Instructions, CLFile Formats, and NC Data Options for more information.
Related Topics
Working with Generic Machine Editor
Accessing and Customizing Settings
APT Format
CLFile Formats
NC Data Options
Managing NC Files Containers

Generate the NC Code

You can generate the NC Code interactively.

  1. Right-click a Manufacturing Program in the Activities Process Tree and select Generate NC Code Interactively .

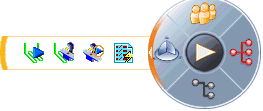
    You can also launch the command from the West Compass toolbar.

    The Generate NC Output Interactively dialog box is displayed.

  2. Define the Input:

    • Part Operations: Select one Part Operation. In this case, all the Manufacturing Programs of the selected Part Operation are processed.
    • Programs: Select one or more Manufacturing Programs.

      Note: If several Manufacturing Programs exist, they are all listed in the dialog box.

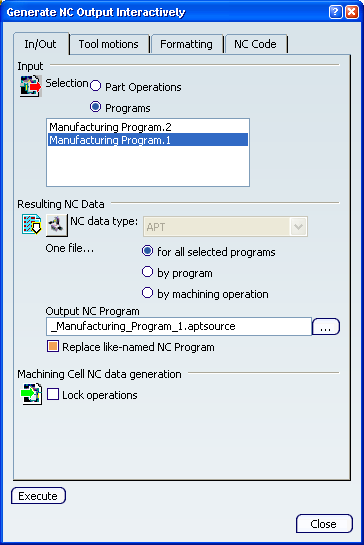
  3. Define the resulting NC Data:

    1. NC data type: this type is defined globally in the machine associated to the Manufacturing Program. However, you can modify it locally. Click and select the required NC data type from the list. See Working with Generic Machine Editor.
    2. Select the desired One file... option.


      • for all selected programs: Generates a single APT file for all the selected Manufacturing Programs.
      • by program: Generates a single APT file for each selected Manufacturing Program.
      • by machining operation: Generates a single APT file for each machining operation in the selected Manufacturing Programs.

        Note: This option is not supported in Manufacturing Programs containing Copy or Tracut Operators.

    3. Under Output NC Program, specify the name of the NC Program file.
    4. Click ... to select an existing NC Files Container from a list of NC Files Containers attached to the Machining Cell.
    5. Select the Replace like-named file NC Program check box, to authorize overwriting an existing like-named NC Program.
    6. Select the Lock operations check box to lock all the Machining Operations after processing. See About Lock/Unlock Mechanisms

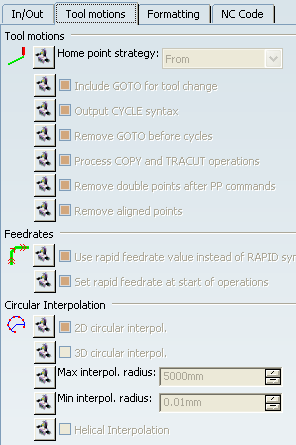
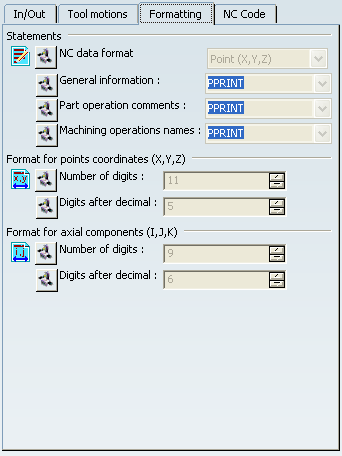
  4. Go to Tools Motions and Formatting if you need to modify locally the machine parameters.


    See Working with Generic Machine Editor.

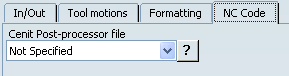
  5. When required, go to NC Code to specify a post-processor.

    1. If not already done, go to Tools > Options > Machining > Output to select the type of Post Processor (Cenit, Intelligent Manufacturing Software (IMS), and ICAM Technologies Corporation).


      • If the output option is set to None, you cannot generate the NC code.
      • The content of the NC Code tab varies according to the post-processor selected.

  6. Click Execute to generate the NC Code file.

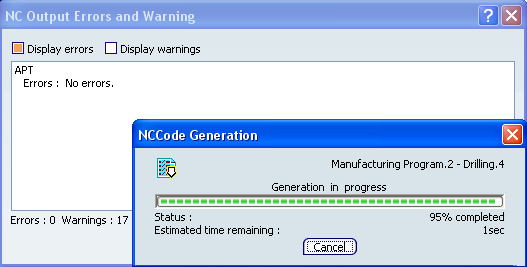
    The NC Code Generation progress bar is displayed with the Machining Operations being processed for output and the percentage of progress. The errors and warnings are also displayed in the NC Output Errors and Warnings dialog box.

    1. Go to Tools > Options > Machining > Output and select No. of Errors and warnings checkbox.

      This helps to configure the output generation stopped after the number of errors and warnings crossed a certain value.

    2. Click Cancel in the NC Code Generation progress bar to stop the output generation.
    3. Click OK in the message that is displayed.

      This message indicates whether the output generation was successful or not. If there are errors or warnings while generating the NC output, the message indicates the number of errors/warnings.

    4. Select Display errors and Display warnings check box in NC Output Errors and Warnings dialog box to view errors and warnings generated during output generation.
    5. Select error or warning in NC Output Errors and Warnings dialog box to highlight the Machining Operationin Activities Process Tree.

      This helps to edit the Machining Operation and perform correction, as required.

    6. Click Close to exit the NC Output Errors and Warnings dialog box.


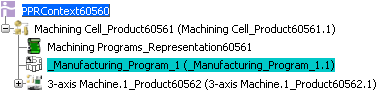
    • A NC Files Container named _Manufacturing_Program_x is created under the Machining Cell.

      Note: The NC Files Container containing the created Output NC program can be stored in the database as a PLM Object.

    • It contains the NC Code file and a log file. See Generating NC Code

      Note: The log file contains machining time information similar to that obtained during the interactive Tool Path Replay, as well as warning/error message entries.

      If the Activate Collision Checking check box is selected in the Part Operation dialog box (see Creating a Part Operation),the log file indicates whether any collisions have been detected.

View the NC Programs

You can view the generated NC code files.

  1. To view the NC Code files, either:

    • Right-click the NC Files Container named _Manufacturing_Program_x under the Machining Cell and select View NC Program in the contextual menu.

    • or right-click the Manufacturing Program and select Display NC program.

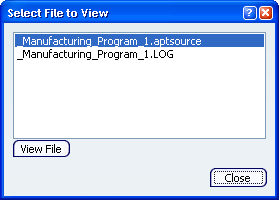
    The Select File to View dialog box appears and lists all files inside the NC Files Container linked to the Manufacturing Program.

  2. Select the required file in the dialog box and click View File.

    The dialog box remains open to select and view more files.