Selecting Using the Multi-Selection

The multi-selection capability enables you to keep the specification of a multi-selection input in a single operation.

It is available with the following functionality:


Before you begin: Let's take an example using the Projection and Translation functionality: create a 3D shape containing several curves to be translated and projected onto a surface.
Related Topics
More about the Multi-Selection
  1. Click Projection .

    The Projection Definition dialog box appears.

  2. Select the element to be projected.

    Important:
    • If one element is selected and you select another element, it automatically replaces the element you selected previously, providing the multi-selection panel is closed.
    • If several elements are selected and you select another element, it is appended to the elements list.
    Tip: When you select or edit an element aggregated under the multi-output node, either in the specification tree or in the 3D area, its input is highlighted in the 3D geometry, in the specification tree, and in the multi-selection panel.
    The selected element is highlighted in the specification tree and in the 3D area.

  3. In the Projection Definition dialog box, click .

    The multi-selection is now active: all selected elements are displayed in the dialog box.

  4. Add elements to the list in the dialog box that opens.

    Tips:
    • You can select an element in the list: it is highlighted in the specification tree and in the 3D geometry.
    • You can select one or more geometrical sets and multi-outputs as inputs of the multi-selection. In that case, all their direct children are selected.
    • Use the Remove or Replace buttons to modify the elements list.
    Warning: Clicking Remove deletes the output feature. Therefore adding a new element in the list creates a new output feature. Click Replace instead to replace an input element by another without deleting the output feature.

  5. Click Close to return to the Projection Definition dialog box.

  6. Select the Support element.

  7. Click OK to create the projection elements.


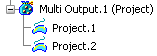
    The projection is identified as Multi Output.1 (Project) in the specification tree.

    the created elements are aggregated under Multi Output.1.


    Tip: You can create several multi-outputs in the specification tree, each one grouping one type of elements.

  8. Click Translate .

    The Translate Definition dialog box appears.

  9. Select the Elements to be translated.

  10. Select Direction, distance as the Vector Definition.

  11. Select the Direction.

  12. Select the Distance.

  13. Click OK to create the translated element.


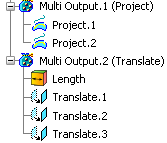
    The translation is identified as Multi Output.2 (Translate) in the specification tree and appears below Multi Output.1.

    The created elements are aggregated under Multi Output.2: all common inputs (in our example, "Length") are directly aggregated under the Multi Output feature and all generated features reference these inputs by pointing the same attribute.