Using the Connection Property Manager | |||||||
|
| ||||||
In the Connection Property toolbar, click Connection Property Manager
 .
.
The Connection Property Manager dialog box appears.
This dialog box lists:
- All the engineering connections created in the root product.
- For each engineering connection, all the connection properties applied to the engineering connection.
- The status of each connection property: included or excluded. If a connection property is included, the corresponding connection mesh exists and is stored under Nodes and Element. A connection property created in the Assembly Design workbench is ignored by default. A connection property created using the Connection Property Manager capability is included by default (you have to define parameters of the connection mesh).
To add a connection property to an engineering connection, right-click the engineering connection, select Add Property, and select one of the following:
- Distant
 to create a distant connection property.
 - User-defined
 to create a user-defined connection property.
 - Face face
 to create a face face connection property.
 - Fastened
 to create a fastened connection property.
 - Bolt tightening
 to create a bolt tightening connection property.
 - Spot weld
 to create a spot weld connection property.
 - Seam weld
 to create a seam weld connection property.
 - Curve curve weld
 to create a curve curve weld connection property.
 - Surface weld
 to create a surface weld connection property.
Important: The list of available connection properties depends on the type of the selected engineering connection. See About Connection Properties. The corresponding dialog box appears.
- Distant
Define the property and click OK.
A symbol appears to represent the connection property.
Example for a rigid distant connection property:
If mesh information is needed (as a tolerance value, diameter of a spot weld...), a dedicated dialog box appears to define the parameters of the connection mesh.
Important: A distant connection mesh does not have mesh parameters.
![]()
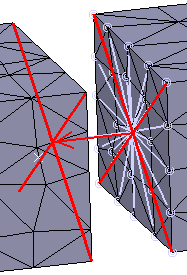
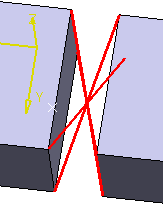
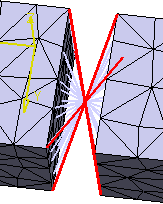
Examples of Connection Meshes
A rigid distant connection mesh is symbolized as shown below:
A smooth distant connection mesh is symbolized as shown below:
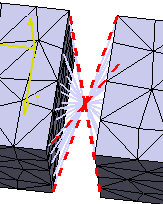
A user-defined connection mesh with the Spring-Smooth/Beam-Spring/Rigid combination is
symbolized as shown below: