Propagating Objects | ||||||||
|
| |||||||
By default, only references are listed:

Note: When the Propagate dialog box opens, the West quadrant of the Compass is automatically selected in the active editor only (whatever the number of open editors):
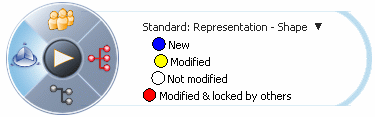
When the dialog box is closed:
- If the West quadrant has not been deactivated, the Compass is restored to its previous state before the command was run.
- If the West quadrant has been deactivated, the Compass keeps its last activation state when the command ends. For instance, if the North quadrant is activated while the Propagate dialog box is open, then it will stay activated after the Propagate dialog box is closed. To restore the automatic West quadrant activation, select the West quadrant while the Propagate dialog box is open.
For more information about the Compass, see the Live ENOVIA V6 Connector User User's Guide: About the Compass.
Click Zoom In
 (or use the Zoom In contextual command).
All references are exploded:

The Propagate dialog box displays the objects in a single list so that:
- Objects are not mixed when they belong to two different editors that do not share any objects.
- Objects can be mixed when they belong to two different editors that share at least one object.
Tips: - The columns and object types as well as their order of appearance in the dialog box can be customized through the Propagation tab. In addition to this, reference nodes can be sorted in each column by clicking the column title. When a column is sorted, all displayed children of each reference remain displayed under their father reference. To retrieve the initial order, click the # column title.
- Double-clicking a reference in the Display Name or in the # column lets you expand or compact it.
- Multi-selection is supported when using the Zoom In and Zoom Out commands.
- When using the Zoom In command on a 3D Part, the associated representation is not displayed.
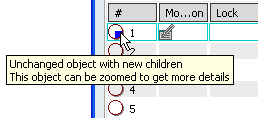
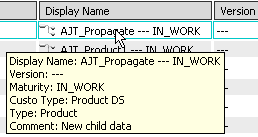
Optional: Point at the # or Display Name column.
A tooltip is displayed to provide useful information about the object to be propagated.
To exclude a reference, a representation reference or an instance from the propagation scope, select it then click Exclude from Propagation Scope
 .
.You can also use the Exclude contextual command or double-click the symbol
 in the Modification column.
Optional: When an object has been automatically excluded, you can use the following two contextual commands:
- Exclusion Impact: lets you retrieve all the objects
that have been automatically excluded because of the excluded object you select. These objects are identified by the symbol
 .
. - Exclusion Roots: lets you retrieve all the
excluded objects implying the automatic exclusion of the excluded
object you select. These objects are identified by the symbol
 .
.
- Exclusion Impact: lets you retrieve all the objects
that have been automatically excluded because of the excluded object you select. These objects are identified by the symbol
Optional: To put an excluded object back to the propagation scope, select it from the list then click Restore in Propagation Scope
or use the Restore contextual command.After its restoration, the object's modification mark
is restored.Note that
- When applied to a reference, the restoration is also automatically applied to all its idirect children (instance, representation, port or connection).
- Any unchanged reference can be restored when at least one of its direct children (instance, representation, port or connection) is excluded: all the excluded direct children are restored as "To be propagated".
When the restoration is applied to a new aggregated representation, the reference is also impacted.
Click View Filter
 .
.The Dashboard Filter dialog box lets you filter objects listed in the Propagate dialog box according to their status:
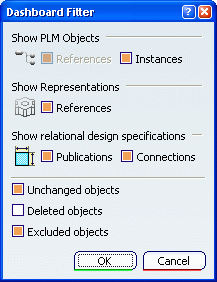
References are always displayed and this is why the References check box is selected and grayed out. You can customize the types to be displayed in the Propagate dialog box through the Propagation tab.
Optional: Select a modified object then click Show Modifications
 .
.The Logged modifications dialog box displays the history of all the modifications made to the selected object since you opened it:
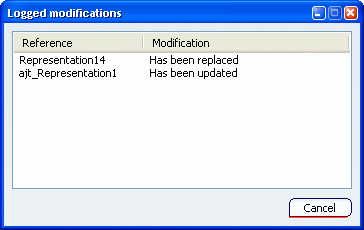
The data displayed in this dialog box is displayed for information only.
Regarding 3D Parts, note that the dialog box gives information on the global 3D Part, whatever the modifications made to the reference or the representation.
In addition to this, note also that when creating a new 3D Part then propagating it, the creation and modification dates remain the same as the original product is not modified. For more information about this behavior, see About the V6 Data Model. To know what has been created or modified, you can use the # column which indicates if the reference and/or its aggregated objects are new or modified.
To create a new version for a product or a representation, select it then click New Major Version
 (or use the New Major Version contextual command).
The new version symbol appears in the Version column and the Applicability date box becomes activated to let you enter the new applicability date (you can also click
 to select the date of your choice).
Inversely, to remove the new version, click New Major Version
again.
Important: - New versions can be defined for products and representations only.
- An aggregated representation cannot be versioned without its reference. The versioning of a reference automatically impacts its aggregated representation, whatever the zoom status of the reference.
- Both shared and aggregated representations are selected along with the reference when creating a new version, whatever the zoom status. The shared representation can be deactivated independently afterwards.
- New Major Version and Propagate as New are mutually exclusive.
- Multiselection is supported.
For more information, see VPM Navigator User's Guide: Versioning.
To change the maturity status of a product, a product instance or a representation, select the desired objects then click Maturity Management
 (or use the Maturity Management contextual command).
 For more information, see VPM Navigator User's Guide: Changing Maturity.
Warning: - You cannot change the maturity status of representation instances.
- The maturity status of aggregated representations can be modified independently of the aggregating reference.
- Both shared and aggregated representations are selected along with the reference when changing the maturity, whatever the zoom status. The shared representation can be deactivated independently afterwards.
- Multiselection is supported.
Optional: To create a new copy of one or many objects, select them then click Propagate as New
 .
.


An easy warning similar to the one below is displayed in
the top right corner of the screen to give a status:
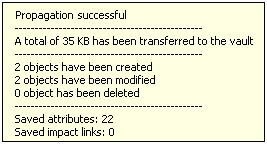
- The total of KB transferred to the vault is the total size of stream representations. As this value depends on stream data, it is unpredictable.
- Some objects are not displayed, even though they impact the number of propagated attributes. Therefore, output values are unpredictable.
- When an assembly update needs to be performed before propagating, the Propagate dialog box stays open to let you perform the update.