Creating a Drilling Operation | ||||
|
| |||
Activate the Manufacturing Program and click Drilling
 in the Axial Machining Operations toolbar.
A Drilling entity is added to the Manufacturing Program. The Drilling dialog box appears directly at the Geometry tab
 . This tab includes a sensitive icon to
help you specify the
geometry.
Areas of the icon are colored red indicating that this
geometry is required.
 Still in the Geometry tab.
- Select the red hole depth representation
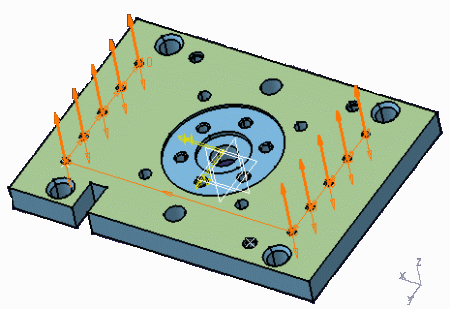
then select the pattern of 10 holes as shown below.
Double-click to end your selections.

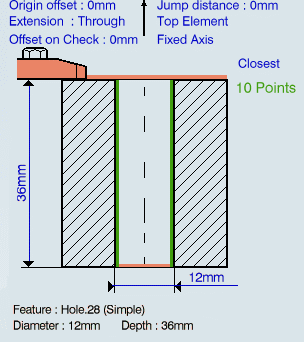
The sensitive icon is updated with the following information:
- depth and diameter of the first selected feature
- hole extension type: through hole
- number of points to machine.

- Select the axis representation in the sensitive icon to invert the tool axis direction, if required.
- If you need to define a clearance, double-click Jump distance in the sensitive icon then specify a value in the Edit Parameter dialog box that appears.
- Select the red hole depth representation
then select the pattern of 10 holes as shown below.
Double-click to end your selections.
Select the Strategy tab
 to specify the following
parameters.
to specify the following
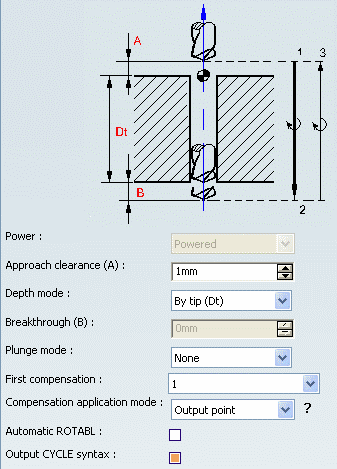
parameters.- Approach clearance (A)
- Depth mode: By tip (Dt)
Note: The depth value used is the one specified in the Geometry tab.
- Breakthrough (B) distance
- Compensation number depending on those available on the tool.
The other parameters are optional in this case.

Go to the Tool tab
 to select a tool.
Remember that you can make use of the hole diameter found on the selected hole feature to select an appropriate tool.
Select the Feeds and Speeds tab
 to specify the feedrates
and spindle speeds for the operation.
to specify the feedrates
and spindle speeds for the operation.Note: In the Drilling tool path represented in the Strategy tab, tool motion is as follows:
- machining feedrate from 1 to 2
- retract or rapid feedrate from 2 to 3.
Select the Macros tab
 to specify the desired
transition paths.
 Click Tool Path Replay
 to check the validity of the operation.
- The tool path is computed.
- A progress indicator is displayed.
- You can cancel the tool path computation at any moment before 100% completion.
Click OK to create the operation.
Note: If your PP table is customized with the following statement for Drilling operations:
CYCLE/DRILL, %MFG_TOTAL_DEPTH, %MFG_FEED_MACH_VALUE,
&MFG_FEED_UNIT, %MFG_CLEAR_TIP
A typical NC data output is as follows:
CYCLE/DRILL, 38.500000, 500.000000, MMPM, 2.500000
The parameters available for PP word syntaxes for this type of operation are described in the NC_DRILLING section of the Manufacturing Infrastructure User's Guide.
Click Edit Cycle
 to edit or choose output syntaxes.