About Patterns | ||||||
|
| |||||
Pattern the Features
Patterns let you duplicate the whole geometry of one or more features and position this geometry on a 3D shape at the location of your choice.
The application provides following three different capabilities for patterning the features:
![]()
Pattern the Current Solids
A current solid is composed of one or more features belonging to the same body. It is the result of the operations as mentioned in the specification tree, the last operation being the current one. For more information about current features, see Generative Shape Design User's Guide: Using Tools: Scanning a 3D Shape and Defining in Work Objects.
To pattern a current solid, just click Rectangular Pattern
 or Circular Pattern
 .
There is no need to select any geometry. By default, the object to pattern
is the current solid. You then just have to enter your specifications in
the dialog box.
.
There is no need to select any geometry. By default, the object to pattern
is the current solid. You then just have to enter your specifications in
the dialog box.
Note: If you change your mind and decide to pattern a feature, you just have to click the Object box and select the feature of your choice.
In the following example, the current solid is the result of one pad and one hole.
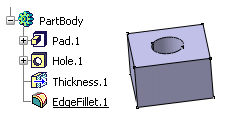
The instances created via Pattern are composed of pads and holes only.
| Important: You cannot transform a patterned list of features into a patterned current solid and vice-versa. |
![]()
Pattern the Bodies
The application patterns the body's geometry without taking into account the body's polarity. However, if then you insert the pattern obtained in another body, then the application takes the polarity of this body into account. This explains why patterned bodies are not visible if they are inserted in negative bodies.
In the following example, the user pattern points to Body.2 included in Body.3 which is a positive body. In this case, the pattern is visible in the geometry area because the pattern's result is added to existing geometry.
If Body.3 is changed into a negative body (the Add feature was changed into a Remove feature), then the user pattern is no longer visible because the pattern's result is subtracted from existing geometry.
![]()
Edit a List of Features
Editing a list of features consists in adding or removing features from the list. To do so, you just have to click the Object box and select the feature of interest to add it or remove it from the list.
Note: Adding a feature to a pattern is possible only if your pattern is already based on a feature list. In other words, you cannot add any feature to a basic pattern created using a single feature.
![]()
Remove the Instances
- Deleting the instances of your choice is possible while creating the pattern. In the pattern preview, just select the points materializing instances. Conversely, selecting these points again makes the application create the corresponding instances.
- Clicking an instance once removes the instance from the specifications. Clicking once or double-clicking an instance does not lead to the same result then.
You can select the desired number of instances of pattern through trap selection and activate/de-activate them. For more information about the trap selection, refer to Infrastructure User's Guide: Selecting Objects: Selecting Using the Selection Traps.
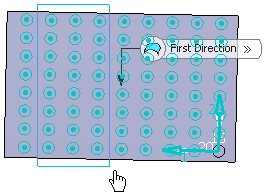
The Activate and De-activate options are displayed at the point where mouse is released.
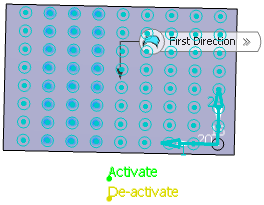
You can click De-activate to remove the selected instances and Activate to keep them.
![]()
Focus on the Instances
During your design, you may need to rework instances specifically. You will then have to use the Explode contextual command to delete your pattern while keeping geometry. For more information, see Exploding Patterns.