Creating a Front View | |||||
|
| ||||
Create a front view
You can create the front view either from a part or from the sub-part of a product, using a reference plane.
Click Front View
 in the Views toolbar.
 To define the reference plane, select either of the following:
- A plane of the 3D part or a plane surface.
Important: If you select a plane surface, the reference orientation will be the external normal of the planar surface. - Two edges: these edges correspond to both axes defining the reference plane according to which the front view will be generated. The first edge determines the horizontal axis.
- A point and an edge, an edge and a point, two points and an edge, or three points: you will thus define a plane.
Blue arrows appear, enabling you to redefine the projection plane before generating the view. For more information, refer to Define the view orientation during view creation.
- A plane of the 3D part or a plane surface.
Click in the drawing to generate the view.
Tip: By default, the axis and center lines are generated. You can also view hidden lines, threads, fillets, project 3D points, etc. To customize the view properties, right-click the frame of the view and select Properties. Click the View tab and select the required options in the Properties dialog box.
![]()
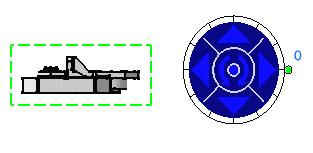
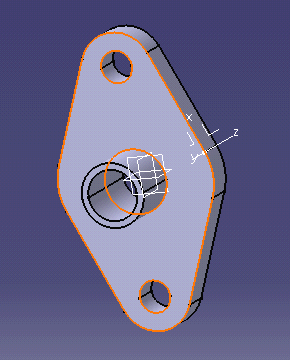
Define the view orientation during view creation
When creating a view, you can redefine the orientation of its reference plane using the available arrows.
This is the case when generating a front view, an isometric view or when generating views using the wizard.
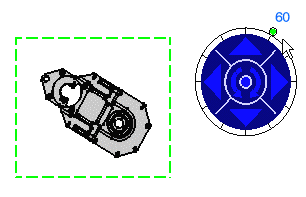
Open a 3D part representation and start creating a front view.
Click the right or left arrow to visualize the right or left side, respectively.
Click the bottom arrow to visualize the bottom side.
Click the counterclockwise arrow to rotate the reference plane.
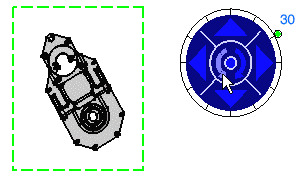
Drag the green knob to redefine the rotating angle. The default increment value is 30 degrees.
| Important: Remember that there is no associativity between the selected plane or face in the 3D part and the projection plane of the generated views. Yet, you can modify the view projection plane if you change the 3D part orientation. For more information, refer to Modifying a View Projection Plane. |
![]()
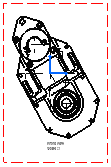
Create a front view with a local axis system
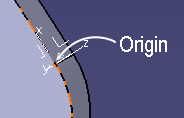
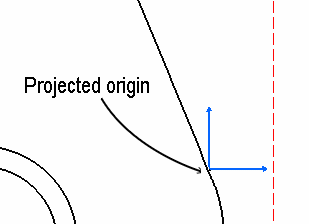
This functionality allows you to take into account a local axis system when creating a view. That way, the origin of the generated view is the projection of the origin of the local axis system selected in the view plane.
Click Front View
in the Views toolbar. Select one plane of the 3D part or a plane surface, to define the reference plane.
Click in the drawing to end the view creation. The part local axis system appears in the view.

Important: When creating views with a local axis system, only the origin of the axis system is taken into account and respected in the generated view. The orientation is not taken into account.
![]()
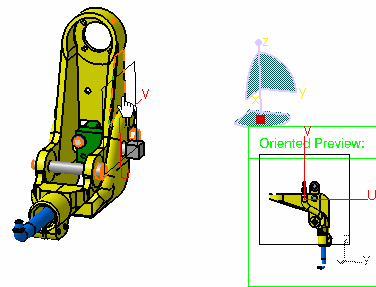
Create a front view from specific sub-bodies/sub-products
You can multi-select specific sub-products in a product and/or several sub-bodies in a part to create front views displaying the selected elements only. These multi-selected 3D elements will be previewed and then used as reference planes for generating several front views.
Open a 3D product.
Click Front View
in the Views toolbar. Select one body, or press the Ctrl key and then multi-select the desired elements in the specification tree.
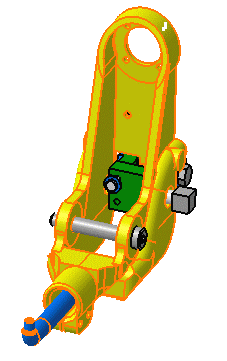
In the 3D, point to the geometry to choose a projection plane. As you go over the geometry with the cursor, the oriented preview automatically appears on the 3D document.

Important: Be careful: once you multi-select bodies or sub-products, and go further into the procedure, you cannot select or de-select any more bodies or sub-products. - As you highlight a 3D element (going over it with the cursor), you can preview and then select the plane corresponding to this highlighted element.
- As you highlight and select one or more elements defining the final plane, you can preview and assign a given orientation to this final plane.
- Once you defined the plane, you can preview the front view within the 3D representation.
Note that once an element is selected, this element becomes gray colored. In addition, you can only work in one 3D document. If you try to select another document, the Front View command quits.
When the oriented preview corresponds to the projection plane you want, click the plane to validate.
The front view is previewed. At this point, you can still modify its orientation:
Click in the drawing to generate the view.
![]()
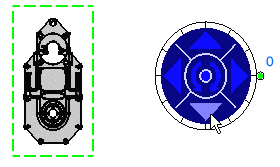
Create a front view using selection sets
Selection sets let you gain in productivity, particularly in the case of large assemblies, when generating several views with numerous common features: you can select and store these features once and reuse the selection set as often as necessary without having to select the features again.
Open a 3D product.
Click Front View
in the Views toolbar.
In the 3D, point to the geometry to choose a projection plane.
As you go over the geometry with the cursor, the oriented preview automatically appears on the 3D document.
When the oriented preview corresponds to the projection plane you want, click the plane to validate.
The front view is previewed. At this point, you can still modify its orientation:
Click in the drawing to generate the view.
Important: - You can also use selection sets when creating isometric views.
- You can also use selection sets to select the sub-bodies and/or sub-products from which you want to generate the front view.
- Views created from selection sets are not associative with the selection sets themselves: if you modify a selection set after having created a view from it, the view will not be seen as needing an update, and if you do update the view, its definition will not change. You have to create the view over again in order for your modifications to be taken into account.