Running the CoexistenceAdministration Batch

Coexistence scenarios enable data transfer from V5 to V6 and all subsequent design updates are made in V6. The transfer history is stored in mapping tables and the mapping information contained in these tables can be viewed and edited through the CoexistenceAdministration batch.


Before you begin:
  • The CoexistenceAdministration batch cannot be used with the 3DLive product.
  • This scenario takes the DownwardCompatibility batch as an example but the CoexistenceAdministration batch can also be used for V5 products imported to V6 through the FBDI batch. For more information about the FBDI batch, see the File-based Design Import User's Guide: Running the FBDI Batch.
Related Topics
More About the CoexistenceAdministration Batch
  1. Start a V6 session.

  2. Select Tools > Options > General > File-based Design Import > Context to select the context to be used.

    A Coexistence mapping context is a couple of strings (context name, parameter, and parameter type) which can be seen as an association between the mapping table string and a logical/physical location.

    The default context is COEXISTENCE but you can create a new context if needed. For more information, see Setting Up Coexistence Mapping Context.

  3. Select Tools > Utility....

  4. Double-click DownwardCompatibility to convert a V6 product to V5.


  5. Click to search for a V6 product to be converted.


  6. In the Convert list, select the target release for the conversion.

  7. In the Context name box, select the context specified in the Context tab.

    For more information on the various options available for the DownwardCompatibility batch, see Running the Downward Compatibility Batch.

  8. Click Run.

    The product is converted to V5:

  9. Select Tools > Utility... again then double-click CoexistenceAdministration:


    Warning: The access to the CoexistenceAdministration batch can be granted or revoked by the administrator through the vplm:: COEXISTENCEADMIN VPLM command. If the batch access is not granted to the end-user, the following message is displayed when double-clicking the batch name:

    You are not allowed to do this operation. Contact your administrator.

    By default, the access is granted to the [All] person which means that the access is then considered as public.

    Access rights can be modified through an interactive tool (the ENOVIA Business administration console), or a batch tool (MQL scripts) by adding or removing:

    • P&O contexts, projects, roles or organizations (all these objects are stored as roles in ENOVIA V6)
    • Persons.

    For more information, see VPM Multi-discipline Collaboration Platform - Installation: Configuring ENOVIA VPM Multi-discipline Platform: People, Organization and Security Concepts: Implementing Security on VPLM Application Commands.

    Note that the vplm:: COEXISTENCEADMIN VPLM command is an administration object and cannot be customized.

  10. In the Context name box, select the context defined in step 2.

  11. Search for the objects to be processed by clicking:

    • to search for objects stored in ENOVIA V6. For more information, see Searching for Objects.
    • to search for objects stored in specific connectors (e.g. ENOVIA VPM, or ENOVIA SmarTeam). If you do so, the button is replaced by the button to let you search for files.

    In this scenario, we are searching for the V6 object converted to V5 through the DownwardCompatibility batch.

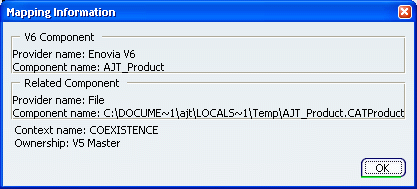
    The search results are listed in the Name column. You can then double-click an object in the list to display the corresponding mapping information for the selected context:

    In the V6 Component area, the information displayed in the Component name box corresponds to the PLM_External_ID and/or the V_Name attributes of the V6 component.

    The Related Component area provides information about the component associated to the object you double-clicked:

    • If the component is a V5 file: the full path of the file is displayed in the Component name box.
    • If the component is stored in a V5 database: the V5 Provider ID of the component is displayed in the Component name box (and in that case, it may contain special characters).

    The Context name and Ownership boxes at the bottom of the dialog box display the mapping context and the ownership (i.e. V6 Master or V5 Master) of the object you double-clicked respectively.

    In the picture above, the ownership of the selected object is "V6 Master". We are going to change it to "V5 Master".

  12. Optional: To remove an object from the search results, select it then click .

  13. In the Ownership transfer area, select the operation to be applied.


    • V5 to V6 Master: relevant for data imported through the FBDI or the Coexistence batch. Note that the FBDI batch only imports "V5 Master" data or data without any mapping.
    • V6 to V5 Master: relevant for data exported through the DownwardCompatibility batch. Note that the DownwardCompatibility batch only exports "V6 Master" data or data without any mapping.

    In this scenario, we want to transfer a V6 product to V5 so we select V6 to V5 Master.

    Warning: This option is not allowed for V6 representations.

  14. Optional: In the Mapping operation area, click Delete to remove the mapping:

    • for all objects listed in the search results if the Components from selection option is activated.

      If you searched for objects stored in ENOVIA V6, you can apply the operation to the selected objects but also propagate it to their children.

    • for all objects in the selected context if All components related to context is activated. Be very careful when using this option because it does not only apply to search results but also to all objects in the selected context.

  15. Optional: Click Preview to test the mapping operation.

    This option is useful to check that the operation complies with the following rules:

    • If a V6 representation is selected and defined as "V6 Master", then you cannot change the mapping to "V5 Master" because the specifications defined for this representation would be lost.
    • A V5 or V6 object can be linked to one and only one "V5 Master" object. For instance, if a V6 product has been exported as a V5 product in two different mapping contexts, only one V5 product can be switched from "V6 Master" to "V5 Master".
    • If the Propagation depth is set to 0 (i.e. the operation is not propagated to the children):
      • When deleting a V6 reference, no mapping data related to representations instantiated under this reference are deleted (except for 3D parts created through FBDI).
      • When transferring the ownership of a V6 reference, no mapping data related to representations instantiated under this reference changes, nor inherits the new ownership.
    • It is not possible to transfer ownership from "V5 Master" to "V6 Master" when data is transferred to V6 in Coexistence with Visualization Only mode with the Coexistence Batch.

    All the components involved in the operation are displayed in "Impacted V6 Components" in the batch report.

  16. Click Save.

    The batch parameters are saved in an XML file.

    When saved, this file can be edited manually and used later on to run the batch directly without accessing the batch interface.

  17. Click Run to launch the batch.

    Note that if one of the above boxes is not correctly filled, the command is grayed out. When the conversion is over, the CoexistenceAdministration batch generates:

    • A quick result information accessible through the Processes tab.
    • A detailed HTML report saved in the directory specified in the Report directory box.

  18. To display the light version of the global results, access the Processes tab then double-click the batch execution line:


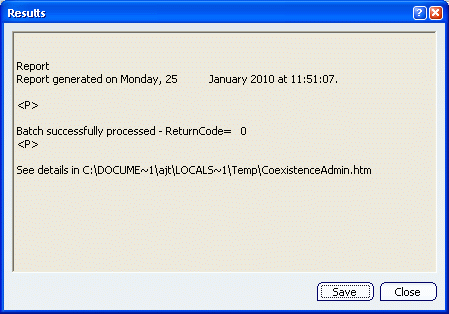
    These results indicate if each of the selected objects has been processed or not along with the result (success or failure). The report contains only text and cannot reference images, URL links, etc.

  19. Optional: To modify your conversion parameters, first close the window then run the batch again.

  20. Click Save to save your results in the folder of your choice.

    Important:
    • The file formats available are .txt and .xml.
    • This file is different from the one you save from the batch interface: the Save button in the Batch Monitor window lets you save the batch results (i.e. the data displayed in the Results window displayed above) whereas the Save button available in the batch interface lets you save the batch parameters.

  21. Click Close to exit the Results window.

  22. Click Open HTML Report to display an HTML version of the global report (this button is activated only when a report has been generated).


    Another method to visualize the report is to open the HTML file from the directory in which it has been saved.

  23. To display the report for each processed object, click OK next to the object of interest, or access the folder where the report has been saved then double-click the desired CoexistenceAdmin_traces.htm file.


  24. Access the Processes tab to display information about the batch execution.

    Tip: When the batch has been run at least once, an XML file containing the batch parameters is generated. You can reuse these parameters next time you run the CoexistenceAdministration batch by using the Read input from parameter file... contextual command.

  25. To read the reports generated by the batch execution, access the folder c:\temp\batchID.

  26. In the CoexistenceAdministration window, double-click again the processed object to check that the ownership has been changed from V6 Master to V5 Master.