Running the Downward Compatibility Batch | |||||
|
| ||||
Start a V6 session.
Select Tools > Utility... to access the Batch Monitor.
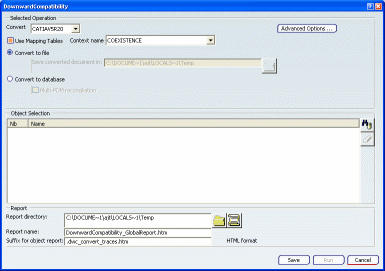
Double-click DownwardCompatibility:
A pop-up message might be displayed when accessing the dialog box if no multirepresentation criteria have been defined. It is also displayed when running the batch or when saving the parameters in an XML file. This message only aims at informing you that you are about to run the batch without multirepresentation criteria. You have two options:
- Cancel the batch execution or the save in the XML file to define the multirepresentation criteria.
- Run the batch or save the parameters without multirepresentation criteria. In that case, the default multirepresentation behavior applies.
If you do want want to display this message again, click Do not show this message again.
In the Convert list, select the target release for the conversion.
The Convert action converts objects into a file which format can be read on the target release. For each selected object, a report gives information about the process (i.e. converted or not) and the result (i.e. success or failure).
Warning: If a selected object cannot be converted, a warning is displayed to explain why the conversion cannot be performed: select the object in the Object Selection area then click  to remove the object and all its related files from the
list, provided that these related files are not linked to
another object.
- Convert to file (default behavior): one or many files are generated for each processed object. If you select this option, you can use the following check boxes:
- Use Mapping Tables: runs the batch in asynchronous mode. This mode lets you convert a group of related documents in different
steps
because mapping tables
register what has already been processed in V6. Thus, the conversion only applies to elements that need to be processed.
This option is activated by default. If deactivated, a data loss might occur when using the converted documents in V5. The directory where the output directory depends on the context selected in the Context name pulldown list.
- Save converted document in: available only if the Use Mapping Tables option is deactivated. In that case, the output directory for the converted documents is not linked to the context and you need to specify it either by entering directly the path in the box, or by clicking the Select location
 button then browsing your file tree to the desired location.
- Use Mapping Tables: runs the batch in asynchronous mode. This mode lets you convert a group of related documents in different
steps
because mapping tables
register what has already been processed in V6. Thus, the conversion only applies to elements that need to be processed.
- Convert to database: if you select this conversion type, the Use Mapping Tables option is automatically activated. The output directory for the converted documents depends on the context selected in the Context name pulldown list.
Other options that are not relevant for this mode are grayed out.
- Multi-PDM reconciliation: available only if Convert to database is activated. This option lets you transfer data from a VPLM V6 server to many PDMs.
The reconciliation between PDMs and V6 is based upon the notion of "master". The contents of an object can be updated only from the master.
A PDM is master on an object if it is the first to transfer it and as such, it is the only PDM able to modify the contents of this object. If the object is transferred (from PDM to V6 or from V6 to PDM), then the master information is set in a mapping table. In this case, the master status information is only available if the master PDM is the source PDM.
When this check box is selected, an additional tag is inserted in the XML file generated when the batch is run:
<CATDWC_MultiPDMSupport> <CATDWC_MultiPDMSupport>
Possible values for the tag are: Yes, Y, No, N, and any upper or lower combination.
XML files generated in previous versions (i.e. which do not have any tag) behave as if the value is No. When editing the xml file, this tag can be evaluated using the ${VARIABLE}.
If Convert to database is not activated, no tag appears in the XML file.
Important: - This functionality is only available through PDM to PDM exchange (transition engine), not through other import engines (such as FBDI or STEP).
- All the objects that are going to be reconciled must have the same Public Unique Identifier in all PDMs. Otherwise, no reconciliation can be done: objects that seem to be unique will be either duplicated in the target PDM or, the creation will be refused (in case of identical identifiers).
A public identifier is a set of attributes computed by a Business Logic and contains:
- a unique information which identifies an object from multiple PDMs
- constant information: if the Public Unique Identifier changes, the reconciliation might fail and it can even lead to a transfer process failure.
- omnipresent information: this information must be available for all object types composing the structure (including instances and representation instances).
- Multi-PDM reconciliation: available only if Convert to database is activated. This option lets you transfer data from a VPLM V6 server to many PDMs.
- Convert to file (default behavior): one or many files are generated for each processed object. If you select this option, you can use the following check boxes:
In the Context name pulldown list, select the Coexistence mapping context to be used as the directory where V5 documents will be created.
Coexistence enables to manage transition between V5 and V6 platforms lifecycles as well as data exchange between V5 and V6 databases. The exchange history is stored in mapping tables and each mapping data is linked to a context.
A Coexistence mapping context is a couple of strings (context name, parameter, and parameter type) which can be seen as an association between the mapping table string and a logical/physical location.
The default mapping context is COEXISTENCE but if customized Coexistence mapping contexts have been defined, they will also appear in the list and you can choose any of them depending on your needs. Mapping contexts are defined in the Context tab.
Note:
- The context is mandatory. If no context is selected, an error message is displayed in a short help.
- If you leave COEXISTENCE, the output directory and the report directory are the same.
- Mapping data generated by the Convert to file action are not compatible with those generated by the Convert to database action. Therefore, it is highly recommended not to use the same context when converting to a file and when converting to a database.
- When the DownwardCompatibility window opens, the last used mapping context is displayed (according to the preferences saved in the CATDWCSettingsRep.CATPreferences file).
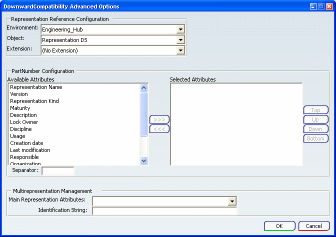
In the Representation Reference Configuration area, select the environment to be used in the Environment pulldown list.
By default, the environment is set to Engineering_Hub. The list of available environments corresponds to the values specified through creation preferences.
When the environment is selected, the types of representation references displayed in the Object pulldown list is then updated and you can then select the type of your choice. If needed, you can also select an extension in the Extension list.
The items you select in this area have an impact on the available attributes displayed in the two other areas of the advanced options dialog box.
In the PartNumber configuration area, define the configuration of the Identification String by selecting the attributes of your choice from the Available Attributes column (you can select multiple elements using Ctrl or Shift) then clicking >>>.
The selected attributes are transferred to the Selected Attributes column.
Optional: Reorder the selected attributes by selecting the desired attributes (you can also use multi-selection) then using the buttons displayed to the right:
- <<< transfers a selected attribute back to the Available Attributes column
- Top moves the selected attributes to the top of the list
- Up moves the selected attributes up in the list
- Down moves the selected attributes down in the list
- Bottom moves the selected attributes to the bottom of the list.
You can also use the box at the bottom of the PartNumber configuration area to enter a string to be used as a separator.
As the separator string has an impact on the document name, the following characters are forbidden: "\, :, ?, <, >, *, /" plus the blank character (using the blank character automatically sets the separator string as empty).
In the Multirepresentation Management area, first select in the Main Representation Attributes list the attributes (of type String) that will be used, then enter the string value corresponding to the main representation in the identified with string box.
You can use ${VARIABLE] to valuate the Identification String box. In that case, the user interface automatically replaces it by the variable value.
When defining the main representation, note that:
- You cannot define a null attribute with a non null value (criteria such as "=VAL" are not allowed)
- You can attach a null value to a non null attribute (criteria such as "=ATT" are allowed)
- You can reset the criteria to a null value and a null attribute (criteria such as "=" are allowed). In that case, the following warning is displayed when running the batch: "No criteria defined". Moreover, a null value and/or a null attribute name is saved as a null preference in the CATDWCSettingsRep.CATPreferences file.
- Regarding the identification string, even if you can select an object other than Representation DS in the Object list, only what is defined for the representation reference is taken into account.
- Only the last definition is kept for the identification string. For instance, if you define an identification string for a representation of type "MyCusto1", then you create a new identification string for a representation of type "MyCusto2", only the identification string for "MyCusto2" will be kept.
Warning: The * character cannot be used as a wildcard. For instance, if you enter Test*String as the identification string, the application will search for a main representation with TYPREP attributes containing the exact string "Test*String" and not "Test xxxString", for instance. For detailed information about multirepresentation, see Multirepresentation.
Click OK to validate and close the DownwardCompatibility Advanced Options dialog box.
The values entered in this dialog box are stored in preference files. When you change the mapping context, the application checks if a preference is available in the CATDWCSettingsRep.CATPreferences file. If so, the boxes of the Multirepresentation Management area are automatically filled with the values stored in this file. Otherwise, you retrieve the last used values, whatever the mapping context.
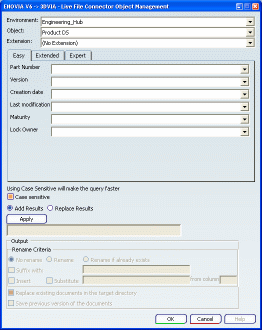
Click
 to open the search dialog box:
For detailed information about:
- Running queries and Output options, see Searching for Objects.
- Rename Criteria options, see Searching for Files (if you use the Convert to file conversion type).
Note: You can now search for Persistent Filter objects (also known as Product View Specification objects). This lets you increase efficiency by applying advanced filters to a PLM Root Reference to take into account volumic, domain, or naming criteria.
Whether the batch is run interactively or from the command line, processed objects and reports only contain the Persistent Filter object (and the name of the PLM Root Reference), but not the result of the Persistent Filter's execution.
For more information about persistent filters, see VPM Navigator User's Guide: Working with Persistent Filters and Searches.
Click Apply to launch the search.
Your search results are displayed in the Object Selection area.
Optional: If you decide afterwards not to process one or several objects displayed in the list, select the objects to be removed and click
 .
.In the Report directory box:
- Enter the directory where the report will be saved.
- Click
 to
navigate through the file tree to the desired directory.
This box is mandatory and is initialized with the current or temporary directory by default.
An additional tag is inserted in the XML file generated when the batch is run: <folder id="targetDir" destination="C:\temp" folderPath="C:\temp" type="bin" upLoadable="RightNow" extension="*" automatic="1"/>.
Important: - You can change the default report directory by setting the PLMBATCH_Default_ReportDir environment variable to a valid directory (an existing directory with write access).
- When entering directly the path of the new report directory, you can use ${VARIABLE} to valuate the report directory.
- An error message is displayed when the new report directory does not match an existing directory with write access, and the selection is refused.
Enter the name of report in the Report Name box.
Note: By default, the report is named DownwardCompatibility_GlobalReport.htm. The global report is in HTML format only, therefore the .htm extension is automatically added even when not explicitly entered in the string.
An additional tag is inserted in the XML file generated when you run the batch: <ReportName>CATDWC_GlobalReport</ReportName>.
Important: - You can change this default name by setting the CATDWC_GlobalReportName environment variable to the new default name or by entering the name of your choice in the Report Name box.
- As for the report directory, you can use ${VARIABLE} to valuate the global report name.
To add a string at the end of the report name, enter the string of your choice in the Suffix for object report box.
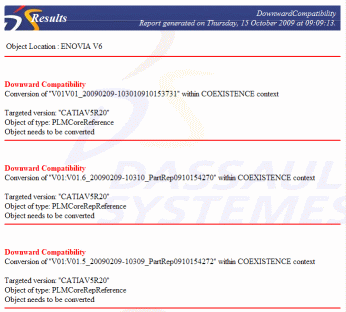
For each processed object, the batch creates an object report in the report directory. By default, the name of the report is the name (PLM_ExternalID) of the object suffixed with dwc_convert_traces.htm.
For PLM Express, the name of the report is the combined name (V_Name+ PLM_ExternalID) of the object suffixed with dwc_convert_traces.htm.
The object report can only be in HTML format, therefore the .htm extension is automatically added even when not explicitly entered in the string.
An additional tag is inserted in the XML file generated when the batch is run: <ReportStringAppend>dwc_convert_traces.Mystring.htm</ReportStringAppend>
Warning: The same restrictions as for the global report name are applied. Click Save.
The batch parameters are saved in an XML file.
When saved, this file can be edited manually and used later on to run the batch directly without accessing the batch interface.
Click Run to launch the batch.
When the conversion is over, the DownwardCompatibility batch generates:
- A quick result information accessible through the Processes tab.
- A detailed HTML report saved in the directory specified in the Report directory box.
- When converting to a file, an XML file containing the list of processed objects (Representations/References) and for each object, the list of V5 objects created. This file, which name is the same name as the global report, gives the ability to post-process objects and to manage data synchronization between V5 and V6. See Infrastructure: VPM Multi-discipline Collaboration: PLM Batches: Run DownwardCompatibility Batch outside Batch Monitor in the CAA documentation for more information about the "CATPLMBatch" and "CATPLMBatchXMLToolBox" CAA objects and the use of the XML mapping file.
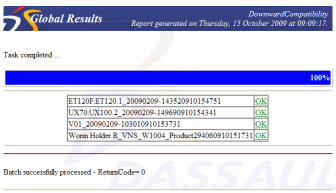
To display the light version of the global results, access the Processes tab then double-click the batch execution line:
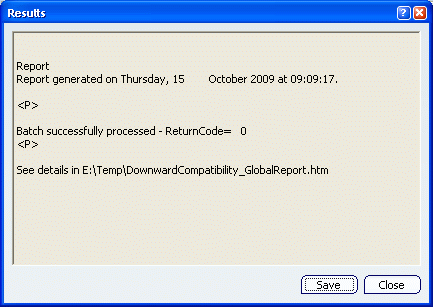
These results indicate if each of the selected objects has been processed or not along with the result (success or failure). The report contains only text and cannot reference images, URL links, etc.
At the end of the report, one of the following return codes will be displayed:
- ReturnCode=0 The batch ended successfully.
- ReturnCode=4 At least one object could not be processed.
- ReturnCode=8 The batch aborted.
Optional: To modify your conversion parameters, first close the window then run the batch again.
Optional: Click Save to save your results in the folder of your choice.
Important: - The file formats available are .txt and .xml.
- This file is different from the one you save from the batch interface: the Save button in the Batch Monitor window lets you save the batch results (i.e. the data displayed in the Results window displayed above) whereas the Save button available in the batch interface lets you save the batch parameters.
Click Close to exit the Results window.
Click Open HTML Report
 to display an HTML version of the global report (this button is activated only when a report has been
generated).
to display an HTML version of the global report (this button is activated only when a report has been
generated).The different statuses that can be displayed for each object are:
- OK when the object has been successfully processed.
- KO when the process failed.
- WG when a warning is issued or when the object was only partially processed.
- ?? when the batch is still in progress and the object is not yet processed.
Another method to visualize the report is to open the HTML file from the directory in which it has been saved.
To display the report for each processed object, click OK next to the object of interest, or access the folder where the report has been saved then double-click the desired .dwc_convert_traces.htm file.
Access the Processes tab to display information about the batch execution.
Tip: - When the batch has been run at least once, an XML file containing the batch parameters is generated. You can reuse these parameters next time you run the DownwardCompatibility batch by using the Read input from parameter file... contextual command.
- You can also use the XML file as a startup for all DownwardCompatibility applications by setting the PLMBATCH_DownwardCompatibility_Startup environment variable to the path of the XML file.
To read the reports generated by the batch execution, access the folder c:\temp\batchID (on Windows) or /temp/batchID.
