Searching for Objects

You can use a dedicated interface to search for objects stored in the environment you are connected to.


Before you begin: Depending on the batch you are running, some of the options detailed below are not displayed. For instance, when running the PLMPrintBatch, only output definition options are available.
  1. In the Object Location list, select the name of the provider.

    This list is not available in all batches. In that case, skip this step.

  2. Click .


    The picture above shows an example of how the search interface looks like but note that:

    • The name of this dialog box changes according to the provider you are connected to (e.g. MatrixOne, etc.).
    • The options available in this dialog box change according to the batch you are running.

  3. In the search dialog box, select your working environment.

    By default, this option is set to Engineering_Hub. The list of available environments corresponds to the values specified through creation preferences.

  4. Select the object onto which the customization is applied.

    In this scenario, this option is set to Product DS. The types displayed in this list depend on the selected environment.

  5. Optional: In the Extension list, select a sub-customization for your environment.

    The extensions displayed in this list depend on the selected environment. By default, no extension is defined.

  6. Access the Easy, Extended or Expert tab, depending on the type of query you want to run, then define your search criteria.

    See Semantic Search for detailed information about these tabs.

  7. Optional: Use the additional search options.


    • Case sensitive: lets you run a case sensitive search.
    • Add Results: when at least one search has been made and you want to run a new search, select this option to add the new search results to the list.
    • Replace Results: when at least one search has been made and you want to run a new search, select this option to replace the previous search results by the new search results.

  8. Click Apply to start the search.

    The progress bar displays the search progress and when the search is over, a pop-up message indicates the number of valid documents found. The list of selected documents (in the main application window) is updated and displays the name of the documents fulfilling the search criteria:


    • If no document satisfying the search criteria is found, a message is displayed.
    • If a document was already selected (in a previous query), it is removed from the search result since a document can appear only once in the list.
    • If a selected document is not locked or is locked by another user, a message is displayed.

    Note that you can pre-valuate the selected documents directly in the XML parameter file. In that case, a test connection is set up and if the connection fails, the document selection aborts.

    Important:
    • You can run several queries. In that case, the list of valid documents is added to the list of the previous query in the main application window.
    • Only documents accessible to the end user are proposed, i.e. documents the end user can manage according to its role/ownership.
    • The Lock/Unlock attribute is not taken into account for the query.
    • The save in database is done only at the end of the batch process.

  9. In the Output area, select the environment to be used for object creation in database.

    By default, the processed documents are stored in database.

    This option is set to Engineering_Hub by default and is activated only when a search has been launched.

    The list of available environments corresponds to the values specified through creation preferences.

  10. Use the Output area to indicate where the processed documents will be stored.

    By default, they are stored in the database.

    • Force save operation on non-locked documents: lets you force the save of documents that are not locked in the database after the process.
    • New version: lets you create a new version of the documents. For more information, see VPM Navigator User's Guide: Versioning.

  11. Optional: Select the Definition of output naming option to customize the name of output documents.

    By default, this check box is cleared. If selected, it means that you can customize the name of output documents. This customization is defined in a specific dialog box that can be accessed by clicking Configure Output Naming...:


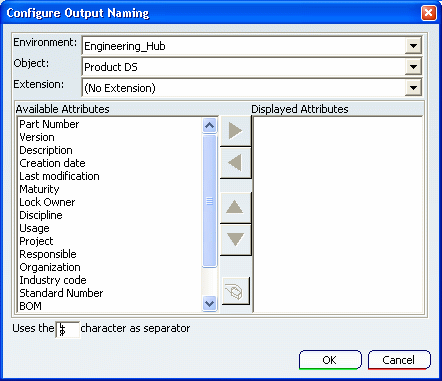
    The list of all the attributes available for the domain you selected is displayed in the Available attributes column.

  12. In the Configure Output Naming dialog box, select the desired attributes from the Available attributes column (you can select multiple elements using Ctrl or Shift) then click .

    The selected attributes are transferred to the Displayed attributes column:


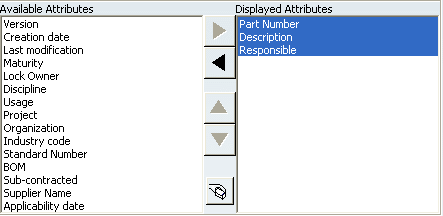
  13. Optional: Reorder the selected attributes by selecting the desired attributes (you can also use multi-selection) then using the buttons displayed to the right:


    • transfers a selected attribute back to the Available attributes column
    • moves the selected attributes up in the list
    • moves the selected attributes down in the list
    • empties the Displayed attributes column.

  14. Optional: Change the single character used as separator by default ($) by entering a new one in the Uses the _ character as separator box.

    Let's suppose that the following attributes have been selected: Part Number, Description and Responsible. Among the documents to be processed, one of them has the following values for the three selected attributes:

    • Part Number = 23010
    • Description = Board
    • Responsible = AJT.

    We use "_" as a separator.

    This means that the HTML report generated in the target directory for this document is named as follows:

    23010_Board_AJT.htm

  15. Click OK to validate and close the Configure Output Naming dialog box.

  16. When finished, click OK to validate and close the search dialog box.