Searching for Files | |||
| |||
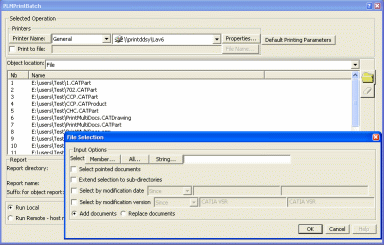
In the Object location list, select File.
Click the
 button.
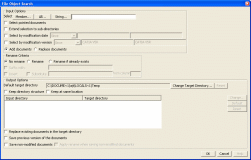
The File Selection dialog box lets you select the documents to be processed and define the input/output options as well as the rename criteria to apply to the selected documents.
The picture below shows all the options available:
The corresponding online documentation can be accessed from the File Selection dialog box by clicking Help.
In the Input Options area, use the appropriate button to select the documents.
Depending on the batch you are running, you can search for:
- V4 model documents (.model, .library, .session, etc.)
- V5 documents (assemblies, parts, drawings, etc.)
- V6 documents.
Tip: When using All and String, you can select the Extend Selection to Sub-Directories check box to propagate the selection to the sub-directories of the selected folder. The main application window displayed in background is updated and shows the name and path of the selected documents. The File Selection dialog box is displayed in foreground to let you select more documents if needed:
Select the appropriate check boxes.
- For the modification date, the syntax is as follows: YYYY.MM.DD (including the given milestone).
- For the modification version, entering SP0 or GA stands for the General Availability level. If no specific level is indicated, all the service packs of the release are taken into account. The syntax is as follows: CATIA V5RnSPx, for instance, CATIA V5R18SP4. However, you cannot select documents saved prior to V5R10.
Important: - If no criterion (no date and no version) has been defined, all the documents found are selected.
- After the batch execution, an XML file containing the batch parameters is generated in a temporary folder. Nevertheless, the boxes used to select your documents are not specified in this file. You can only get information on the documents that have been selected but not on the filter used to select them.
In the Rename criteria area, select the appropriate option to rename the documents selected in the Input Options area.
The chosen rename criterion is identified in the XML parameter file as follows:
- <Rename_Scope>No</Rename_Scope> if No rename has been selected.
- <Rename_Scope>Yes</Rename_Scope> if Rename has been selected.
- <Rename_Scope>ifExists</Rename_Scope> if Rename if already exists has been selected.
Optional: If you select the Rename or Rename if already exists option, you can then choose the appropriate rename criteria:
- Suffix with
Enter the string to be added in the box displayed to the right. The defined string is identified in the XML parameter file as follows:
<Append_String>my_string</Append_String>
- Insert
Enter the string to be inserted in the first box then in the from column box, indicate the position of the character from which you want to add the string. The column is an integer comprised between 1 and 80. The defined string and column number are identified in the XML parameter file as follows:
<Insert_string>my_string</Insert_string>
<Insert_column>my_number</Insert_column>
- Substitute
Enter the string to be modified then in the from column box and indicate the position of the character from which you want to insert the new string. The defined string and column number are identified in the XML parameter file as follows:
<Substitute_string>my_string</Substitute_string>
<Substitute_column>my_number</Substitute_column>
Important: - If you select the Append string and Insert or Substitute check boxes simultaneously, Append string is applied first, then Insert or Substitute.
- Clicking Cancel closes the File Selection dialog box but when you re-open it, the last validated values are restored.
- Insert and Substitute are mutually exclusive. However, if you entered a value in one of the boxes, this value is kept even when the box is cleared.
- Suffix with
In the Output Options area, select the Default target directory.
Each time a new directory is added to the Input directory list, its target directory is the one specified in the Default target directory box.By default, the box is initialized with the current or temporary directory, depending on your configuration and write access.
Optional: To change the default path and specify another directory, click Change Target Directory... then navigate to the desired directory.
When the target directory has been changed, you can restore the default directory (i.e. the directory displayed in the Target Directory box of the main application interface) by clicking Reset.
If you leave the default path, Reset is grayed out.
The target directory is identified in the XML parameter file as follows:
<target_dir>path_of_the_directory</target_dir>
Optional: Select the Keep directory structure or the Keep at same location check box.
The Keep directory structure option is relevant only when:
- Extend selection to sub-directories is activated in the Input Options area.
- the current document environment is not "DLName".
If no sub-directory exists in the target directory, you are informed that a sub-directory will be created before writing the documents. As a matter of fact, when directories are created, they are created when the documents are written and not when they are selected.
The Keep directory structure check box is identified in the XML parameter file as follows:
<KeepfileTree>Yes/No</KeepfileTree> ("Yes" if the option has been selected).
The Keep at same location option is identified in the XML parameter file as follows:
<KeepLocation>Yes/No</KeepLocation> ("Yes" if the option has been selected).
Important: Note the following information about the Keep at same location option: - Replace existing documents in target directory must be activated, otherwise it does not make sense.
- To use a target directory other than the default displayed, first select the new directory before activating Keep at same location: selecting this check box grays out Change Target Directory...which lets you select your own target directory.
- If Extend selection to sub-directories is selected, the directory mapping displays one line per directory impacted by the selection and for each of these lines, target directory=input directory.
Define the directory mapping by using the appropriate option.
Note that you can select multiple files from the directory list using Ctrl and Shift.
- Change
This buttons impacts only the target directory of the lines you select and not the default target directory. The change is effective for the selected input directory only: if you add another directory to the directory mapping, it will be mapped to the default target directory.
- Default
This button is relevant only if you used Change Target Directory... to modify the target directory. It is available when at least one line is selected in the list and if at least one of the selected output directories is different than the target directory.
- Reset
This button is available when at least one line is selected in the list and if at least one of the selected output directories is different than the target directory.
The mapping is identified in the XML parameter file as follows:
<directory_mapping>IN=Directoryx OUT=Directoryy RES=Directoryz</directory_mapping>
where:
- "IN" is for the input directory
- "OUT" is for the target directory
- "RES" is for the default, i.e. the directory displayed in the Default target directory box.
Important: - Output capabilities are applied to documents that are processed and stored by the batch, not to new V6 documents created from documents processed by the batch. In addition to this, output capabilities are not applied to reports, results and any other output that may be generated.
- Input/Target mapping is provided at directory level only and not at document level. It is not possible to define two different target directories for two documents coming from the same input directory.
- When a directory mapping is defined, it is kept as is even if all the selected documents contained in a directory are removed from the Document Selection list.
- When opening an XML parameter file containing a mapping definition, no information is provided if a directory does not exist or if a specific read-write access has been defined.
- Clicking Cancel closes the File Selection dialog box but when you re-open it, the last validated values are restored.
- Change
Optional: Use the check boxes displayed at the bottom of the Output Options area.
- Replace existing documents in target directory
When a document with the same name already exists in the target directory, this option automatically replaces the old document by the new one.
- Save previous version of the documents
When the Replace existing documents in target directory check box is selected, the already existing document is not overwritten and a backup version is kept. This backup version is identified by the following suffix:
".DLC.date" where date is YYYY.MM.DD_HH.MM.SS.
- Save non-modified documents
This option helps you identify more easily on which documents the batch has been run. It is identified in the XML parameter file as follows:
<File_SaveNonmodifiedDoc>No</File_SaveNonmodifiedDoc> if the option is not selected.
<File_SaveNonmodifiedDoc>Yes</File_SaveNonmodifiedDoc> if the option is selected.
- Apply rename when saving non-modified documents
This check box can be selected only when Save non-modified documents is activated AND at least one rename criterion has been defined. This option is identified in the XML parameter file as follows:
<File_RenameNonmodifiedDoc>No</File_RenameNonmodifiedDoc> if the option is not selected.
<File_RenameNonmodifiedDoc>Yes</File_RenameNonmodifiedDoc> if the option is selected.
- Replace existing documents in target directory
When finished, click OK to validate and close the File Selection dialog box.
The documents are displayed in the main application window.

