Recording an Excitation | ||||||||
|
| |||||||
 .
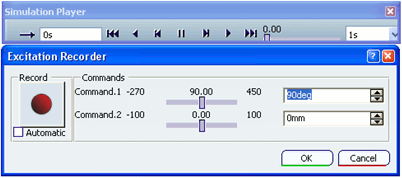
.If the Excitation Recorder dialog box is not open, double-click Recorded Excitations in the specification tree.
Both the Excitation Recorder dialog box and the Simulation Player appear.
If an incident is detected, a message appears. You can access the immersive Incident Diagnosis dialog box by clicking to analyze and solve the problem. See Diagnosing Computation Incidents.
Important: You can lock  and unlock
  commands for partially defined mechanisms. For more information, see Locking and Unlocking Commands and About the Mechanism Manager.
To modify and record the values of a recorded excitation:
- In manual mode, use the sliders or spinners in the Excitation Recorder dialog box, and click
 .
. - In automatic mode, use the sliders or spinners in the Excitation Recorder dialog box in sequence. Any new command value is automatically recorded.
Tip: To improve simulation reversibility, use manual mode to store the command values for the nominal configuration of your mechanism.
As each command value is recorded, the Simulation Player goes to the next time step. The time step increment depends on the Time step value you defined in the scenario parameters. Any probes that are included in the kinematics scenario are dynamically updated.
To learn more about how the time increments are interpolated during a simulation, see Interpolation of Time Increments.
Warning: When editing an existing recorded excitation in Automatic mode, the command value displayed in the Excitation Recorder reflects the stored value for the current time increment. When you click the slider or spinner to change the command value, the new value is applied to the current time increment and the Simulation Player moves automatically to the next time increment. Therefore, the command value displayed in the Excitation Recorder now reflects the stored value for the new increment, not the increment that was just modified. To review the value for the increment that was just modified, click Step backward in the Simulation Player. - In manual mode, use the sliders or spinners in the Excitation Recorder dialog box, and click
To manually modify the values of a recorded excitation:
- Right-click the recorded excitation in the specification tree, and select Edit Table.
The Recorded Excitation Table dialog box appears.
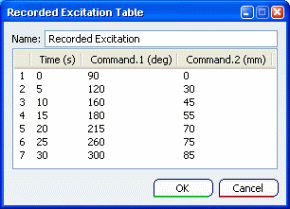
- Right-click the recorded excitation in the specification tree, and select Edit Table.