Create the Spot
You can first create the spot.
Click
Spot Fastener  in the Fasteners toolbar.
The Spot Fastener Definition dialog box is displayed.
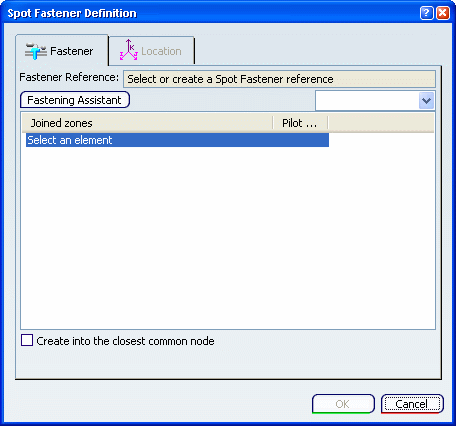
Create or select the fastener reference (that will be instantiated).
Each spot fastener instance is coupled with a
fastener engineering connection used to store the list of
fastened parts and define the positioning
of constraints if needed.
Select the joined zones, i.e. the set of parts to fasten, among which a piloting part is defined. This part will be used to compute the closest surface to the fastener instance for the On Point and On Curve location methods.
The piloting part can be set manually or automatically, depending on the option defined in Tools > Options > Infrastructure > Fastener Infrastructure > General tab.
Click the Fastening Assistant button to use the assistant to define the fastener parts. Refer to Defining an Engineering Connection Using the Assistant.
Select the Create into the closest common node option
to aggregate the spot fastener instance under the first common product corresponding to the fastened parts. If this option is cleared, the spot fastener instance will be created and aggregated under the active product.
Locate the spot instance as explained below.
Click OK
to create the spot fastener.
The specified fastener reference is instantiated into the appropriate product, as a fastener instance product. The Spot Fastener Instance can be edited by selecting the Spot Fastener Instance through the specification tree, then activating the contextual menu, 'Edit Fastener Instance' command The associated engineering connection that connects the specified part is be created in the same product. Depending on the chosen location method, this fastener engineering connection may contain some additional constraints.

Locate the Spot
You can use various methods to locate the spot.
Location methods are parameterized through the associated reference fastener type.
Note:
Depending on the chosen location method, you can:
- modify the spot location by defining new coordinates,
- modify the material orientation if the reference element does not
lie on the surface.
Explicit
You can explicitly valuate the positioning of the spot fastener instance into the root product.
Select Explicit in the Location method drop-down list.
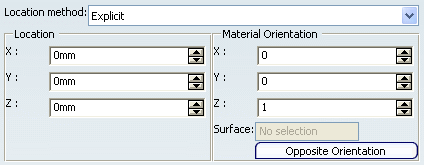
Select a surface or a point where the spot is to be created.
Click the Opposite Orientation button to reverse the material orientation direction. Note:
This method is not assiociative, i.e. if the surface or point is modified, the orientation remains unchanged.
On Point / On Axis System
You can position the origin of the spot fastener instance according to a selected point or axis system. This method is associative: if you move the point, the fastener instance moves accordingly. If you move the axis system, the position and orientation of the fastener instance move.
Select On Axis System in the Location method drop-down list.
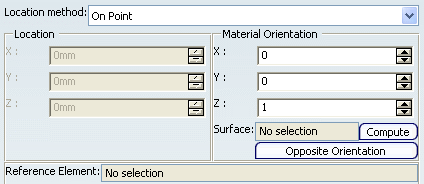
Select the Reference Element.
Optional: Select a Surface if you have selected a point that does not lie on a surface. The
closest surface is determined by projecting the
input point at a minimum distance.
Note that if the closest surface is modified, you have to edit the fastener instance and click the Compute button.
On Surface
You can position the spot fastener instance origin according to a point defined on a selected surface.
Select On Surface in the Location method drop-down list.
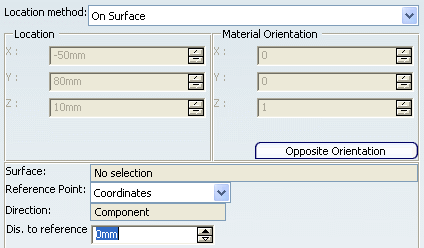
Select a Surface.
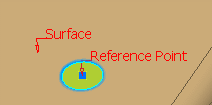
Optional: Select the
Reference Point (Default (surface middle or Coordinates). Optional: Select the Direction. Optional: Define the distance to the reference point (Dis. to reference).
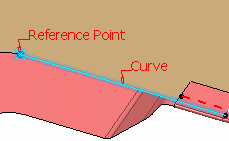
On Curve
You can position the spot fastener instance origin according to a point defined on a selected curve.
Select On Curve in the Location method drop-down list.
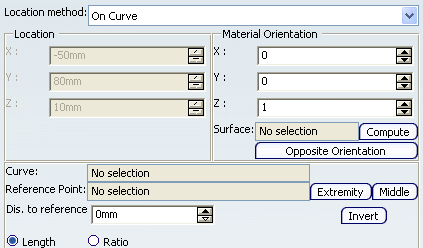
Select a Curve. Optional: Select the
Reference Point (Extremity or Middle of the curve).
Optional: Select a Surface if you have selected a point that does not lie on a surface. The
closest surface is determined by projecting the
input point at a minimum distance.
Note that if the closest surface is modified, you have to edit the fastener instance and click the Compute button. Optional: Define the distance to the reference point (Dis. to reference). You can click
Invert
to reverse the distance direction from the reference point.
Optional: Define the distance type (Length or Ratio).
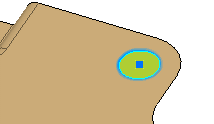
The spot on curve corresponds to the point that is projected onto the closest surface. Point On Parallel Curve On Surface
You can position the spot fastener instance origin according to a point defined on a curve which is itself parallel to a selected curve that lies on a selected surface.
Select Point On Parallel Curve On Surface in the Location method drop-down list.
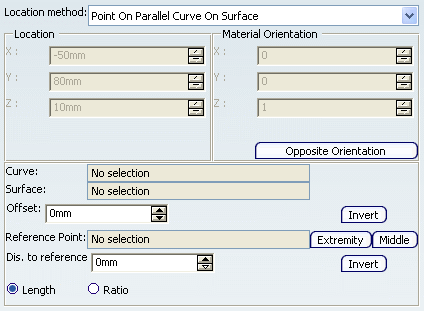
Optional: Select a Curve lying on a surface. Optional: Select a Surface.
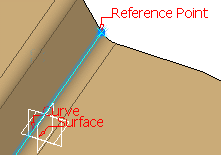
Optional: Modify the Offset value. You can click
Invert
to reverse the offset direction. Optional: Select the
Reference Point (Extremity or Middle of the curve). Optional: Define the distance to the reference point (Dis. to reference). You can click
Invert
to reverse the distance direction from the reference point.
Optional: Define the distance type (Length or Ratio).
Bitangent Circle Center
You can position the spot fastener instance origin according to a point located at the center of a circle tangent to two curves on a selected surface.
Select Bitangent Circle Center in the Location method drop-down list.
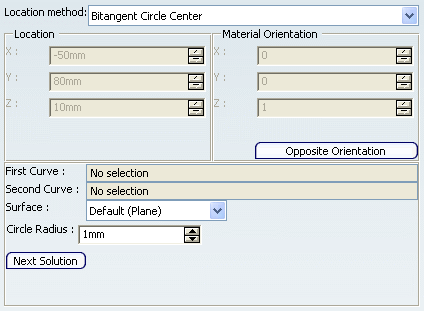
Select the First Curve and the Second Curve.
The resulting bitangent circle, highlighted in the 3D area, is
automatically computed and the default spot location is the circle
center.
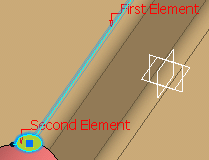
Optional: Select a support
Surface
in the drop-down list or in the 3D area if the curves are not
coplanar. In this case, the center of gravity of the circle is
automatically computed.
Optional: Define the Circle Radius value.
Tritangent Circle Center
You can position the spot fastener instance origin according to a point located at the center of a circle tangent to three curves on a selected surface.
Select Tritangent Circle Center in the Location method drop-down list.
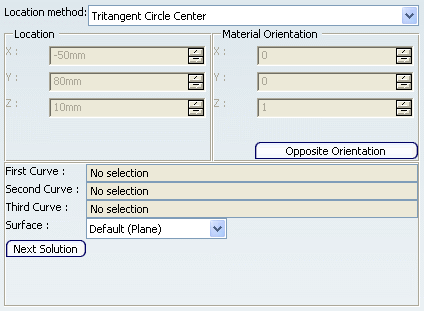
Select the First Curve, the Second Curve and the Third Curve.
The resulting tritangent circle, highlighted in the 3D area, is
automatically computed and the default spot location is the circle
center.
Optional: Select a support
Surface
in the drop-down list or in the 3D area if the curves are not
coplanar. In this case, the center of gravity of the circle is
automatically computed.
|