Create the Multiple Instances
You can first create the multiple instances.
Click Multi-Instantation of Fasteners  . .
The Multi-Instantiation of Unitary Fasteners Definition dialog box is displayed.
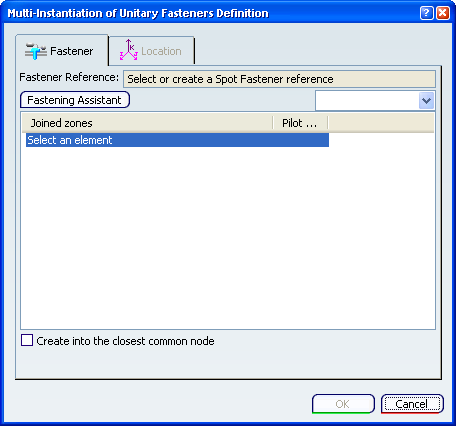
Create or select the fastener reference (that will be instantiated).
Each spot fastener instance is coupled with a
fastener engineering connection used to store the list of
fastened parts and define the positioning
of constraints if needed.
Select the joined zones, i.e. the set of parts to fasten.
Click Fastening Assistant to use the assistant to define the fastener parts. Refer to Defining an Engineering Connection Using the Assistant
Select the Create into the closest common node option
to aggregate the spot fastener instance under the first common product corresponding to the fastened parts. If this option is cleared, the spot fastener instance will be created and aggregated under the active product.
Locate the multiple instances as explained below.
Click OK to create the multiple instances. All created fastener instances are independent, i.e. when you edit a fastener instance, the modification applies only for this instance.

Locate the Multiple Instances
You can use various methods to locate the multiple spot fasteners.
Select the Location tab.
Select the location method:
Repeat the Selected Instances
You can use the repeat parameters when selecting the On Curve or Point On Parallel Curve On Surface location method.
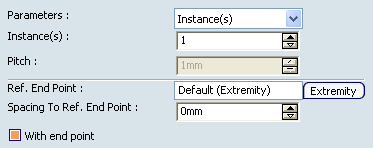
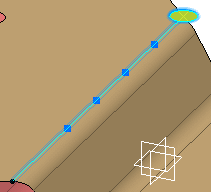
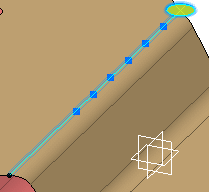
Select either the On Curve or Point On Parallel Curve On Surface location method. The Repeat dialog box is displayed. It shows the Ref. End Point that corresponds to the extremity of the curve by default. You can choose the
other extremity by clicking
Extremity
as well as selecting a point or a spot point.
Select the repeat Parameters:
Instance(s)
You can define the number of instances to be created.
The distance between two
successive points is automatically computed, fasteners are equidistant
and the last repeated fastener is positioned on the curve end point.
The spacing between two successive fasteners is computed.
Define the number of instances to be created in the
Instance(s)
field.
Optional: Specify a
Spacing To Ref. End Point
to define the working curve length: enter a spacing value to
specify the end of the working curve length. The pitch is
automatically updated and the reference end point is the end point of the curve.
Optional: Clear the
With end point
option if you do not want the last created spot to be located on
the end point. It is not mandatory that the end point be located on
the curve end.
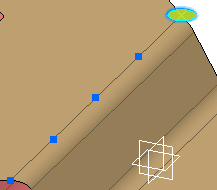
Instances = 4, Spacing To Ref. End Point = 10mm, With end point option selected
Pitch
You can define a spacing value between two consecutive fasteners.
The number of
instances created do not exceed the working curve length.
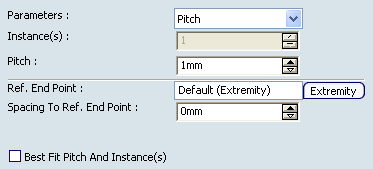
Define the number of spacing value in the
Pitch field. Optional: Specify a
Spacing To Ref. End Point
to define the working curve length: enter a spacing value to
specify the end of the working curve length. The reference end point is the end point of the curve.
Optional: Select the
Best Fit Pitch And
Instance(s)
option to automatically compute the best pitch and the
corresponding fastener instances. It lets you optimize the distribution
of the created fasteners on the working curve length. A new pitch is
computed to comply with both
Spacing To Ref. End Point
and
Best Fit Pitch And
Instance(s)
defined values. The
With end point
option appears and is selected by default. It is not mandatory that
the end point be located on the curve. Pitch = 50mm, Spacing To Ref. End Point = 80mm, With Best Fit Pitch And Instance(s) options cleared
Instances & Pitch
You can define the number of instances and spacing value.
Spots are created towards
the end point and can be created after the end point.
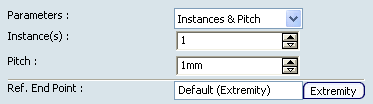
Define the number of instances to be created in the
Instances field. Define the number of spacing value in the
Pitch field. Optional: Specify a
Spacing To Ref. End Point
to define the working curve length: enter a spacing value to
specify the end of the working curve length. The reference end point is the end point of the curve.
Instances = 6, Pitch = 30mm
|