Setting Shell Properties

You can set the shell properties for a given solid functional set. The shell properties assign a wall thickness to an active body.

Related Topics
More about Shell Properties
Setting Draft Properties
Inserting a Solid Functional Set
  1. Click Shell Properties .

    The Shell Properties dialog box appears.


  2. Choose the wall direction.

    If you specify Inside wall direction and 0mm thickness, the shellable features generates the outside with the positive volumes and no core will be removed. It is the default value of the Wall direction box.

    Warning: If you specify Outside wall direction and 0mm thickness, the shellable feature generates the inside with the negative volumes and the product disappears from the screen. Besides the third tab name becomes Cavity.

  3. Assign a wall thickness to the solid functional set.

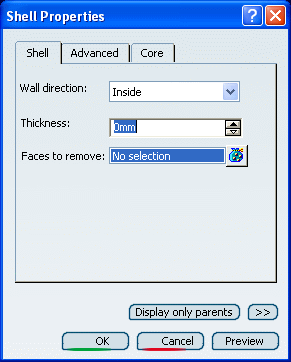
  4. Choose one or more faces to remove from the shelled volume.

    Tip: If you select several faces, note that clicking displays the Faces to remove dialog box that allows you to:
    • View the list of all of the selected faces,
    • Remove any face clicking the Remove button,
    • Replace any face using the Replace button and selecting a new one in the geometry or the specification tree.


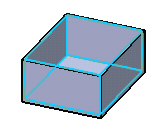
    Important: After a shellable volume is shelled, only features that have behaviors that function within internal volumes, such as ribs, can penetrate the shell (or internal) boundary. Thus, features such as boss and reinforcement cannot penetrate the shell because their behaviors are to add material volume to the outside of another material volume.

  5. Choose the type of Core definition:


    • Interconnected core
    • Isolated core
    • Select core

    In some specific cases, the application cannot create non-offsetable surface in the shell computation. An error message then appears informing you that the resulting geometry cannot be assembled. These errors are difficult to manage because they generally involve several shellable features and the shell properties.

  6. Click OK to confirm the shell properties you defined.

    Shell Properties is added to the specification tree.