Click Pocket
 in the Functional Features toolbar.
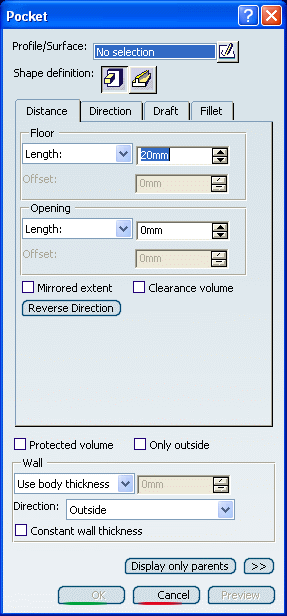
The Pocket dialog box appears.
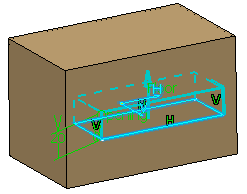
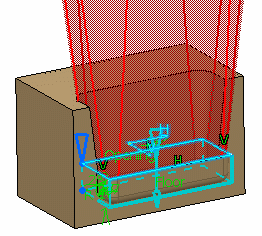
A pocket requires a closed planar profile. Select the
profile defining the shape of the pocket.
The prism is the default shape. Just click
Sweep  if you want to change. For the purposes of our scenario, keep the default
option. The direction of a pocket always goes from the inside to the
outside of the body.
if you want to change. For the purposes of our scenario, keep the default
option. The direction of a pocket always goes from the inside to the
outside of the body.
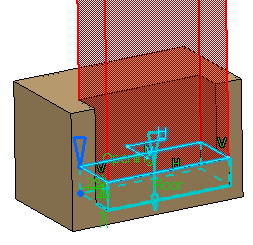
Set the parameters and options you want to define the
shape as explained in Prism.
In the Distance tab:
- Floor: Length=20mm
- Opening: Length=0mm
Click Reverse Direction.
Select the Clearance volume check box.
Click Draft tab to
define a draft angle.
In the Draft behavior box, select Intrinsic
to feature.
Enter the desired value in the Angle box,
2 for example.
The default neutral element (defines a neutral
curve on which the drafted face will lie) is the Profile
plane. The other possible neutral elements can be:
- Floor
- Opening
- Plane/Surface
Click Preview.
In the Clearance volume angle box, enter
7deg.
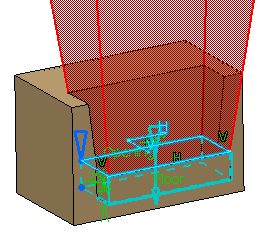
Click the Fillet tab.
Select the Lateral radius and Floor
radius check boxes to fillet lateral edges and the floor edge
with 7mm radius value.
Click Preview.
To define the wall, you can set one of the two options
available from the Type drop down list:
-
Use body thickness: the pocket wall thickness
is that of the active shelled body thickness.
-
Enter thickness: simply enter the value you
want. After this option is selected, the value box becomes
available. Wall thickness values can only by positive values.
You can
control whether the wall is constructed inside or outside of
the selected profile for Direction. The default
is an outside wall thickness.
With Constant wall thickness option, it propagates
the fillets inside of the shell to maintain the wall thickness.
Constant wall thickness is selected by default.
For the purposes of our scenario, set the
Enter thickness option and enter 7mm in the value
box.
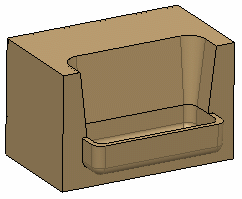
Click OK to confirm and create the pocket.
The pocket is created. The protected volume
is hidden. Pocket.X is added to the specification
tree in the Solid Functional Set.x node.
 icon enables you to sketch the profile you need.