Editing Graphic Properties

You can display and edit the graphic properties (color, transparency, linetype and thickness, etc.) of a selected object through a dedicated interface.

Related Topics
More About Editing Graphic Properties
  1. Select Start > Mechanical Design > Part Design.

  2. In the specification tree, select the part body whose graphic properties you want to display.

  3. Select Edit > Properties command (you can also press ALT+Enter, or right-click then select Properties).

  4. Click the Graphic tab.

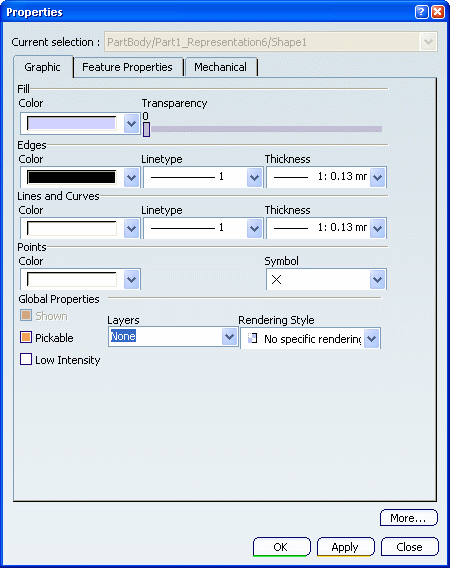
    The graphic properties of the current object are displayed (note that the tabs might be displayed in a different order depending on the object you select):

    Warning:
    • The Properties dialog box dedicated to Assembly objects is different. For more information, see VPM Physical Editor User's Guide: Managing Graphic Properties in Products.
    • If you select an Assembly object and another object type (point, line, etc.) simultaneously, only one Properties dialog box is displayed. If the dialog box dedicated to Assembly objects opens, you will only be able to modify the graphic properties of the Assembly object. Other object types will not be impacted by your changes.

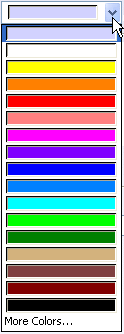
  5. Select the object color from the Color list.

    The selected color is displayed in the list. Pointing the cursor over the list displays the name of the selected color.

    The list contains:

  6. To make the part more or less transparent, drag the Transparency slider to set the appropriate value (between 0 and 255).

    The visual feedback differs according to the transparency mode you set via the Performance tab.

    Important:
    • For .asm documents, you can select or clear the Transparency check box to apply or not a transparency inheritance independently from the color of the selected object.
    • If you apply transparency on a solid (or on one or more of its faces) on which you perform a section cut using any sectioning commands, the interior of this solid then is not materialized.

  7. Use the Color list for edges and proceed the same way to set color edges on parts.

  8. Use the appropriate lists to set edge linetype (dashed, etc.) and thickness.

  9. Set the line and curve color, the linetype and thickness the same way as for parts.

  10. Set the point color in the same way as for parts.

  11. To select the symbol used to represent the point, select the symbol from the Symbol list.

  12. Optional: Select the Low Intensity check box.

    The low-intensity color is applied to the selected element. By default, the color to be applied to low-intensity elements is "dark green" but it can be modified in the Visualization tab.

    Important: The Shown check box is displayed for information only to indicate if the object is always visible (i.e. in Show mode) or always hidden (i.e. in No Show mode). For more information, see Hiding and Showing Objects.

  13. Use the Layer box to choose among the list of named layers and assign the chosen layer to the selected objects:


    Warning:
    • Layers can only be applied to 3D Shapes and drawing representations. This means that in product edition context, the Layer box is grayed out.
    • When no object is selected, the Layer box indicates the current layer.

  14. Use the Rendering Style list to specify how the selected element should be rendered, provided that it supports rendering styles .

    By default, no rendering style is applied.The selected rendering style will then be used to visualize the object independently from the rendering style applied to the 3D window when using the Rendering style per object visualization mode.

  15. Click Apply or OK to confirm.

The Properties dialog box is closed and the graphic properties you defined are applied to the object.