Visualization | ||
| ||
Colors
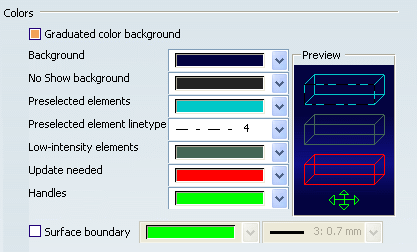
- Graduated color background
-
Activates a graduated color background in all open documents, and in the
Preview area of the Visualization tab itself. This
graduated color uses a double gradient mode as explained below:
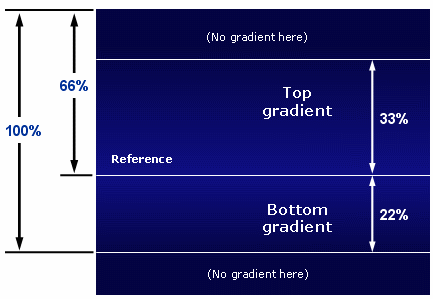
The reference line's color (66% of the viewer's height from top) is calculated automatically from the background color as follows:
- Hue (name by which the color is designated): identical
- Saturation (color intensity): -10%
- Luminance (color brightness): +20%
When the Graduated color background check box is selected, the background color is progressively graduated from the top of the viewer to the reference line, then returns progressively to the predefined background color from the reference line to the bottom of viewer.
For example, the picture below shows a graduated color background. The color becomes gradually lighter towards the bottom of the document:

The result is as follows with a normal color background:
 By default, this option is activated.
- Background
-
Sets background color in all open document windows. Note that the
default graduated background color can also be reset by selecting it from
the list.
Warning: This option has no effect on the following ambiences: Design Icy Blue, Design Deep Blue and Review Dark Mirror. For more information on ambiences, see Infrastructure User's Guide: Viewing Objects: Using Ambiences. - No Show background
-
Sets background color in the No Show space. Transferring objects to the No Show space means that they are no longer displayed.
To keep coherence between the Show and No Show spaces, the following rule is applied:
- When the background color of the Show space is modified, the background color of the No Show space is updated accordingly.
- When the background color of the No Show space is modified, the background color of the Show space is not updated.
Note that this option has no impact on the background color (graduated or not) you define above.
For more information about transferring objects to the No Show space, see Infrastructure User's Guide: Viewing Objects: Hiding and Showing Objects: Hiding Objects.
- Preselected elements, Low-intensity elements and Preselected element linetype
-
Set colors of preselected elements, low-intensity elements, and the linetype used to display preselected elements.
Low-intensity elements are elements such as parts, products, drawings, etc. which can be neither filtered, nor removed. The default color for low-intensity elements is "dark green" (as indicated in the picture of the Visualization tab above). See Infrastructure User's Guide: Selecting Objects: Preselecting and Selecting Using the Pointer for more information about preselection and selection techniques.
- Update needed
- Sets the color of objects to be updated; see Part Design User's Guide for more information about updating objects.
- Handles
- Sets manipulator handle colors. Graphic manipulators are displayed on certain objects (planar patches, holes, ...) for the purpose of moving the objects more easily. See Infrastructure User's Guide: Using the Robot: Moving Objects Using the Robot for more information about how the Robot is used on examples of where manipulators are used.
- Surface boundary
-
If this option is selected, you can set the color and thickness of the surface boundary.
By default, this option is cleared.
![]()
Depth display

- Display all elements using Z-buffer depth
-
If this option is selected, it means that the Z-buffer is activated so that all elements hide each other. When activated, all elements including lines and planes (usually displayed in front of other elements) are displayed at their true depth in the 3D scene. When deactivated, lines and planes are always displayed in front of other elements.
By default, this option is cleared.
![]()
Anti-aliasing

- Edges/Lines
-
Select the Edges/Lines check box to activate anti-aliasing on
all edges and lines.
Then, define the Offset coefficient using
the arrows (which are now activated) to
the right. This offset enables you to enhance the quality of anti-aliasing.
The maximum value you can set is 0.9.
When the offset has been defined, you have to perform a viewing
operation, such as a translation or a rotation, to see the result. Note
that during the viewing operation, anti-aliasing is deactivated for
performance reason but it is applied as soon as you stop manipulating
the object. Anti-aliasing makes
jagged lines and edges appear smoother.
In the example, the offset has been set to 0.8:
When the option is cleared, edges and lines look jagged:
 By default, this check box is cleared.
- Full Scene
-
If this option is selected, it means that the full scene
super sampling is activated.
Super sampling is a technique used in the
anti-aliasing algorithm.
This technique avoids rendering artifacts, such as the staircase effect,
by improving the
visual quality of lines and surface edges (whether they are common or free
border edges) in the whole scene.
Super sampling means that the image is rendered internally with a
resolution higher than the one on screen. With this technique, each given
pixel on screen is divided into "n" sub-pixels: the more
sub-pixels, the better the result.You can specify
the quality level to be applied by selecting a value from the Super
sampling list:
- 4x Each pixel is divided into 4 sub-pixels. The quality is four times better
- 8x Each pixel is divided into 8 sub-pixels. The quality is eight times better
- 16x Each pixel is divided into 16 sub-pixels. The quality is 16 times better.
The higher the value, the better the quality but note that there is a price to pay in performance if you choose a very high quality level. 4x is a good value to start with because you can obtain a nice result with a minor impact on performance. Note that it is recommended not to use Edges/Lines when Full scene is activated.
Below are two examples:
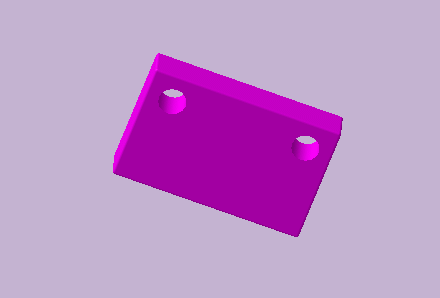
- Super sampling is cleared and the staircase effect is clearly visible:

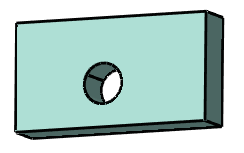
- Super sampling is activated and set to 4x:

By default, this option is activated.


![]()
Perform transparent faces as opaque in HRD mode

Lets you display transparent faces as opaque when working in HRD mode.
This option is used in combination with the Dynamic hidden line removal option in the View Mode Customization dialog box and enables to make the visualization correspond to what you when printing objects using the HRD rendering mode: when both options are activated, edges located behind transparent faces are not displayed.
In the example below, the front face of the object is transparent:

When the Perform transparent faces as opaque in HRD mode option is set to On and the Dynamic hidden line removal option is activated, the result is as follows:
| Warning: When using the command, hidden edges might appear because when you change the frustum, some sections of the transparent faces which were considered as opaque might not be in the frustum anymore. Therefore, hidden edges located behind these faces are displayed. |
By default, Off is activated.
![]()
Display current scale in parallel mode

When the On option is selected, this activates the display of the scaling factor (at the bottom right of the geometry area) when displaying objects in a parallel view (through ).
The option helps you to know the real size of an object by using the following formula:
real size = size on screen / scaling factor
Note that the scale display is automatically refreshed when zooming.
To illustrate this, let's suppose a pad with the following dimensions:
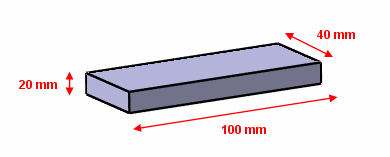
Now, follow the steps below:
- Display this pad in a parallel view then set the viewpoint so that you see one face of the pad.
- Click On in the Display current scale in parallel mode area.
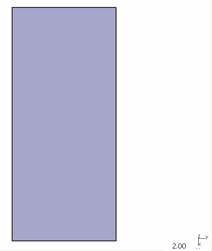
- Zoom until the scale factor is equal to 2.00. The result should look like this:
According to the above-mentioned formula, you know that the pad real dimensions are:
Length = 50 mm (100 mm / 2) Width = 20 mm (40 mm / 2) Height = 10 mm (20 mm / 2)
By default, Off is activated.