Creating a Spot | ||||||
|
| |||||
Create the Spot
You can first create the spot.
Click Spot
 in the Fastener Creation toolbar.
Select the Fastener Set in the specification tree, if needed.
Important: You can double-click the Spot icon to activate the repeat mode but it is only available when the Representation is active. The Spot Fastener Definition dialog box opens.
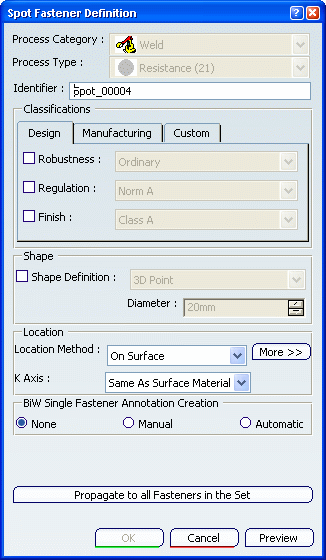
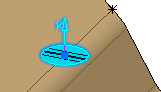
Define the orientation of the spot by setting the K Axis to either:
-
Same as Surface Material Orientation
-
Opposite to Surface Material Orientation
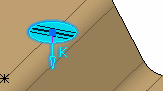
Important: To visualize the K axis, the Show Fastener Axis Orientation option should be selected in the Editing Fasteners Graphic Properties of the spot. -
![]()
Locate the Spot
You can use various methods to locate the spot.
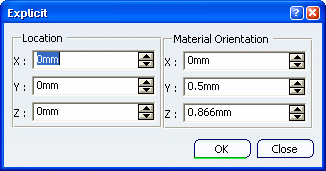
Explicit
You can use the Explicit method.
Optional: Click More>> to display the Explicit dialog box:
You can:
- modify the spot location by defining new coordinates,
- modify the material orientation if the reference point do not lie on the surface.
On Point
You can use the On Point method.
Select a point.
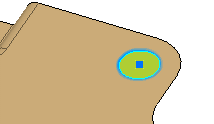
Tip: You can as well select a circle instead of a point: the center of the circle is computed to get the reference point. Note that you cannot select an arc of circle. Optional: Click More>> to display the On Point dialog box:
You can:
- modify the Reference Point type (selected point, coordinates or axis origin),
- modify the material orientation if the reference point do not lie on the surface.
On Surface
You can use the On Surface method.
Select a surface or a point to indicate the spot location.
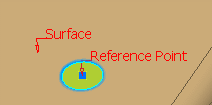
Tip: You can as well select a circle instead of a point: the center of the circle is computed to get the reference point. The spot will then be created on the selected zone, which may not be a support zone of the fastener set. Optional: Click More>> to display the On Surface dialog box:
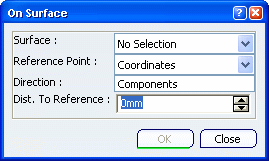
You can:
- modify the selected Surface,
Tip: A list of possible surfaces to be selected is available in the drop-down list. - modify the Reference Point (selected point, surface middle or coordinates),
- modify the Direction,
- modify the distance to the reference point (Dist. To Reference).
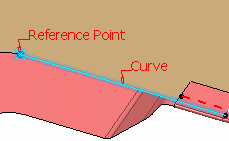
On Curve
You can use the On Curve method.
The On Curve dialog box is automatically displayed: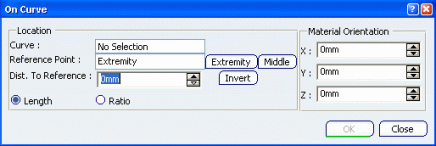
Select a Curve.
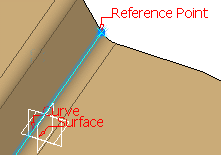
Point On Parallel Curve On Surface
You can use the Point On Parallel Curve On Surface method.
The Point On Parallel Curve On Surface dialog box
is automatically displayed: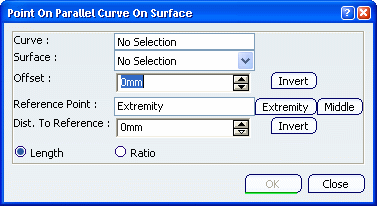
Optional: Select a Surface.
Important: You can select a published surface from the drop-down list or choose No Selection if the surface to be selected cannot be found and select the desired surface in the 3D geometry.
Intersect
You can use the Intersect method.
Select the first and the second element.
Elements can either be two curves or a curve and a surface.
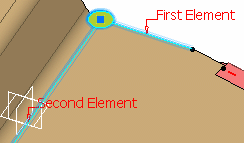
Click More>> to display the Intersect dialog box:
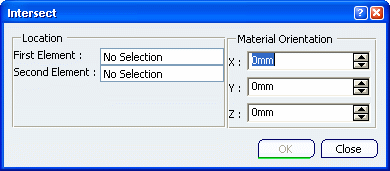
You can:
- modify the selected elements,
- modify the material orientation if the reference elements do not lie on a surface.
Important:
|
Bitangent Circle Center
You can use the Buitangent Circle Center method.
The Bitangent Circle Center dialog box is automatically
displayed: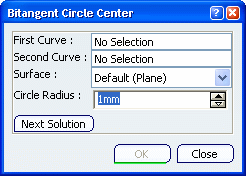
Select the First Curve and the Second Curve.
Warning: They must not be parallel. 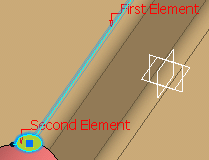
The resulting bitangent circle, highlighted in the 3D area, is automatically computed and the default spot location is the circle center.
![]()
Create Spot Fasteners Annotations Automatically
You can automatically create a single fastener annotation during the spot fastener creation or edition.
![]()
Specify the type of annotation by activating one of the following options:
-
None: no annotation is created. This option is set by default.
-
Manual: when clicking OK in the Spot Fastener Definition dialog box, the annotation command is automatically launched to let you set the annotation parameters needed to create the annotation.
-
Automatic: a single fastener annotation associated to the created fastener is automatically created after clicking OK in the Spot Fastener Definition dialog box. Each field of the created annotation is automatically set from:
-
the user preference file; i.e. BiW Fastener Annotation parameters will be set from the customization of the last created BiW Fastener Annotation. For example, if Field 1of the previous created BiW Fastener Annotation was set to ID-Process Type, then Field 1 of the BiW Fastener Annotation automatically created will display ID-Process Type of the associated fastener.
-
if no user preference file already exists (i.e. no previously created annotation), the default BiW Fastener Annotation customization specified in the Fst_Standard File for the Field Fi is used, where i=1,..., 4. For example, the default parameter set to Field F1 for a BiW Fastener Annotation through the Fst_Standard File is JEID (specified between <>) or the first specified parameter.

For more information on customizing the Fst_STD Standard File, refer to Customizing the BiW Fastening Application Standard File. -
-
Important:
|
Using the Repeat Mode
You can use the repeat mode to create annotations.
If the Repeat object after OK option, (which is
available only with the On Curve and the Point
on Parallel Curve On Surface options) is selected during
the creation of fastener annotations:
- in case of an Automatic creation: repeated fasteners and their BiW annotations are automatically created after clicking OK in the BiW Fastener Repetition dialog box.
- in case of Manual creation: the Welding creation dialog box is displayed for the reference spot fastener, then the BiW Fastener Repetition dialog box to create the spot fasteners.
- the annotations of the repeated fasteners are further created with the same parameters as that of the reference annotation (that is the annotation associated to the reference spot fastener)
Using the Datum Mode
You can use the datum mode to create annotations.
Depending on the selection of the Create Datum
![]() icon in the Fastener Tools toolbar, the annotation will
be created in different ways.
icon in the Fastener Tools toolbar, the annotation will
be created in different ways.
- In case of an Automatic creation:
- If the icon is not activated during the automatic annotation creation, the created annotation remains associative to its fastener.
- If the icon is activated by a single click (i.e. not permanent datum mode), then only the fastener is isolated and the annotation remains associative to its fastener.
- If the datum mode is activated by a double-click (permanent datum mode), then the fastener and its associated annotation are isolated and the annotation is no longer associative to its fastener. Therefore, modifying the fastener location or fastener parameters has no impact on the datum annotation.
- In case of a Manual creation: the annotation is created as a datum annotation whatever the activation of the datum mode (simple or double-click).