Procedure for Opposite Hand Machining

This procedure helps you obtain a Manufacturing Program for the symmetrical part that has the same machining conditions as the initial part. Although this is quite a flexible procedure, there are usually three steps involved.

The stages in this procedure are as follows:

Related Topics
Reversing Machining Conditions
Effect of Reverse Machining Conditions

Prepare the Manufacturing Program

Opposite Hand Machining requires some preparation. The following procedure assumes that a proven Manufacturing Program already exists for one symmetrical half of a part or for one workpiece in a left-hand/right-hand pair.

  1. For symmetrical left-hand/right-hand parts such as the one below, with an existing left-hand Manufacturing Program,

    copy/paste the left-hand Manufacturing Program to create a new right-hand Manufacturing Program.

    See Refer to Reversing Machining Conditions.

  2. For a symmetrical (or nearly symmetrical) workpiece such as the one below, with an existing left-hand Manufacturing Program,

    copy/paste the Machining Operations used to machine the left-hand portion to create new Machining Operations in the same Manufacturing Program to machine the right-hand portion.

  3. Propagate your modifications.

Transform the Manufacturing Program and Reverse the Machining Conditions

You can now complete the Manufacturing Program.

  1. Click Utilities.

    1. Click TRACUT Operator in the Copy/Tracut Operations sub-toolbar that appears
    2. Create and apply a mirror transformation (or another suitable transformation) in order to create a symmetrical tool path.

      See Inserting a TRACUT Operator Instruction.

  2. However, applying a transformation to the tool path can reverse the machining conditions of some Machining Operations (climb/conventional milling, for example). This needs to be rectified in order to obtain a valid Manufacturing Program. Still in the Utilities toolbars:

    1. Click Opposite Hand Machining Options.
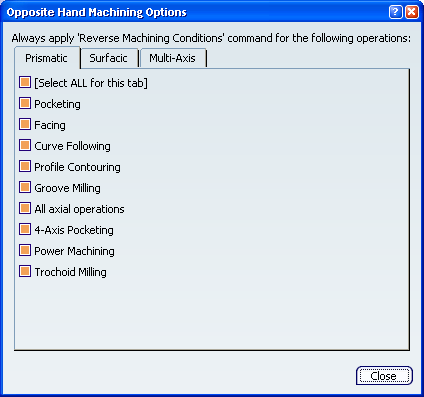
    2. In the dialog box that appears, select the types of Machining Operations whose machining conditions change after a mirror type transformation.

      This dialog box shows the Machining Operations supported by Reverse Machining Conditions. The Reverse Machining Conditions are supported for all mill type Machining Operations.

      By default, all the check boxes are selected.


    You can now apply a Reverse Machining Conditions processing to the selected Machining Operations types.

  3. Still in the Utilities toolbars:

    1. Click Reverse Machining Conditions in the Reverse Operations sub-toolbar.
    2. Select the Manufacturing Program (or groups of Machining Operations) whose machining conditions have to be reversed

      See Reversing Machining Conditions.

      A message is displayed if any of the Machining Operations selected are locked, asking you to unlock them.

    3. Answer Yes to unlock those Machining Operations, and apply the Reverse Machining Conditions are applied.
    4. Answer No to keep those Machining Operations locked and let Reverse Machining Conditions ignore them.


  • If a Reverse Keyword has been specified under When Reversing Operation in Tools > Options > Machining > Operation, it is applied to the Machining Operation name. For example:
    • the Reverse Keyword is _Reverse.
    • Reverse Machining Conditions is applied to the Machining Operation Facing.1.
    • the name of the Machining Operation becomes Facing_Reverse.1
  • Modified Machining Operations can be easily identified in the Manufacturing Program: their status is no longer up-to-date. The tool paths of these Machining Operations must be computed or re-computed.
  • Due to the applied TRACUT transformation followed by the Reverse Machining Conditions processing, the machining conditions are reset to the values of the initial Manufacturing Program. A summary of the processing appears in an information pop-up.

Note: You can change the machining conditions of deactivated Machining Operations, since they can be edited, but not the machining conditions of locked Machining Operations, since they cannot be edited.

Locally Edit the Transformed Manufacturing Program

You can edit some Machining Operations.

  1. If the Machining Operations of the original Manufacturing Program are linked one after the other, you may need to reverse the order of these Machining Operations in the processed Manufacturing Program. This is the case, for example, if the end point of Operation1 is the start point of Operation2. Still in the Utilities toolbars, click Reorder Operations List to reverse the order of one or more groups of Machining Operations.


    • Groups of Machining Operations must be selected one after the other in the Manufacturing Program and they must use the same tool.
    • Machining Operations in each group must be selected from top to bottom.

    In the example below, Machining Operations A, B, C, and E, F were selected and reversed.

    • Manufacturing Program before reordering:
                Operation.A 
                Operation.B 
                Operation.C 
                Operation.D 
                Operation.E 
                Operation.F
    • Manufacturing Program after reordering:
                Operation.C 
                Operation.B 
                Operation.A 
                Operation.D 
                Operation.F 
                Operation.E

  2. Similarly, it may be necessary to inverse the approach and retract macros on a Machining Operation. Still in the Utilities toolbars, click Inverse Macros in the Reverse Operations sub-toolbar.

Modify a Left-Hand Manufacturing Program (Fully Associative)

Machining Operations in left-hand program have been updated because of design changes, but the tool path was fully associative.

  • No action required.

    In this case, right-hand program is updated and is associative.

Modify a Left-Hand Manufacturing Program (New Geometry)

Machining Operations in left-hand program have been updated because of design changes, or some Machining Operations have been edited to take new geometry into account.

  1. Delete the existing old Machining Operations in the right-hand Manufacturing Program.

  2. Select and duplicate the modified Machining Operationss from the left-hand Manufacturing Program to the right-hand Manufacturing Program.

  3. If necessary, perform local modifications as explained in Procedure for Opposite Hand Machining.

Modify a Left-Hand Manufacturing Program (Added Machining Operations)

The options of some Machining Operations in a left-hand Manufacturing Program have been modified, or some Machining Operations have been added to the left part.

  1. Delete the existing old Machining Operations in the right-hand Manufacturing Program.

  2. Select and duplicate the modified and the new Machining Operations from the left-hand Manufacturing Program to the right-hand Manufacturing Program.

  3. If necessary, perform local modifications as explained in Procedure for Opposite Hand Machining.