Creating Rectangular Patterns | |||||
|
| ||||
Create the hole or constraint area to be copied.

Click Rectangular Pattern
 .
.
The Rectangular Pattern Definition dialog box opens.
Click OK to validate.
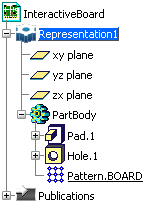
The pattern is added to the specification tree and the result looks like this:

Notes:
- The properties of the original hole or constraint area are extended to the pattern.
- When exporting hole or constraint area patterns, the IDF file contains as many holes or areas as specified in the pattern.
- You can create a more complex hole pattern based on an existing hole pattern. To do so, select the pattern in the specification or in the geometry area first, then click Rectangular Pattern. The properties of the original pattern are extended to the more complex pattern. This functionality is valid for hole patterns only.
For more information about rectangular patterns, refer to Part Design User's Guide: User Tasks: Transformation Features: Creating Rectangular Patterns.