Importing Boards | ||||||
|
| |||||
Select the IDF file containing the board you want to import.
The Circuit Board Design dialog box opens.
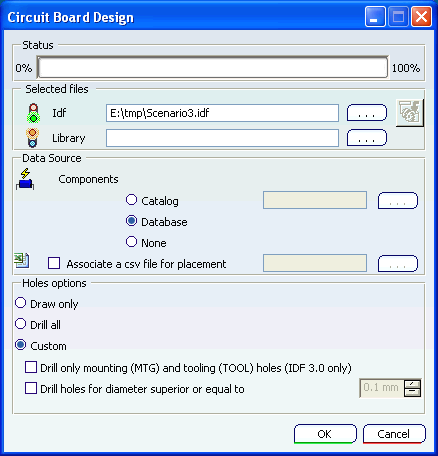
Status lights in the dialog box give you the following information:
 : Your selection is valid.
 : File is optional.
 : File is mandatory.
Optional: It is possible to select another IDF file on a disk. For this:
- Click
 opposite Idf, the File To Import dialog box appears:
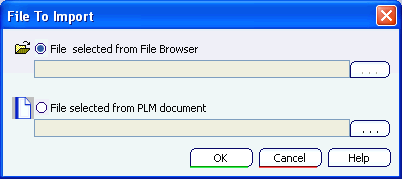
- Select the File selected from File Browser option if you want to find an IDF
file on a disk and click . The Import from file window opens.
- Browse a .idf file and click Open. The File selected from File Browser field now contains the IDF file name.
- Click OK, the IDF name appears in the Circuit Board Design dialog box:

- Click
Optional: Select an IDF file from a PLM Document,
Note: You can save an IDF or Library file in the database:
- Select New in the PLM Access menu
- Choose the Document type.
- In the browser, select the file to be saved in database. The authorized files are: .idf, .brd, .bdf, .ldf and .lib.
- Click Finish. The document is in database and can be found with the PLM Search.
- Click
opposite Idf, the File To Import dialog box appears:
- Select the File selected from PLM document option and click . The Import from file window opens.
- Click OK, the PLM Document name containing the IDF file appears in the Circuit Board Design dialog box:

Through the Import in context and Compare and Update commands, you can also select a PLM document containing an Idf or Library file and you can import it in an assembly.
You can also attach a PLM document containing an Idf file under the root Board assembly. For this, select the Document > Attach Document contextual command of the root Board. It can be interesting for keeping an history of the different Idf versions of the exported board.
You can select a Library file (from a PLM Document) containing the components' geometry you want to import. For this, repeat the steps above.
The PLM Chooser is pre-valuated to query only PLM Documents. After the user's validation in File To Import, the selected documents are checked. If no .idf, .brd or .bdf documents are detected, an error message will be displayed.
Optional: To import the components' reference from the database, under Data Source, you can select:
- Catalog: the query will be done in the catalog. To import components from the catalog, click
opposite Catalog. In the Catalog
dialog box, select either a database or your favorite catalog.
Tip: Defining your own catalogs so that you can select your own components will improve the import process performance. You can declare your electrical Catalog in a Project Resource Management (PRM), for more information please refer to Using 3D Electronic Component Catalogs in Project Resource Management. - Database : the query will be done in priority in the database. If no objects are found in database, the query will be done in the Library file if it has been selected. By default, this option is activated and the component geometry is About IDF Files.
- None: the query will be done in the Library, not in the database.
- Catalog: the query will be done in the catalog. To import components from the catalog, click
Optional: To import components from a Library (.lib) in database,
- Click
opposite Library, the File To Import dialog box appears.
- Select the File selected from PLM document option if you want to find a Library
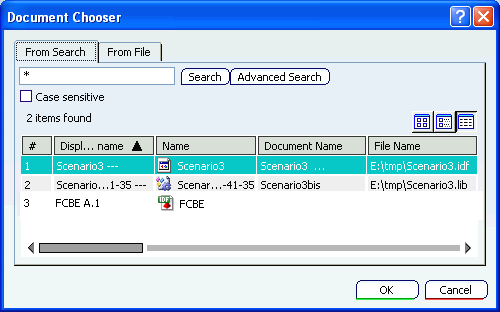
file in database and click . The Document Chooser window opens.
- In the results, select the file you need and click OK.
The Library file name appears in the File To Import window.Note: The IDF versioned models are supported in V6. You can read these files coming from the Designer Central database.
- Select the File selected from PLM document option if you want to find a Library
file in database and click . The Document Chooser window opens.
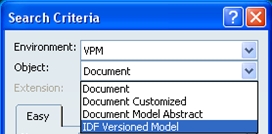
- Use the Advanced Search to find the IDF versioned model stored in the database:
- In the results, select the file you need and click OK.
- In the Document Chooser dialog box, you can see the files stored in the IDF versioned model (.bdf and .ldf).

- Once the IDF versioned model is selected, click OK. The intermediate dialog box File To Import displays the name of the selected IDF Versioned model.
- Click OK and you return to the Circuit Board Design dialog box:

- Select the File selected from PLM document option if you want to find a Library
file in database and click
- Click OK in File To Import. The Library file name is listed in the Circuit Board Design dialog box:

- Click
Click OK to validate.
A progress bar lets you monitor the import operation.
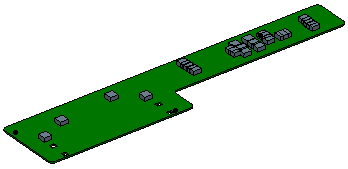
The following picture shows a typical result.