Importing in Context | |||
| |||
Double-click to activate the shape representation of the product you just added.
To import components, do one of the following:
- To import components from the database, select an IDF file.
By default, the Database option under Data Source is selected and component geometry is About IDF Files.
- To import components from the catalog, click
 opposite Electronics Catalog. In the
Catalog dialog box, select either a database or your
favorite catalog.
opposite Electronics Catalog. In the
Catalog dialog box, select either a database or your
favorite catalog.Tip: Defining your own catalogs so that you can select your own components will improve the import process performance. - To import components from a library (.lib) file on disk or in database:
- Select None under Data Source to search only in database.
- Click
opposite
Library and browse to select a library file.
For more information about importing an IDF or Library file from the PLM database in Circuit Board Design, please refer to Importing Boards.
- To import components from both the database and a
library file:
- Leave the Database option selected
- Select a library file.
Note: Components found in the database have priority.
- To import components from the database, select an IDF file.
Click the Browse
button and
select the IDF file containing the board or panel data you want to import.Click OK to import the board and components.
The status bar indicates the progression.
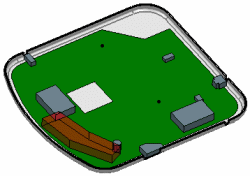
The result should look like this: