More about Advanced Drafts | |||||
|
| ||||
Draft Definition (Advanced) Dialog Box
This section describes the various options available in the Draft Definition (Advanced) dialog box.
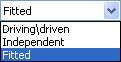
To define angle values, two modes are available in the combo list:
- Independent: you need to specify two angle values.
- Driving/Driven: the angle value you specify for one face affects the angle value of the second face.
Tip:
If you have a Cast and Forged Part Optimizer license, the
Fitted option is also available. This option lets you
perform a draft operation on two opposite sides of the part while
adjusting the resulting faces on the parting element you chose.
 |
Pulling Direction
Contextual commands creating the reference elements you need are available from the Selection box:
- Create Line: For more information, see Generative Shape Design User's Guide: Creating Wireframe Geometry: Creating Lines. .
- Create Plane: For more information, see Generative Shape Design User's Guide: Creating Wireframe Geometry: Creating Planes. .
- X Axis: the X axis of the current coordinate system origin (0,0,0) becomes the direction.
- Y Axis: the Y axis of the current coordinate system origin (0,0,0) becomes the direction.
- Z Axis: the Z axis of the current coordinate system origin (0,0,0) becomes the direction.
If you create any of these elements, the application then displays the corresponding icon next to the Selection box. Clicking this icon enables you to edit the element.
![]()
Parting Line Adjustement
The Parting Line Adjustment option adjusts the smoothness of the transition zone on the draft surface.
A transition zone occurs when a neutral element that was driving becomes driven, or vice versa. A zero parting line adjustment would yield a sharp edge on the draft surface.
Methodology
This option thus adds material to the 3D shape. If then you decide to use it, you should keep in mind that you need to enter reasonable values not to add too much material before launching machining processes. Usually, 0.1mm set as the default value provided by the application, proves to be efficient most of the time.
Concerning draft angle values, again make sure the value you enter does not add too much material. In the worst cases, this would prevent you from removing parts from molds.
In other words, a successful draft operation requires a fine tuning between the draft angle value you set and the parting line adjustment you may perform. The challenge being to add the minimum material to the part.
 and draft validity by using the
  . For more information, see FreeStyle Shaper Optimizer & Profiler User's Guide: Analyzing Shapes: Analyzing Surfacic Curvature and Analyzing Draft Angle.