Insert a Machine Rotation Manually
You can add a Machine Rotation manually in
the Manufacturing Program.
Open an existing Machining Process containing Machining Operations. - Click
 NC Machine Control.
- Click
 Machine Rotation
in the toolbar that is displayed. Machine Rotation
in the toolbar that is displayed.
- In the Manufacturing Program, select the activity after
which you want to add the Machine Rotation.
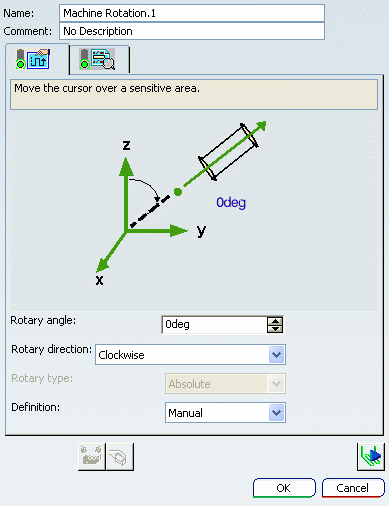
The Machine Rotation dialog box appears.

Note:
The Rotary type is set to Absolute in this
version and is not editable.
Go to the Properties tab
 to specify the
characteristics of the Machine Rotation: to specify the
characteristics of the Machine Rotation: - Select the Definition mode from the list: Manual or Selection.
If you have selected Manual, key in the required value in Rotary angle. If you have selected Selection, in the sensitive icon of the dialog box:
- Click the axis symbol, and select an axis
system in the authoring window.
- Click the vector symbol, and select a line
or cylinder in the authoring window.
The value of Rotary angle is defined by the absolute value of the angle formed by the z-axis of the selected axis system
and the line or cylinder axis.
- Alternatively, click the point symbol, and select a point in the authoring window.
The value of Rotary angle is defined by the absolute value of the angle formed by the z-axis of the selected axis system
and the line going through the selected point and the axis system
origin.
The machine table is rotated by this angle around the rotary
axis (A, B or C). This rotary axis is defined on the machine set in
the Part Operation. See Working with Generic Machine Editor. Still in the Properties tab
 , select the Rotary direction: , select the Rotary direction: - Clockwise,
- Counter-clockwise,
- Shortest.
Go to the Syntax tab
 . . - Select the Initialize from PP words table check box
to consult the Machine Rotation syntax defined in the PP table referenced by the Part Operation. See Working with Generic Machine Editor.
- Or key in your own PP instruction for the Machine Rotation. See Defining User Parameters in PP Instructions.
Note:
This user-defined syntax has no link with the PP table
and its validity is not checked by Machine Programming.
Click OK to create the Machine Rotation in the
Manufacturing Program.

Generate Machine Rotations Automatically
You can add a Machine Rotation automatically in
the Manufacturing Program.
Make sure the check box Generate Transition Paths in the Part Operation is not selected. See Creating a Part Operation. When the check box Generate Transition Path is selected, the contextual menu items Generate Machine Rotations and
Delete Generated Machine
Rotations
are
not available. All the generated Machine Rotations are removed from the Activities Process Tree Right-click the Manufacturing Program in the Activities Process Tree and select
Generate Machine Rotations in the contextual menu. The program is updated with
all necessary Machine Rotations. Note:
The Manufacturing Program is updated with Machine Rotations. Right-click
the Manufacturing Program in the Activities Process Tree and select
Delete Generated Machine Rotations. All Machine Rotations that were automatically
generated are removed from the Manufacturing Program.
|