Creating Associative Use-Edges

When projecting 3D elements, intersecting 3D elements or projecting 3D silhouette edges, you can create associative use-edges.

Note: Once you have created an associative use-edge, you can also replace its reference element. For more information, refer to Replacing Reference Elements in Associative Use-Edges.


Before you begin:
  • Open a 3D shape representation containing a layout. Open the layout in the 2D window, alongside the 3D window. In the Visualization toolbar, activate Display Backgrounds as Specified for Each View .
  • To create associative use-edges by default, go to Tools > Options > Mechanical > 2D Layout for 3D Design > Geometry tab and select Create associative use-edges. (Note that you can activate Isolate Use-Edge in the Tools Palette each time you want to create a non-associative use-edge. If you leave Create associative use-edges unselected, you can create associative use-edges, one at a time, by deactivating Isolate Use-Edge .)
  • Go to Tools > Options > Mechanical > 2D Layout for 3D Design > Display tab, Specification Tree area, and select Use edges and Use edge inputs to display use-edge features in the specification tree.
Related Topics
About Use-Edges
Replacing Reference Elements in Associative Use-Edges
Projecting 3D Elements onto the View Plane
Intersecting 3D Elements with the View Plane
Projecting 3D Silhouette Edges
  1. Double-click the front view to activate it.

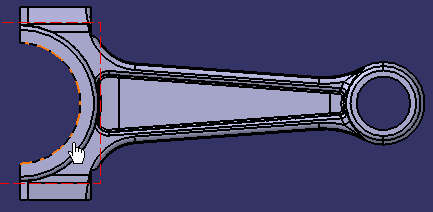
  2. Select the element to be projected.


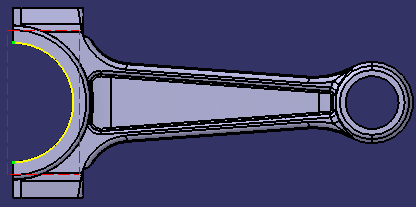
  3. Click Project 3D Elements in the Operation toolbar (Use-Edge sub-toolbar).

    Important: Associative use-edges can also be created using Intersect 3D Elements and Project 3D Silhouette Edges , depending on the type of input you want to get.

    A use-edge is created. It is associated to the geometry.


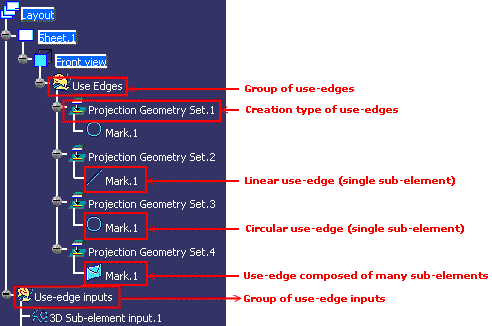
    Two new nodes are added to the specification tree:


    • Use Edges: this node is created under the appropriate view node in the specification tree. It groups sub-nodes indicating the use-edge creation type: Project 3D Elements , Intersect 3D Elements and Project 3D Silhouette Edges . Each use-edge is then represented by a mark. An explicit icon (for example, a circle or a line) represents a single sub-element, and an envelope represents several sub-elements. In this case, selecting the envelope in the specification tree selects all its 2D sub-elements, which makes it easier to offset them.

    • Use-edge Inputs: this node groups newly created use-edge geometrical input, 3D Sub-element input.1 in this case.


    Important: The Use Edges node is created by default when a use-edge is created, but it is not displayed by default. At any time, you can specify whether or not you want to view this node in Tools > Options > Mechanical > 2D Layout for 3D Design > Display tab, Specification Tree area, by selecting Use edges and Use edge inputs.

  4. Right-click the use-edge in the geometry.

    A contextual menu is displayed, with the following commands:


    • Isolate: isolates the associative use-edge making it non-associative with geometry.

    • Deactivate: removes the associative use-edge from the update process (the use-edge is still associative to the geometry but is not updated).

    • Auto-search: performs an implicit profile search starting from this geometry.

  5. Right-click the 3D Sub-element input.1 element and select Parents/Children....

    The Parents and Children dialog box is displayed, providing a summary of the links created to the 3D. For more details on an element, double-click it in the dialog box.