Visualization Tab | ||
| ||
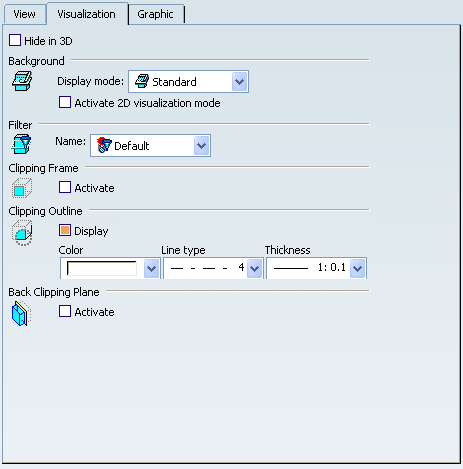
General
- Hide in 3D
-
Select this check box if you do not want any element on the sheet
(views, geometry, annotations and so on) to be visible in a 3D
workbench (such as Part Design). In this case, sheet elements will
not be visible in Show or No Show space.
Important: This property is independent of the Hide/Show option available in the sheet's contextual menu, which controls the visualization of the sheet both in 2D and 3D. - The
hidden element is displayed in the specification tree with a mask on the icon.
Note: The mask on the icon is usually not applied to the children nodes, which keep their own status, with the exception of aligned/offset section cuts/views and their associated views (in this case, the mask on the icon is simultaneously applied to all the children nodes).
![]()
Background
- Display mode
-
Specify how the view's 2D and 3D backgrounds should be handled.
 Standard: shows both the 2D and 3D backgrounds.
 Invisible: hides both the 2D background (the 3D
representation of 2D elements which do not belong to the current
view, but to other views) and the 3D background (the representation
of all 3D elements, including edges, faces and 3D wireframe).
Invisible: hides both the 2D background (the 3D
representation of 2D elements which do not belong to the current
view, but to other views) and the 3D background (the representation
of all 3D elements, including edges, faces and 3D wireframe).
 Unpickable: prevents selecting all elements in both the 2D and 3D backgrounds,
even though you can see them. You can just handle 2D elements which
belong to the current view.
.
Unpickable: prevents selecting all elements in both the 2D and 3D backgrounds,
even though you can see them. You can just handle 2D elements which
belong to the current view.
.
 Low-intensified: dims all elements in both the 2D and 3D backgrounds.
 Unpickable low-intensified: dims all elements in both the 2D and 3D backgrounds. Additionally,
although you can see these elements, you cannot select them. You
can just handle 2D elements in the current view.
Unpickable low-intensified: dims all elements in both the 2D and 3D backgrounds. Additionally,
although you can see these elements, you cannot select them. You
can just handle 2D elements in the current view.
- Activate 2D Visualization mode
- Select this check box if you want to display only the 2D planar elements that are in the same plane as this view in 3D for the newly created views.
![]()
Filter
- Name
- Select an existing filter to apply to the view. Refer to Creating View Filters for more information.
![]()
Clipping Frame
- Activate
- Select this check box to clip the 3D background of the view using a frame. Refer to Using the Clipping Frame for more information.
![]()
Clipping Outline
- Display
- Select this check-box if you want to display the outline of the clipping view. Refer to Using the Clipping View for more information.
- Color
- Select a color for the clipping outline.
- Linetype
- Select a linetype for the clipping outline.
- Thickness
- Select a line thickness for the clipping outline.
![]()
Back-Clipping Plane
- Activate
- Select this check box to clip the 3D background of the view using a back-clipping plane. Refer to Using the Back-Clipping Plane for more information.