More About Dimensions | |||||
|
| ||||
Dimensions
You can create a dimension and then change its properties.
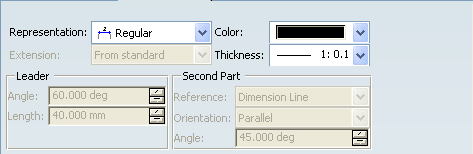
- You can use this functionality through the Properties
menu: right-click the dimension and choose Properties. In
the Dimension Line tab, select the type of extension you
want from the Extension list: From standard, Till center
or Not till center.
- This functionality works with radius dimension and one-symbol diameter dimension.
- When you create a dimension between a generated element in a broken view and a sketched element, the dimension value may be false to let you set a fake dimension value.
- When you create a dimension between an axis and another element,
the dimension created by the software is automatically an half dimension.
To bypass this problem, clear the Half Dimension contextual command during the creation.
- You can generate errors when refreshing the dimensions in the following
cases:
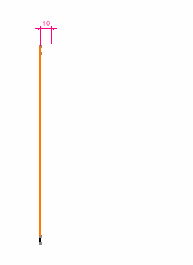
- In this drawing the dimension "80.14" is measured from the line
B to the line C:
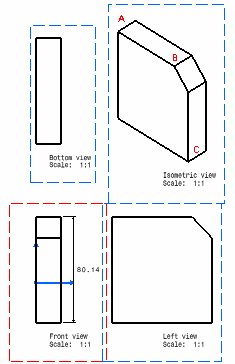
If the corresponding part is modified and the chamfer is removed, then when the drawing is updated, the dimension is colored in fuchsia. Because the line B was removed with the chamfer: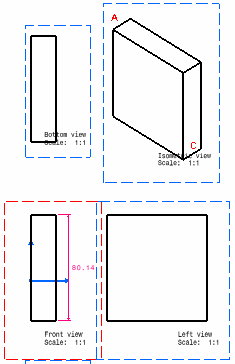
- If the two elements separated by the dimension value are moved
and then merged, an error is generated and the dimension turns to fuchsia
by default (or according to the color defined for Dimensions for which last update failed in the Element's Analysis
dialog box available via Tools > Options > Mechanical
> Drafting > Display tab, Elements Analysis
area, Activate elements' analysis check box, Configure... button).
Note: In this case, it is not possible to create a null value. If you need to, you should create a Creating Driving Dimensions and set its value to 0.
- In this drawing the dimension "80.14" is measured from the line
B to the line C:
Dimensions Properties
If you right-click the dimension before creation, a contextual menu lets you modify the dimension type and value orientation as well as add funnels. Using this contextual menu, you can also access the Value Tab once the dimension is created.
Dimension Symbol Manipulators
You can change a dimension symbol manipulator directly from the symbol itself without using the Properties dialog box.
For this:
- Go to Tools > Options > Mechanical > Drafting > Manipulators tab and select the Modify symbol check box for the Creation and Modification options.
- Create a dimension. Manipulators are displayed during dimension creation.
- Right-click a manipulator and select required symbol from Symbol Shape. For more information, refer to Settings Customization User's Guide: Mechanical Design Settings: Customizing Settings: Manipulators.
- Optionally, right-click the manipulator and select Invert Symbol to reverse the direction of the manipulator symbol.
| Important: The manipulator is displayed only for Symbol 1 and Symbol 2 of a dimension. It is not displayed for the Leader Symbol. |
Associativity
If one parent element of the dimension is deleted or deactivated, as soon as you update the drawing, the dimension turns to the color defined for Dimensions for which last update failed in Tools > Options > Mechanical > Drafting, Display tab (provided the Activate elements' analysis check box is selected).
![]()
Driving Dimensions
You can create dimensions that will, by default, drive the geometry.
For this:
- Go to Tools > Options> Mechanical > Drafting, Dimension tab, and select the Create driving dimension check box.
- Create and/or modify the desired dimension on the geometry. If needed,
you can use the Tools Palette and define the Value of the
dimension you want to be driving.

For more information, refer to Creating Driving Dimensions.
![]()
True Length Dimensions
True Length dimensions can be created using the True Length Dimensions
 command in the Tools Palette, or using the contextual menu.
Before creating true dimensions, make sure that you have not selected the Only create non-associative dimensions option in Tools > Options > Mechanical > Drafting, Dimension tab, Associativity on 3D button, Dimensions associativity on 3D dialog box. In order to work, this functionality must be applied to an associative dimension.
| Important: When dimensioning in an isometric view, the dimensioning mode is automatically switched to True length. If you are not satisfied with this dimensioning mode, you can select another one. |
![]()
Half-Dimensions
You can create half dimensions.
For this, right-click the created dimension and select Half-dimension.
For more information, refer to Creating Half-Dimensions.
![]()
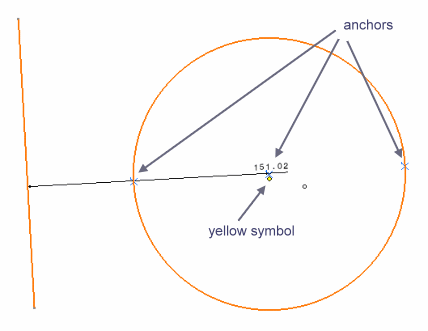
Extension Line Anchor
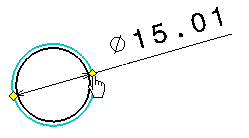
As you create a dimension between two elements, one of these elements being a circle, you can select the extension line anchor.
To do this, you can:
- Use the contextual menu (positioned on the dimension) and select one of the available Extension Line anchor options (First Anchor, Second Anchor, Third Anchor).
You will thus position the extension line:
- At one extremity of the circle (First Anchor)
- At the center of the circle (Second Anchor)
- At one extremity of the circle (Third Anchor)
- Drag the yellow symbol to the one of the anchors (anchors appear
when the pointer is over the yellow symbol):
Note: If you selected the Dimension following the cursor (CTRL toggles) check box in Tools > Options > Mechanical > Drafting > Dimension tab, then, to move the extension line anchor, you must press the Ctrl key before selecting the yellow symbol (to switch the option temporarily).