More about Ribs and Posts | |||||
|
| ||||
About Profiles
If you are not satisfied with the profile you selected, note that you can:
- Click the Profile/Surface box again and select another sketch.
- Use any of these creation contextual commands available from the
Profile/Surface box:
- Go to profile definition. For more information, see Part Design User's Guide: Sketch-Based Features: Pads: Using the Sub-Elements of a Sketch.
- Create Sketch: For more information, see Sketcher User's Guide: Creating a Positioned Sketch.
- Create Join: Joins surfaces or curves. For more information, see Generative Shape Design User's Guide: Performing Operations on Shape Geometry: Joining Surfaces or Curves.
- Create Extract: Generates separate elements from non-connex sub-elements. See Generative Shape Design User's Guide: Performing Operations on Shape Geometry: Extracting Geometry: Extracting Elements
Concerning the creation of posts, in addition to points, sketches can contain curves, which enables
you to obtain results as illustrated below: 
![]()
Extension Type
To define the extension type you want, you can set one of the four options available from the Extension type drop down list:
- No extension: Confines the rib to be created only within the walls of the shelled volume, even if the profile is outside the walls of the volume. For an example, see Creating a Rib
-
Across removed
face: Like No extension (above) except that the rib is not
confined within the wall of the shelled volume's deleted face.
- Add all: Creates the rib based on the specified length and width values, even if the values cause the rib to protrude outside of the volume to which it is applied.
- Subtract all: Subtracts the volume of the rib from the volume to which it is applied.
![]()
Fillet Tab
To define the extension type you want, you can set one of the four options available from the Extension type drop down list:
When you have the rib like below with the ends of the open
profiles, you can add the fillets at the ends of the open profile
with Lateral radius and Fillet profile ends options.
The Fillet profile ends option can be combined with other
radius options. Please see Creating a Prism for some examples. 
If you want to add an intersection fillet, you can choose between Intersection with Core/Cavity, Intersection with Core or Intersection with Cavity in the Intersection Fillet box.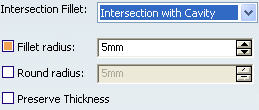
If you want to add material to the feature, select the Fillet radius checkbox, if you want to remove material from the feature, select the Round radius checkbox.
Select the Preserve Thickness checkbox if you want to keep the thickness applied on the feature.
![]()
Thin Solid
To define a thin solid, you can set one of the two options
available from the Type drop down list:
- Use body thickness: The rib wall thickness is that of the active shelled body thickness.
- Enter thickness: Simply enter the value you want. When this option is selected, the value box becomes available. Wall thickness values can only by positive values.
- Neutral fiber adds the same thickness to both sides of the profile. When you clear the Neutral fiber check box, Thickness1 and Thickness2 inputs are available. You can give the different thickness to the left/right side of the profile, and one of them can be 0mm.

![]()
Extend Across Removed Faces
SelectingAcross removed faces as Extension type causes the
feature not to be confined within the wall of the deleted face of
the shelled volume.
![]()
Posts Tab
The Reference box lets you choose between three types of elements used for neutral elements for applying the taper angle. The three elements available are:
- Profile plane
- First limit: The reference will use the First Limit. The Up to Surface option is
used for the first limit. Refer to the picture below for details:
- Second limit: The reference will use the second limit when you set this option.
The draft properties defined in the Draft tab can be used in the Posts tab for creating a rib feature. In this case, the draft angle value is assigned to the Taper Angle field. This option is then disabled and dimmed. A new Use parting element option is added in the Reference box.