Creating Octree Triangle Meshes

You can create a 2D mesh using linear or parabolic triangle elements (TR3 or TR6 elements).


Before you begin: A finite element model representation must exist.
Related Topics
Adding Local Specifications for Octree Meshes
Linear Triangle
Parabolic Triangle
Updating Meshes
Creating 2D Properties
Finite Element Model Representations
  1. In the Meshes toolbar, click Octree Triangle Mesh .

    The Octree Triangle Mesh dialog box appears.

  2. Select the 2D geometry.

    The local specification tools are now available.

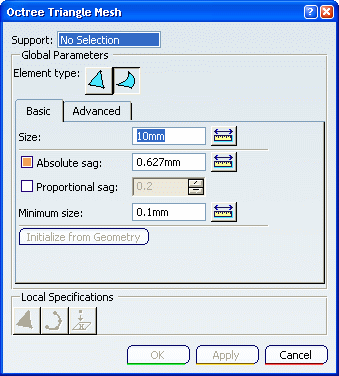
  3. Choose the element type.

  4. In the Basic tab, specify the mesh size and mesh sag attributes.

    1. In the Size box, enter a value of element size.
    2. Optional: If you want to specify a maximum size value for interior elements, select the Global interior size check box, and enter a value of maximum size.

      Warning: If the value of the global interior size is smaller than the value of the size, the size value is reduced automatically to the value of the global interior size.

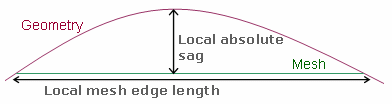
    3. Optional: To specify a maximum gap between the mesh and the geometry, select the Absolute sag check box and enter a value.


    4. Optional: To specify a ratio between the local absolute sag and the local mesh edge length, select the Proportional sag check box, and enter a value.

      Important: Proportional sag value = (local Absolute sag value) / (local mesh edge length value)

      You can use both absolute sag and proportional sag, the most constraining of the two is used.

    5. Optional: To impose a minimum size for the mesh refining due to sag specifications, enter a value in the Minimum size box.
    6. Optional: To initialize the mesh size and the mesh sag values with a ratio of the geometry size box, click Initialize from Geometry.

  5. Optional: In the Advanced tab, specify the advanced global parameters.


    1. To impose the maximum size of the elements ignored by the mesher (before meshing operation), enter a value in the Ignore edges smaller than box.
    2. To remove small edges (after meshing operation), select the Mesh edge removal criteria check box.

      Warning: This operation may involve constraint violation.

    3. To optimize the mesh quality, select Shape, Skewness or Strech in the Smoothing criteria list.
    4. To generate a mesh with at least two element layers, even in thin material areas, select the Ensure two layer elements check box.

      All the mesh edges that satisfy one of the following conditions will be split automatically:

      • A mesh edge on a curve connects two nodes on vertices.
      • A mesh edge on a face connects two nodes on curves or vertices.
      • A mesh edge inside a volume connects two surface nodes.

      Note: If you select the Ensure two layer elements check box, the mesh quality decreases in areas with small geometry (small edges, thin faces).

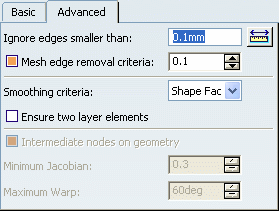
    5. To specify the position of the intermediate nodes of parabolic elements, select the Intermediate nodes on geometry check box.

      The distance d between the geometry and the intermediate nodes is a function of the Jacobian and Warp values.

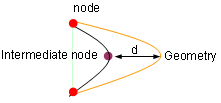
      Warning: This option is available only for parabolic tetrahedron elements (TE10).

  6. Optional: Add local specifications.

    See Adding Local Specifications for Octree Meshes.

  7. Click one of the following:

    • Cancel to cancel the modifications and close the dialog box.
    • Apply to save the parameters you defined and to create, update, and generate the mesh.

      The PLM Update progress bar appears. You can interrupt the update. See Updating Meshes.

      The Octree Triangle Mesh dialog box remains open to continue modifying parameters if necessary.

    • OK to save the parameters you defined, to create the mesh, and to close the dialog box. To generate and visualize the mesh, you have to update it. See Updating Meshes.

    If you click Apply or OK, the 2D mesh is created and appears in the specification tree.