Creating Multi-profile Branches

You can design a multi-profile electrical branch from scratch. Creating multi-profile branches let you refine segment geometry in order to accurately represent branch shape and ensure an overall volume close to reality.


Before you begin: Create an electrical geometry.
Related Topics
About Multi-profile Branches
Creating an Electrical Branch Geometry and First Branch
  1. Double-click to activate the electrical geometry.

  2. Create two points to route the branch, at coordinates 0,0,0 and 200,800,0 for example. For more information about creating point, refer to Generative Shape Design User's Guide: Creating Points.

  3. Click Electrical Branch Geometry .

    The Electrical Assembly Design workbench switches to the Electrical Part Design workbench. The Branch Definition dialog box appears.

  4. Set branch properties in the Branch Definition dialog box.

    For information on Diameter, Section, Bend Radius and Bend Radius Ratio options in the dialog box, see Creating an Electrical Branch Geometry and First Branch.

  5. Click Route Definition and route the branch between the two points.

    Note: By default, the branch profile is round.

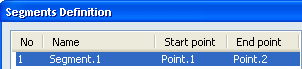
  6. Click Segments Definition to add branch points and manage segment profiles .

    Your branch contains only one segment at the moment.


  7. Add two branch points:

    1. Add a first branch point about 200mm from the start point of Segment.1.

      The branch is split into two segments.

    2. Add a branch point to Segment.2 about 300mm from the start point of this segment.

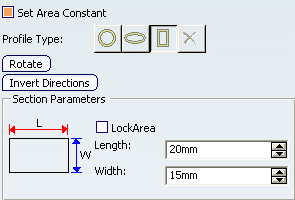
  8. Change the profile of Segment.2:

    1. Select Segment.2 and click Detailed Profile Management.

      The Profile Management dialog box appears. You will now add a different profile to Point.4

    2. Select Point.4
    3. Clear the Set Area Constant check box to keep the section parameters you specify for each profile.
    4. Change the profile type to rectangular.
    5. Enter a length of 20mm and a width of 15mm under Section Parameters.

    6. Click OK when done.

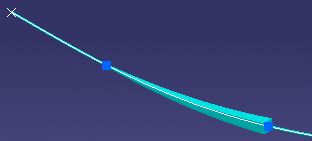
    The segment is now multi-profile:


  9. In the Segment Definition dialog box, select Segment.3 and add a branch point about 200mm from the start point.

  10. Change the profile of Segment.3:

    1. Select Segment.3 and click Detailed Profile Management.

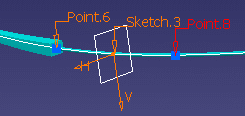
    2. Right-click Point.6 in the Segment Definition dialog box and select Import & Link Profile at Junction to copy the end profile of the previous segment and link it for a smooth transition between segments.
    3. Right-click Point.6 again and select Copy Profile across the Segment to copy the profile you just imported, then click OK when done.

  11. Change the shape of Segment.4:

    1. In the Segment Definition dialog box, select Segment.4 and click Detailed Profile Management.

    2. Clear the Set Area Constant check box.

    3. Change the profile at the start point to an ellipsis and specify a major axis of 8mm and a minor axis of 4mm.

    4. Select the end point and keeping a round profile, enter a diameter of 11mm.

  12. Click OK to validate your changes in the successive dialog boxes.

    The end result looks like this: