Edit Component Parameters
The Component Parameters Edition
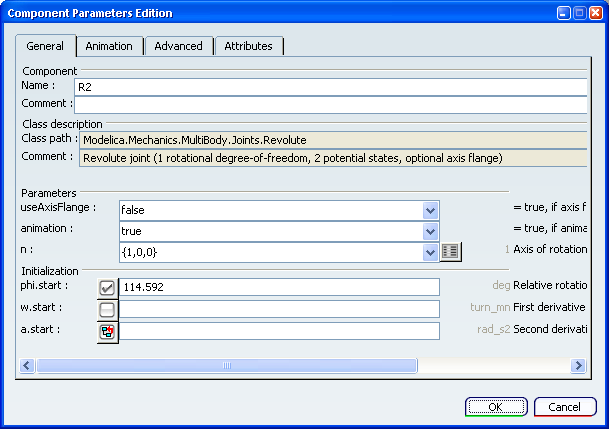
From the Component Browser or from the diagram, select a component. Select Edit Component Parameters  from the Balloon contextual toolbar, from the contextual menu or from the Parameter and Variable Editor. from the Balloon contextual toolbar, from the contextual menu or from the Parameter and Variable Editor. The Component Parameters Edition dialog box appears to let you edit the component parameters. For more about this dialog box, refer to Component Parameters Edition Dialog Box.

To find and insert any variable (except protected ones) from the current model, including variables in sub-components; - Right-click the parameter input field, then select Insert component reference from the contextual menu.
A Select a parameter dialog box appears.
- Browse for the wanted variable in the browser.
- Select the variable.
- Click OK.
The variable, including the path to it, is inserted in the parameter input field. Note:
The current content of the field is not replaced.
You can get help on how to e.g. insert matrix values by clicking on the icon  (if any) after the parameter input field. By posing over it you can see what kind of help that is given. (if any) after the parameter input field. By posing over it you can see what kind of help that is given. For more information about the alternatives and how to use them, please see Edit Command Dialog Boxes/Editors. A simple text editor faciliates working with long texts. Right-click the parameter input field, then select Modelica Text from the contextual menu. To define a final parameter, right-click the parameter input field, then select Final from the contextual menu.
To define how a start value in the Initialization section of the dialog box should behave; - Right-click the icon in front of the start value.
- Select the wanted behavior.
An icon indicates the behavior of the start value. This can also be shown as text by posing over the icon. There are four possible behaviors:
 The start value is used to initialize (modifier "fixed" = true). The start value is used to initialize (modifier "fixed" = true). The start value is only a guess value (modifier "fixed" = false). The start value is only a guess value (modifier "fixed" = false). The behavior of the start value is inherited (modifier "fixed" gets its value from other levels). The behavior of the start value is inherited (modifier "fixed" gets its value from other levels). The behavior of the start value can not be presented here (modifier "fixed" is modified from another tool and is an expression). The behavior of the start value can not be presented here (modifier "fixed" is modified from another tool and is an expression).
Click OK to exit the dialog box and save the component parameters.

Edit a Component Parameter Attribute
You can define an attribute (minimum, maximum, unit...) for a parameter, variable or sub-parameters.
Note:
- The dialog box looks different depending on the type of parameter.
- If an Edit command is present after the input field, you can use this command or the contextual menu described in this scenario. It displays a matrix editor. For more information about the matrix editor, refer to Working With the Matrix Editor.
The Component Parameters Edition
dialog box of the relevant component must be displayed.
In this example, we edit a parameter of real type.
Right-click the input field of the parameter/variable that should be edited, and select Edit
in the context menu that is displayed.
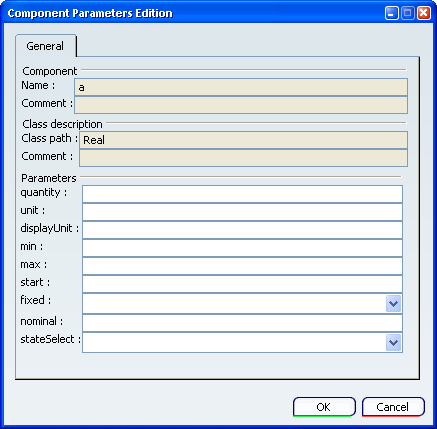
A Component Parameters Edition dialog box appears. For a simple real value it can look like:

Define the following attributes for the component parameter:
- StateSelect.never - do not use as state at all.
- StateSelect.avoid - use as state only if it cannot be avoided.
- StateSelect.default - use as state only if appropriate.
- StateSelect.prefer - prefer as state over the default ones.
- StateSelect.always - use as state always.
Click OK to validate your parameter attributes. The dialog box is closed, and you're back to the component parameter edition.
|
![]()
 from the
