Running the FBDI Batch | |||
| |||
FBDI Batch User Interface
This section describes the FBDI Batch User Interface.
Open the Batch Monitor:
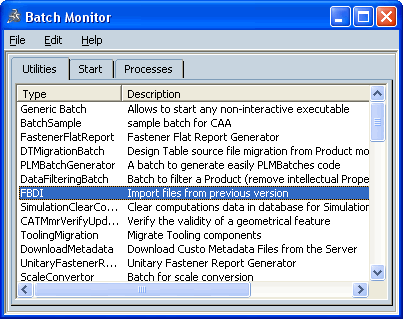
Double-click the FBDI line in order to open the FBDI dialog box.
Note: All the parameters except Use Light Mode option in Select the files to Import dialog box are retained from the previous session of FBDI Import.

Click
 in the Object Selection section to choose the
Input data
in the Object Selection section to choose the
Input dataThe ENOVIA V6 Object Management dialog box opens.
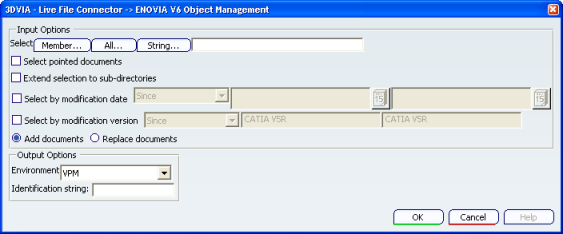
The following options are available in the Input Options section:- Select Member... to open the CATIAFileBox (browser) window. Select one or several CATIA documents and click Open. The selected object will be listed in the FBDI window.
- You can select the following:
-
Select pointed documents
-
Extend selection to sub-directories
-
Select pointed documents
- Select by modification version
-
- Add documents. This option is always checked by default.
Note: Both options Add documents and Replace documents are not taken into account by FBDI since the FBDI tool creates new components in ENOVIA database.
In the Output Options section of the File > ENOVIA V6 Object Management window, you can define:
-
the Environment of the database in which data will be saved (in our example: "VPM")
-
the Identification String that will be added on all the saved components.

![]()
FBDI Batch Report
This section describes how to generate FBDI Batch Report .
In the Report section, you can choose the Output data.
-
Report directory: the directory in which the migration report will be stored. You can type a path or browse it by clicking
. -
Report name: GlobalResults.hm.
-
Suffix for object report: .htm.
For more information about these report options and the Licensing Setup, see Running Batches Using the Batch Monitor section, in the Infrastructure User 's Guide.
-
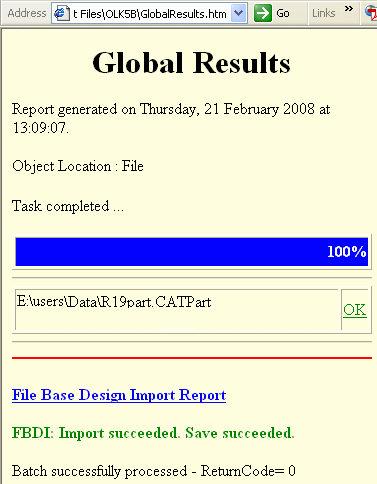
Open the Global Results Report in your Output directory or click Open HTML Report
 .
.
Note: This button is activated only when a report has been generated, otherwise it is grayed out.
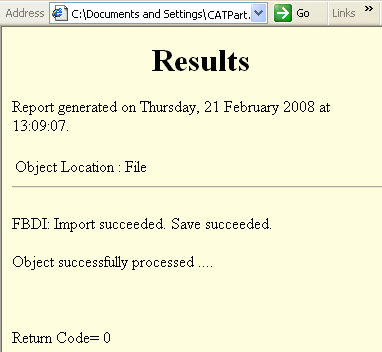
Click OK to have more details about the migration results: FBDI and Save status.
The Results page opens:
If you have chosen an Asynchronous migration, the information is also visible in the GlobalResults.htm report:
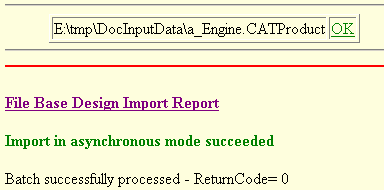
You can find more information about the FBDI Report by selecting File-based Design Import Report: migration status per document.
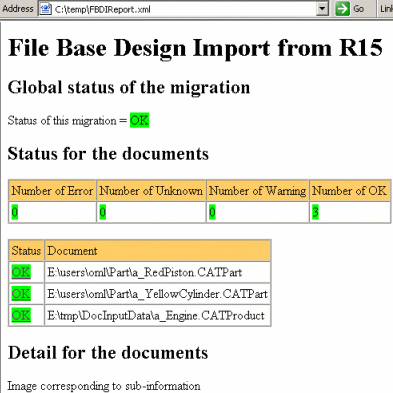
The content is the same as in the Report of FBDI used in Interactive Mode. When the migration is OK, the migrated documents are saved in the ENOVIA database.If a migration status is KO in the Global Results, open the File-based Design Import Report to identify the problem.
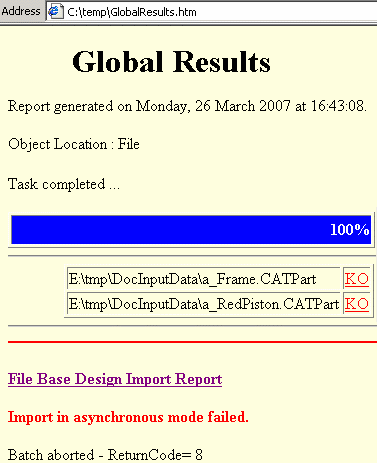
There is however a limitation: if several documents have been selected as Input data and if the migration of one of them failed, all the statuses are shown as FAILED in GlobalResults.htm. See the Report to get more details on the cause of the problem.