File Access Mode | ||
| ||
Access Mode Administration
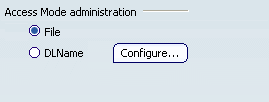
This tab lets you choose your access mode which is a
way of accessing your documents. The following modes are available:
- File
- DLName
- File
-
This is the default mode in which the dialog accesses any folder containing files. To set this environment as the active access mode, select File.
 By default, this option is selected.
- DLName
-
This mode lets you restrict the access to specific folders referenced by logical names referred to as "DLNames", each folder being assigned a logical name. In this mode, the different opening and saving commands only allow end users to access documents in directories referenced by DLNames. Any modification of a path impacts the DLName once, which avoids you to search for and to manually modify any occurrence of this path.
The administrator may also define the folders in which users are allowed to work.
To work with DLNames, you need first to set the DLName mode as the current access mode before creating DLNames.
-
Select DLName.
-
Click Configure....

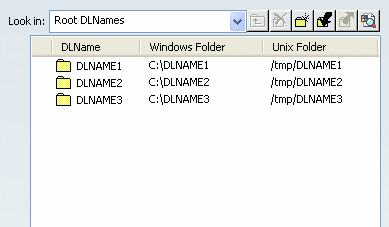
Important: - The Unix Folder column is displayed on Windows only when running V6 in administrator mode.
- When running V6 in user mode, only the column corresponding to your operating system is displayed (for instance, "Windows Folder" when working on Windows).
The Lock column (next to the DLName column) appears in both administrator and user modes and can display the following lock symbols:
 "locked" (in user and administrator mode)
 "locked at administrator level" (in administrator mode)
-
 "no lock" (in administrator mode). In user mode, there is no lock symbol.
-
Click Define DLNames
 or right-click then select New to create a new DLName.
A default name and a default folder are assigned to the new DLName (you can create as many DLNames as necessary).
-
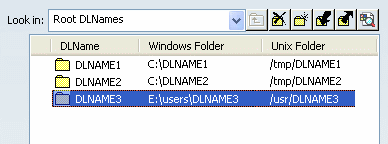
If you are authorized by your administrator (i.e. when no lock appears opposite the DLName), you can modify the values displayed. To do so, click the desired value to be able to edit it then type the new data.
In administrator mode, you can modify the DLName and the associated paths as needed.
In user mode, you can create a root DLName. However, do not forget that some rules apply if you want to modify names and folders:
- When changing the folder of a sub-DLName, the new folder must correspond to a folder of the father DLName.
- The name of the last folder is always the one of the DLName. If you change the name of a DLName, the modification is automatically applied to the folder: if you have DLNAME2 as a sub-folder of C:\DLNAME1 then rename DLNAME2 in DLNAMEA, the path displayed in the Folder column will automatically change from C:\DLNAME1\DLNAME2 to C:\DLNAME1\DLNAMEA.
Therefore, be very careful when renaming a DLName because this modification impacts the name of the folder and of the sub-folders, if any.
Any modification of a root DLName path is controlled by the administrator which may prevent you from doing so.
As far as sub-DLNames are concerned, you cannot modify the path of a sub-DLName because this path contains the name of the sub-DLName and depends on the location of the father DLName.
To modify the Windows folder of a DLName, right-click the folder to be modified in the Windows column then select Browse: this opens a dialog box that lets you navigate to the new folder. After clicking OK, the new folder replaces the former folder in the Windows column.
Important: You can include variables in DLNames using the syntax ${VARIABLE}. For instance:C:\users\${MODEL}\publish where ${MODEL} is a user-defined variable. -
If you are in administrator mode, you can lock or unlock each DLName individually simply by clicking the green symbol opposite the DLName.
Locking a DLName changes its state from
to
(and inversely when you
unlock the DLName).As an administrator, you can click the general
lock to prevent end users from defining and modifying DLNames.
In that case, the following commands are not available: New,
Browse, Delete, Import and
Export. -
When finished adding DLNames to your list, you can click Export DLNames
 (or right-click and
select Export) to save your list of DLNames as a .txt file in
the appropriate location using the Export DLNames dialog box.
(or right-click and
select Export) to save your list of DLNames as a .txt file in
the appropriate location using the Export DLNames dialog box.You can make as many lists as you like and, for further use, import the list whenever you want to. To do so, click Import DLNames
 (or
right-click and select Import) then select the list to
be imported in the Import DLNames dialog box.
(or
right-click and select Import) then select the list to
be imported in the Import DLNames dialog box. -
To remove a DLName from the list, select it then click Remove DLNames
 (or
right-click it and select Delete).
(or
right-click it and select Delete).When DLNames have been created, they are displayed in the Look in list.
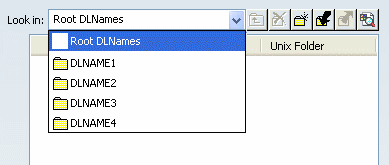
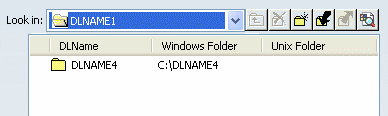
You can then use this list to display sub-DLNames, if any. In our example, selecting "DLNAME1" in the list shows that it contains a sub-folder "DLNAME4".
You can also display sub-DLNames either by double-clicking the father DLName in the DLName column, or by right-clicking the father DLName (still in the DLName column) then selecting Down. To re-access the upper level, click Up
 .
.
-
Click OK to close the Configure dialog box then OK to exit the File Access Mode tab.
Important: - When DLNames have been defined, you can put them in a search order. For more information, see Search Order.
- The Configure dialog box also lets you search for the DLNames you defined. See Search for DLNames.
- For an example of DLName integration in other commands, see DLName Integration.
By default, this option is cleared.
-
- Search for DLNames
-
When a great number of DLNames has been defined, it may be difficult to find a DLName. This is why a search functionality is provided in the Configure dialog box to let you find DLNames more easily.
- Click Configure... .
- Click Import DLNames
(or right-click and select Import) then select the text
file containing the DLNames to be searched for.
In our example, we use the following text file (you can copy then paste these instructions in your own text file to follow the scenario):
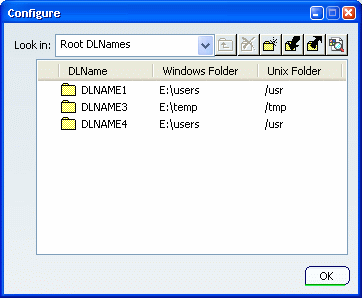
DLNAME1;E:\users\;/usr;;
DLNAME2;E:\users\DLNAME2;/usr/DLNAME2;DLNAME1;
DLNAME3;E:\temp;/tmp;;
DLNAME4;E:\users\;/usr;;
DLNAME5;E:\users\DLNAME5;/usr/DLNAME5;DLNAME1;
DLNAME6;E:\users\DLNAME6;/usr/DLNAME6;DLNAME1;
DLNAME7;E:\temp\DLNAME7;/tmp/DLNAME7;DLNAME3;
DLNAME8;E:\users\DLNAME8;/usr/DLNAME8;DLNAME4;
DLNAME9;E:\users\DLNAME9;/usr/DLNAME9;DLNAME4; MyNewTest;E:\users\MyNewTest;/usr/MyNewTest;DLNAME4; NewDLName;E:\users\NewDLName;/usr/NewDLName;DLNAME4;
Three root DLNames (DLNAME1, DLNAME3 and DLNAME4) have been defined, each of them containing sub-DLNames.
-
Click Search
 .
.
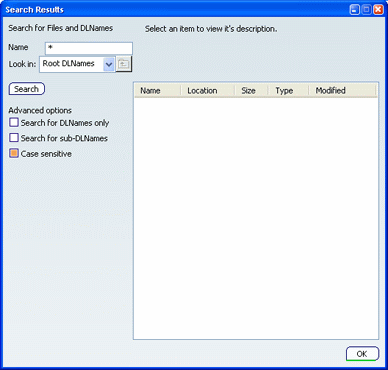
Note that for performance reasons, the look of the Search Results dialog box might not be the same on all operating systems.
This dialog box lets you search for DLNames (either root DLNames or sub-folders) using two criteria:
- The name, by entering a search string in the Name box.
- The location, by selecting the DLName in which you will run your search from the Look in list.
-
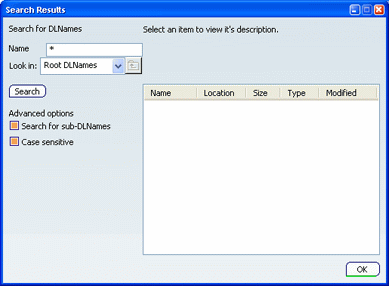
In the Search Results dialog box, leave the default values which means that you are going to search for all DLNames created in the root, then Search to run the search.

The three root DLNames (DLNAME1, DLNAME3 and DLNAME4) as well as all their sub-DLNames are found.
The five columns next to the Search button give you the following information about the search results:
- Name: gives the name of the search result. In our example, eleven DLNames have been found in the root DLName.
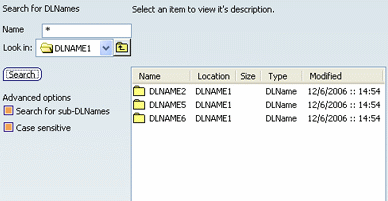
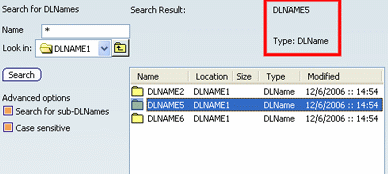
- Location: gives the path of the search result. In our example, among the eleven DLNames found, you can see that some DLNames are sub-folders of other DLNames. For instance, DLNAME1 contains three sub-folders named DLNAME2, DLNAME5 and DLNAME6.
- Size: gives the size of the search result. This column is relevant only when searching for files.
- Type: gives the type of the search result. When you access the Search Results dialog box via the Configure dialog box, you always search for DLNames. However, when you access the Search Results dialog box from the Select File dialog box, you can also search for files which means that your search results can be of type "CATPart", "CATProduct", etc.
- Modified: gives the last modification date of the search result.
If needed, you can sort the search results by clicking the desired column title. For instance, clicking "Modified" sorts the search results by their last modification date (in ascending order).
-
Select "DLNAME1" in the Look in list, still with * in the Name box, then click Search. This means that you are going to search for all DLNames created in "DLNAME1".
-
Select a DLName in the list of search results.
You can see that the name and type of the selected item are displayed on top of the dialog box.
Note that you cannot select multiple files in the list but only one file at a time.
-
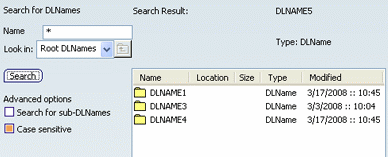
Select "Root DLNames" in the List box then in the Name box, enter *New* to search for all DLNames whose names contain the string "New".
The asterisk (*) is used as a wildcard to replace any number of characters. The question mark (?) is used to replace one character only.
Suppose the following example with two DLNames, DLName1Test and DLName2Test:
- DLName*Test finds DLName1Test and DLName2Test.
- DLName?Test finds DLName1Test.
Tip: By default, the search is case sensitive and therefore, entering *new* instead of *New* does not give the same result. To run a search that is not case sensitive, clear the Case sensitive check box. -
Click Search.

-
To search for DLNames that are sub-folders of other DLNames, select the Search for sub-DLNames check box.
For instance, if you run the following search (in which the Search for sub-DLNames check box is activated), all the DLNames (including those located in other DLNames), are found.
If you run the same search with the Search for sub-DLNames check box cleared, only the root DLNames are found.
Important: The state (activated or deactivated) you define for the advanced options is stored in preference files. The Advanced options' default values can be administered, which means that if an option is locked by the administrator:
- It is grayed out.
- Preference files are not used because the value assigned to the option is stored in the settings.
he values assigned to these advanced options are kept from one session to another, whether they are stored in .CATSettings or .CATPreferences files.
- When finished, click OK to close the Search Results dialog box.
- DLName Integration
-
When DLName is set as the current access mode, the following dialog box appears instead of the usual Select File dialog box when relevant (for instance, when using PLM Access > Import > CATIA File...).
If no DLName has been previously defined, a warning dialog box opens when running the command.
-
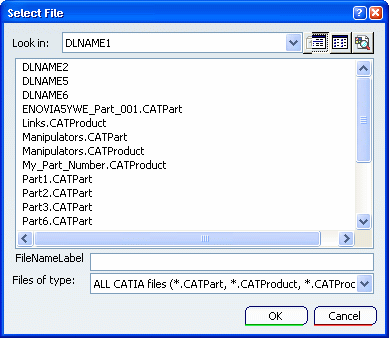
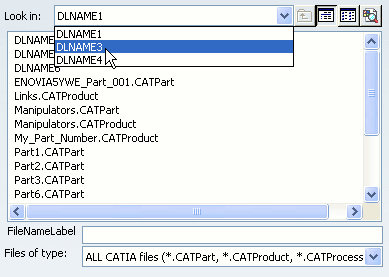
Click the black arrow next to "DLNAME1" to display a list containing the DLNames you have defined, then select the desired sub-DLName to access its content.
About the Look in list:
- If the option "Activate logical filetree for DLNames" is activated, the Look in list shows only the root DLNames. Their sub-DLNames are displayed in the Name column. In the picture above, "DLNAME1" contains three sub-folders named "DLNAME2", "DLNAME5" and "DLNAME6".
- If the option "Activate logical filetree for DLNames" is not activated, the DLNames are displayed in "flat" mode, i.e. all the DLNames you have defined are displayed in the Look in list.
By default, the List display mode is activated. This display mode only shows the file names.
To display your files in Details mode (which gives you information on the file size, the file type and the last modification date and time), click the Details button.

You can also rename files. To do so, right-click the file to be renamed then select Rename. This opens the Rename File dialog box that lets you enter the new file name.
However, note that in a DLName environment, V6 files cannot be renamed with a non-V6 extension (such as .xls, .doc, etc.). If you try to do so, then the original V6 extension is added to the new extension. For instance, let's suppose you want to rename a file named "MyPart.CATPart" in "MyPart.doc": this would give "MyPart.doc.CATPart".
When finished renaming the file, click OK to validate and close the Rename File dialog box.
- Select the desired file name and type from the list.
-
To search for a specific file or DLName, click Search
.
The look of the Search Results dialog box is identical in all the commands in which DLNames are integrated.
This behavior of this dialog box is identical to the one of the Search Results dialog box you access when configuring DLNames, except that:
- You can search for DLNames and for files stored in DLNames.
- An additional search option named Search for DLNames only is available. This option lets you restrict your search to DLNames.
For more information about the other advanced options, see Search for DLNames.
-
Select the Search for sub-DLNames check box.
-
In the Name box, enter the string to be searched for.
For instance, entering My* searches for any files or DLNames whose names start with the string "My".
The asterisk (*) is used as a wildcard to replace any number of characters. The question mark (?) is used to replace one character only.
Suppose the following example with two items, teston.CATPart and testoff.CATPart:
- testo*.* finds teston.CATPart and testoff.CATPart.
- testo?.* finds teston.CATPart.
- Use the Look in list to select the DLName in which you want to run your search.
-
Click Search.

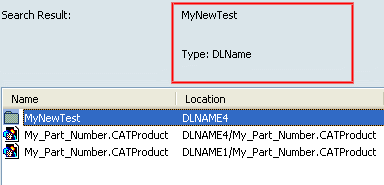
In our example, three items have been found: a DLName ("MyNewTest") and two .CATProduct files.
-
Select an item other than a DLName. The data contained in the Name, Location, Size, Type and Modified columns are displayed on top of the dialog box.
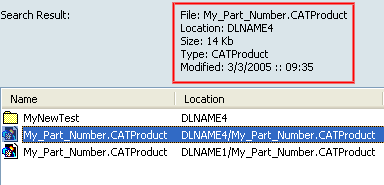
If you select a DLName, only the Name and Type are indicated.Note that you can select multiple search results. In that case, the total number of items selected and the total file size are indicated as follows.
For more information on this dialog box, see Search for DLNames.
-
When you have found the desired object, click OK
to close the Search Results dialog box.
The name of the object is displayed in the File name box of the Select File dialog box.
- Click OK to open the selected object.
-

