Search Order | ||
| ||
Linked Document Localization
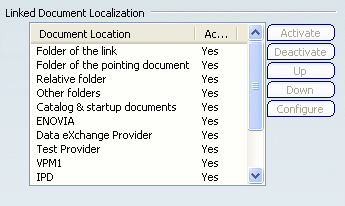
The primary aim of the Linked Documents Localization function is to resolve document links and to manage in an easy way the strategy that will be used to locate your linked documents. Its purpose is different from that of Edit > Links and Relations... (see Infrastructure User's Guide: Editing Links). This section shows you how to define a personal strategy for link resolution.
Important:
The Document Location column contains the various strategies you can choose to localize your linked documents. The Active column indicates whether a strategy has been activated (Yes value) or deactivated (blank value). |
-
Choose a strategy from the proposed list:
- Folder of the link: provides the absolute path which was saved in the link, i.e. the path used when you saved your document.
- Folder of the pointing document: provides the current folder of your document. This strategy is not recommended when working in a DLName environment ; use the Folder of the link strategy instead.
- Relative folder: provides a sub-folder with the same starting path. Note that choosing this strategy does not make sense if you are working in a DLName environment since the hierarchy used to store documents is different from the one used when working in a Folder environment (there is no "sub-folder" notion). Use the Folder of the link strategy instead.
- Other folders: provides a user-defined list of folders.
- Catalog & startup documents: provides the absolute path to catalogs and documents saved in the startup installation folder. When migrating from one release level to another, any link to a catalog or document located in the installation folder is automatically updated to match the new startup path.
- ENOVIA (appropriate license is required) for documents stored in ENOVIA.
- Data eXchange Provider
- VPM1 (appropriate license is required) for documents stored in ENOVIA VPM.
- IPD (appropriate license is required) for documents stored in DELMIA. This item appears in DELMIA products only.
- PLM1
- MX1 (appropriate license is required) for documents stored in SmarTeam database.
- SMT (appropriate license is required) for documents stored in SmarTeam database.
- VP5 for documents stored in ENOVIA VPM V5.
The following example illustrates more precisely the behavior of the first four strategies:

We use a product named Product1.CATProduct in /u/users/DS/. This product is linked to Part1.CATPart, which is stored in /u/users/DS/Sub/. Then, we moved Product1 to another folder, i.e. E:\tmp\DS\. This product is linked to Part1.CATPart, so you need to select a link resolution strategy. Depending on the strategy you select, the behavior is:
- Folder of the link: tries to locate Part1 in /u/users/DS/Sub
- Folder of the pointing document: tries to locate Part1 in E:\tmp\DS
- Relative folder: tries to locate Part1 in E:\tmp\DS\Sub
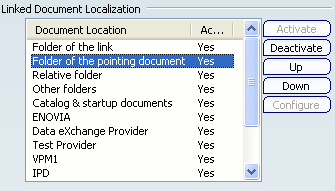
When the strategy is selected, click one of the buttons displayed in the right part of the dialog box.
These buttons are grayed out depending on the strategy you selected:
- Activate lets you activate a strategy that has been deactivated.
- Deactivate enables you to deactivate a strategy.
- Up and Down let you customize the strategy order.
- Configure is available for the Other folders strategy only.
Whichever action you choose for the strategy, you must restart your V6 session to take this modification into account. A warning message is displayed after clicking one of the above buttons.
When you click Configure..., a dialog box appears with a user interface depending on your current access mode. In our example, we are working in a File access mode.
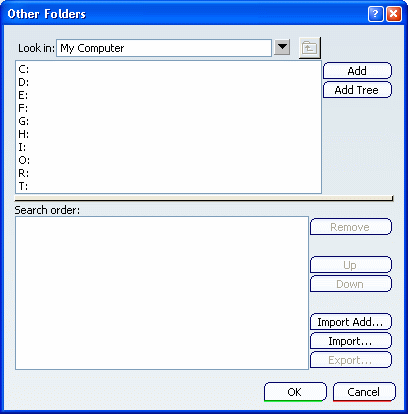
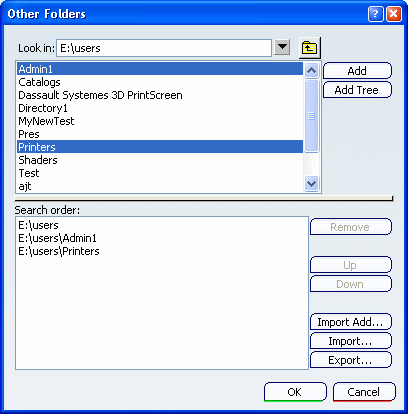
Select a directory in the Look in list then click Add.
This puts the directory into the Search order list:
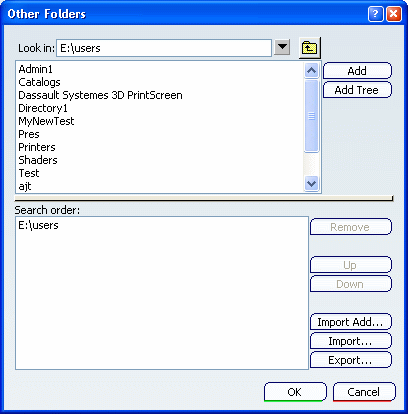
The Search order list is intended to contain the directories in which your linked documents are saved. You may wish to use different search order lists for particular uses and for different circumstances.
Tip: - If at least one document is already opened in your current session, a warning window is displayed to ask you to close then reopen the documents to take into account your modifications. Thus, it is recommended to close any opened documents before modifying the Other folders strategy.
- You can also click Add Tree to add the folder tree underneath the specified directory. However, the more elements, the longer the duration. This button is available for the Folder environment only. When working in a DLName environment, you can copy a DLName but not its folders.
- You do not need to enter the whole path in the Look in box: if you enter the main directory then press Enter, any subdirectories are then displayed in the list and you can then select the appropriate subdirectory before clicking Add.
-
Click the
 button to access your various directories or the
 button to move up in the directory's hierarchy.
 -
If needed, use the multiselection to add several folders to the search order:
Tip: - To change the priority of a directory i.e. move it up or down in the list, select it then click the appropriate button: Up or Down (multiselection is supported).
- To remove a directory, select it and click Remove.
- Remove, Up and Down are activated only when at least one item in the list is selected.
Click Export... to save the list as a .txt file in the appropriate location using the Export Search Order dialog box:
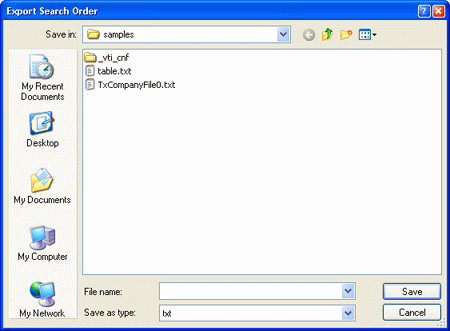
You can create as many lists as you like.
-
To reuse one of these lists, click Import.... to access the Import Search Order dialog box:
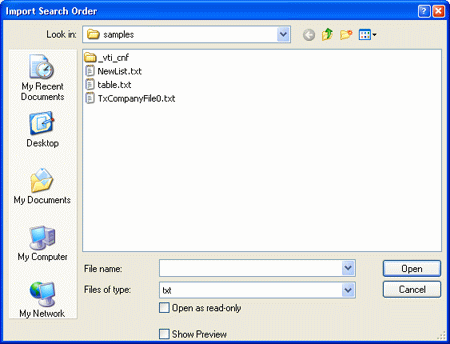
Tip: - You can right-click any of the .txt files to modify it. If you then click Open, the contents of the edited .txt file is placed in the list and replaces the elements previously contained, if any.
- Clicking Import Add... lets you import and add a search order contained in a text file to the current Search order list.