Applying Pipe Properties | ||||
|
| |||
Assign Pipe Properties
You can modify the properties of a pipe using the Edit Properties command.
Single click it and click Edit Properties
 in the balloon.
The Route Definition dialog box displays.
Note: The value of Nominal Size is undefined if you have not selected a value.
Click Route Size Table
 .
.Select a pipe reference and click OK.
The size value is displayed in the Nominal Size box, and corresponding values for material, diameter and thickness display in their respective boxes.
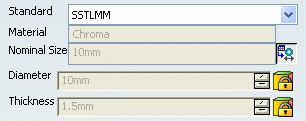
Important: The values are locked after you select from the Pipe Reference Table - their values are obtained from the table. Click Route Size Table
again. The Nominal Size value reverts to undefined, and the Diameter and Thickness values can be modified.
In the Route Bend Radius box, enter a bend value.
The bend value will be applied to all bends in the design.
You can also open the Turn Rules table and make a selection by clicking Bend Radius Table
 .
.If the Bend Radius column has a value, it will be used. When the value is 0, the bend radius is calculated by multiplying the diameter factor value by the bend diameter value.
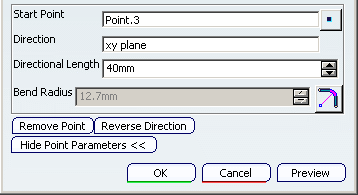
Optional: Select Point Bend Radius: Show Point Parameters to change the radius of selected points .
The dialog box is expanded to show more parameters for the selected point.
- Click Reset Bend Radius
to reset the selected point's bend radius to the global bend
radius.
- Click Reset Bend Radius
to reset the selected point's bend radius to the global bend
radius.
Note:
You can check the value set for the pipe property use the Edit > Properties command in the menu bar. You can also check the route properties using the Route Information ![]() command. To check the route properties, double-click the pipe and click Route Information
command. To check the route properties, double-click the pipe and click Route Information ![]() that appears on the right side of the graphic area.
that appears on the right side of the graphic area.