Right-click the sheet item in the specification tree
and select Sheet.X object > Print Area > Edit Print Area,
or activate the sheet and select Edit > Sheet.X object > Print
Area > Edit Print Area.
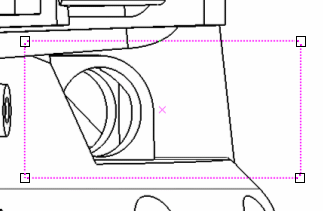
This zooms onto the print area, which is outlined as
a purple dashed box, with an X cross at its center.
Use the manipulators at the corners of the box to re-dimension
the print area.
Drag the dashed box or the central X cross to re-position
the print area.
You can then exit the print area visualization mode
by pressing the Escape key or by clicking elsewhere in the
drawing. You can check the sheet properties to make sure that the coordinates,
width or height have been updated.
Change the sheet properties as wanted, and then click
OK to validate.
|