Printing a Sheet | |||||
|
| ||||
Select PLM Access > Print....
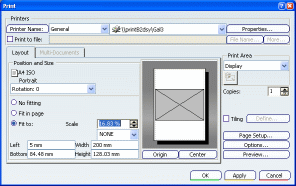
The Print dialog box is displayed.

Choose your print options as required.
Note: For detailed information, refer to Infrastructure User's Guide: Printing Documents. The Customizing Print Settings and Printing Objects with Multiple Sheets tasks should prove particularly helpful.
In particular, you can set the options in the Print Area section to define precisely the area you want to print. The following choices are available:
- Whole Document: prints the entire sheet.
- Display: prints the sheet as seen on screen.
- Selection: prints a selected area. This activates Selection Mode
 . Click this icon and drag the cursor on the drawing or layout to define the print area.
 - Document
area: prints the print
area previously defined for the sheet. Refer to Visualizing the Print Areafor more information.
Note: The Document area option appears only if you activated the print area in the sheet properties prior to accessing the Print dialog box.
Optional: If the current document contains several sheets, click the Multi-Documents to specify additional choices.
Click OK to print the sheet and close the Print dialog box.
Important: - When printing a sheet, the current filter and layers (those used for screen display) are taken into account. For more details on layers and filters, refer to Infrastructure User's Guide: Viewing Objects: Using Layers and Layer Filters.
- Elements such as constraints, construction elements and view frames are not printed.