Using Drawing Tools | |||||
|
| ||||
Tools
The Tools toolbar displays a number of options. This toolbar is situated at the bottom right of the screen. If you cannot see it properly, you can undock it.
The options available in the Tools toolbar are explained below.
 Snap to Point
When activated, this option makes your geometry (as well as 2D components) begin or end on the points of the grid. As you create geometry, points are forced to the intersection points of the grid. Note that this option is also available via Tools > Options > Mechanical > Drafting > Display tab.
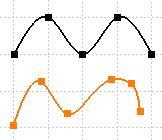
In this example, the black spline was created with the Snap to Point option activated. The points are on the grid.
Conversely, the highlighted spline was created with the option deactivated. The points are not necessarily on the grid.
| Important: You can use autodetection even if this option is activated. |
 Create
Detected Constraints
Create
Detected Constraints
When activated, this option creates lasting constraints. If you do not activate this icon, the constraints you create are temporary: the geometry is only temporarily constrained, which means that it can subsequently be moved without being constrained.
 Preserve modifications
of graphical properties
Preserve modifications
of graphical properties
| Important: This command is active provided you installed a Generative Drafting license. |
When activated, this option preserves the graphical modifications you apply to generated geometry when the view is updated. To restore graphic modifications in a view, right-click the view frame and select View object > Restore Properties. For more information, refer to Generative Drafting User's Guide: View Content Customization: Managing the Graphical Properties of Generated Geometry and Dress-up. By default, this option is activated.
![]()
Visualization
The Visualization toolbar displays a number of visualization-related options. This toolbar is situated at the bottom right of screen, after the Tools toolbar. If you cannot see it properly, you can undock it.
![]()
The options available in the Visualization toolbar are explained below.
 Grid
Grid
Activate this option to display the grid in your session. The grid will help you to draw geometry in given circumstances. For example, the grid will make it easier to draw profiles requiring parallel lines. Note that this option is also available via Tools > Options > Mechanical > Drafting > Display tab.
 Show
Constraints
Show
Constraints
Activate this icon to display the constraints. For more information, refer to Interactive Drafting: Constraints.
 Display View
Frame as Specified for Each View
Display View
Frame as Specified for Each View
When activated, this option lets you display the view frame which is available for each view, as specified in each view's properties (Edit> Properties, View tab, Display View Frame check box). In this case:
- The view frame will be displayed for all views for which the Display View Frame check box is selected.
- The view frame will be hidden for all views for which the Display View Frame check box is cleared.
Deactivating this option hides the view frame for all views.
 Elements' Analysis
This option lets you visualize the colors assigned to the different types of dimensions.
These displayed colors correspond to the colors customized in the Options dialog box. To modify these colors, go to Tools > Options > Mechanical > Drafting > Display tab. Then select the Activate element's analysis check box and click the Configure button to assign the desired color(s) to the desired dimension types.
![]()
Tools Palette
The Tools Palette appears whenever you select a command for which specific options or value fields are available. This enables you to know immediately when tools are available for a command.
For example, when creating a line, the values of the elements you are sketching appear in the Tools Palette as you move the pointer. In other words, as you are moving the pointer, the Length (L) and Angle (A) boxes display the coordinates corresponding to the pointer position.
Important:
Value boxes in the Tools Palette:
|
Below are a few examples of options and value boxes available in the Tools Palette.
|
|