Managing Geometrical Sets | |||||
|
| ||||
Insert a Geometrical Set
You can add a geometrical set in the specification tree.
Select additional entities that are to be included in the new geometrical set.
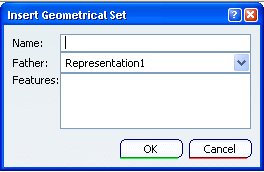
Tip: If all selected entities belong to the same geometrical set, the father of the new geometrical set is automatically set to the father of these entities.
![]()
Remove a Geometrical Set
You can remove ta geometrical set from specification tree.
- Two methods are available:
- If you want to delete the geometrical set and all its contents: Right-click the geometrical set then select the Delete contextual command.
- If you want to delete the geometrical set but keep its contents. This is only possible when the father location of the geometrical set is another geometrical set. This is not possible when the father location is a root geometrical set. Right-click the desired geometrical set then select the Geometrical Set.x object > Remove Geometrical Set contextual command. The geometrical set is removed and its constituent entities are included in the father geometrical set.
| Warning: You cannot delete a feature within a geometrical set created on the fly. Indeed this geometrical set is considered as private and can only be deleted globally. |
![]()
Move a Geometrical Set to a New Body
You can move a whole branch, i.e. a whole body and its contents, at a time.
From the specification tree, select the geometrical set then choose the Geometrical Set.object > Change Geometrical Set... item from the contextual menu.
The Change geometrical set dialog box is displayed, listing all the possible destinations.
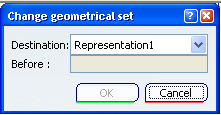
Click OK to move the geometrical set to the new body.
The geometrical set is moved to its new location in the specification tree, but geometry remains unchanged.
Important: When elements are imported using external references or through a Copy-Paste As result with link, the Change geometrical set command is not available through the contextual menu. Use the Edit > Links and Relations menu bar item instead. For more information, refer to Editing Links and Relations in the Infrastructure User's Guide.
![]()
Move Elements of a Geometrical Set to a New Body
You can move elements of a geometrical set to a new body.
From the specification tree, select the element(s) then choose the Extrude.2 object > Change Geometrical Set... item from the contextual menu.
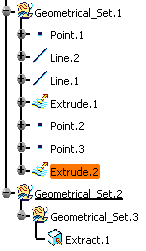
The Change geometrical set dialog box is displayed, listing all the possible destinations.Important: Multi-selection of elements of different types is supported. However, note that the contextual menu is not available, and that you can access this capability using the Edit menu item. 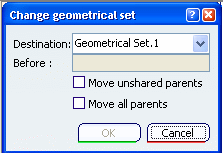
Select the element above which the one you already selected is to be inserted.
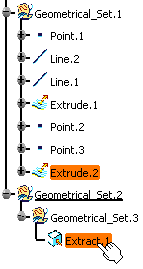
You can directly select this positioning element. In this case the Destination box is automatically updated with the body to which this second element belongs.Click OK to move the elements to the new body.
The element selected first is moved to its new location in the specification tree, but geometry remains unchanged.
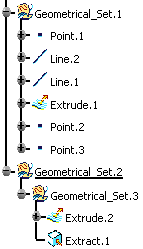
- Select the Move unshared parents check box to move all parents of the first selected element to its new location, provided these parents are not shared by any other element of the initial body. In this case, all the unshared parents are highlighted prior to the move.
- Select the Move all parents check box to move all parents of the first selected element to its new location, regardless of whether these parents are used (shared) by any other element of the initial body. In this case, all the parent elements are highlighted prior to the move.
Warning: - Contextual parents cannot be moved.
- You cannot move some elements of a multi-output alone to another body: only the whole multi-output can be moved.
- Multi-selection of elements of different types is supported. However, note that in this case, the contextual menu is not available, and that you can access this capability using the Edit menu item.
- You cannot move external references to another body.
![]()
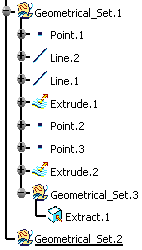
Sort the Contents of a Geometrical Set
You may need to sort the contents of a geometrical set, when the geometric elements no longer appear in the logical creation order. In that case, use the Auto-sort capability to reorder the geometrical set contents in the specification tree (geometry itself is not affected).
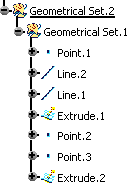
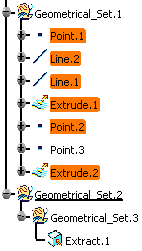
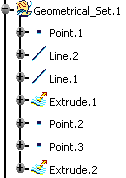
In our example, Geometrical Set.1 contains two extruded surfaces based on point-point lines. The specification tree looks like this:
- Right-click Geometrical Set.1 from the specification
and choose the Geometrical Set.1 object > AutoSort
command.
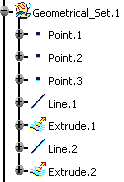
Instantly, the contents of the Geometrical Set are reorganized to show the logical creation process.
The geometry remains unchanged.
![]()
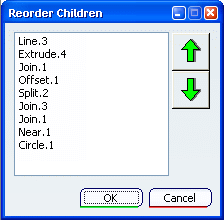
Reorder Elements within a Geometrical Set
You can reorder elements inside the same geometrical set.
Use the arrows to move an element up or down.
Important:
Note
that the feature defined as the In Work Object after the Reorder
operation is not affected by this operation from an update point
of view:
|
Tips:
|
![]()
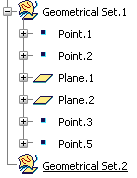
Drag and Drop Elements
You can drag one element (feature or parent's node) from one location, drop it to another location and keep its original name and location.
- For instance, drag Geometrical Set.1 and drop in Geometrical
Set.2.Before
 After
After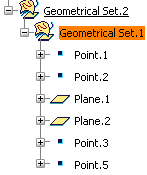
Important: - If you drag and drop a parent's node, the name and location of the children also retained.
- If multi-selected elements are dragged from one location and dropped to another, only the first feature of the multi-selection is dropped.