More About Breakout Views | |||||
|
| ||||
Conditions Applicable to Breakout Creation
You need to consider the conditions that apply when creating breakout views. This sub-topic provides information about those conditions.
You can create breakout views on:
- projection views.
- auxiliary views.
- section views.
- a view that already contains breakouts.
Once created, the breakout view profile cannot be modified.
You cannot create breakout views on:
- section cuts.
- detail/ clipping views.
- broken views.
Important:
|
![]()
Breakout Removal
This sub-topic provides information about the removal of breakouts.
To remove a breakout, choose either of the following methods:
- Once the breakout view is created, right-click the view, and select View Definition > Remove breakout. All the breakouts will be removed.
- Right-click the edge of a resulting breakout and select View Definition > Remove breakout. Only this breakout is removed.
![]()
Propagation of Breakout Specifications
This sub-topic provides information about the propagation of breakout specifications to other views.
Propagation of Specifications: Definition
Propagating a specification means generating a view (B) from another view (A) on which you previously performed an operation, and including this operation in the generated view (B).
For example, you create a broken or breakout view (view A) and select the Propagation of broken and breakout specifications option. You then generate a projection view (view B). As a result, the projected view (view B) appears with the broken/breakout area.
How to Propagate Breakout Specifications
Breakout specifications can be propagated when creating projection views, auxiliary views, section cuts and detail views from a breakout view.
| Important: Breakout specifications are not propagated to section views. |
To propagate the specifications, go to tab, and select Propagation of broken and breakout specifications.
You can also propagate the specifications manually: right-click the view, select and click another view to apply the breakout to it.
![]()
The Cut in Section Views Capability
This sub-topic provides information about the Cut in section views capability relating to breakouts.
In an assembly, you can specify whether product should or should not be sectioned when generated into section views or breakout views. (This capability is not available for section cuts.)
The 3D part not to be cut, has to own a dedicated Boolean property (refer to PLM Customization documentation to add this property) named E_DrwUncutInSections, valuated as TRUE through Product > Edit > Properties.
You can also do this when overloading element properties in a generated view.
| Important: If you choose not to cut elements in section views (i.e. if you clear the Cut in section views option), note that this capability does not work for section or breakout views generated using the Approximate generation mode: selected elements will be cut nonetheless. Likewise, if you switch an exact view to the approximate mode, the elements for which you cleared the Cut in section views option will be cut in the view nonetheless. |
![]()
Patterns
This sub-topic provides information about the patterns which are used to represent breakouts.
Patterns are defined in the standards. For more information, refer to Administration: Setting Standard Parameters: Pattern Definition.
You may modify the pattern (hatching, dotting, coloring or motif) by right-clicking it and selecting Properties from the contextual menu. This will display the Properties dialog box in which you may either select a new pattern or modify some graphical attributes of the existing pattern. For more information, refer to Interface Description: Dialog Boxes: Properties Dialog Box: Pattern Tab.
| Important: In the case of parts which use a material to which a specific pattern is associated, views generated using the Approximate generation mode do not inherit the material properties from the 3D, and therefore do not use the pattern associated to this material. Furthermore, as pattern properties are not persistent, the pattern may change after switching an exact view to the approximate mode and vice versa. |
![]()
Line Types
This sub-topic provides information about line types in breakout views.
If you choose the zigzag linetype (linetype #8), note that this linetype is just a graphical dress-up of the view. This means that if one line is relimited on the breakout line, then it will be relimited on the theoretical line as shown here, and not on the visualized zigzag line.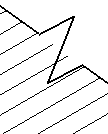
![]()
About Graphic Dress-Up Properties of Breakout View Profiles
If you modify the graphic dress-up properties of a breakout operator profile, then, they remain persistent even after updating the view and get applied to all the profile lines of the breakout operator.
Note: Persistency of graphic dress-up properties is available only for views created using the Exact or the Approximate mode of view projection.
If you select any profile line of a breakout operator profile and modify its graphic properties such as color, linetype, linethickness, delete, layer and hide/show, and update the view or use c:force update, then all the profile lines of that breakout operator are assigned with the new graphic dress-up properties.
Note: The graphic properties of the breakout operators modified through the Edit > Properties or through the Graphic Properties toolbar take precedence over overloading of the graphic properties done using the contextual command XXX object > Overload Properties.
Switching Between Exact and Approximate View Modes
- The graphic dress-up properties for the operators are maintained independently for Exact and Approximate view modes. Therefore, if you switch between these two view modes, you can visualize the latest set of modified graphic dress-up properties for those particular operator profile lines in that particular view mode. However, if there is no last modification available for those operator profile lines for that view mode, then the default properties set in the standard for that operator in that view mode are seen.
- For example, you can assign one set of graphic dress-up values for the breakout operator in exact view mode and another set of graphic dress-up values for the same breakout operator in approximate view mode. When you switch between exact and approximate view modes, you can visualize the profile lines of that same breakout operator differently.