In the Structural Properties toolbar, click Imported Composite Properties  .
.
The Imported Composite Property dialog box appears.
Optional:
In the Name box,
modify the property name.
Select a 2D body as property support.
By default, all the composite design contained in the selected 2D body is selected.
In the Analysis list, select one of the following approaches:
- By zone to take into account the preliminary design defined in the Composite Design workbench. The stacking order is not taken into account.
- By ply to take into account manufacturing parameters (producibility). The producibility parameters allow realistic computation of composite fiber orientation on geometry by taking into account the way of applying fibers on this geometry (stacking order). You can define a fiber orientation on geometry even if the geometry is collinear to the Z-axis of the composite rosette.
To refine the ply or zone selection:
- Click
 .
.
- If you selected By
zone, select one or several zone groups. If you selected By ply, select one or several plies or ply groups.
- Click Close.
If you selected By ply, you can transfer producibility and take into account manufacturing parameters.
- Click
 .
.
- Select the Transfer producibility check box.
- Click Close.
Optional: To take into account the draping direction defined in the Composite Design workbench in the surface offset computation, clear the Symmetrical check box.
By default, the Symmetrical check box is selected. Thus, the thickness is distributed symmetrically.
Symmetrical distribution applies the composite thickness as though the selected supports are at the center of the composite thickness. Toggling this option off lays (drapes) the composite thickness on top of the supports as they would be layered on top of a mold; appropriate offsets are added in the analysis to account for the thickness. This option usually makes little difference for thin composites or models with few plies.
In the Type list, select one of the following physical types:
-
Shell to add a shell physical behavior to the composite property. See Shell Property.
- Membrane to apply a membrane physical behavior to the composite property. See Membrane Property.
-
Shear panel to apply a shear panel physical behavior to the composite property. See Shear Panel Property.
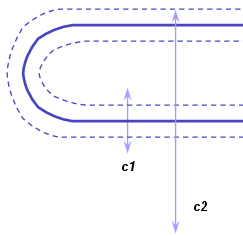
To control the number of zones or plies to be used in the simulation context, select the Core sampling depth check box, and enter a value to define the core sampling.
A core sampling depth equal to 0mm means that the sampling is done endlessly.
In the following example, a core sampling depth equal to c1 is correct, and a core sampling depth equal to c2 gives incorrect results.

Click OK.