Edit the Color Map
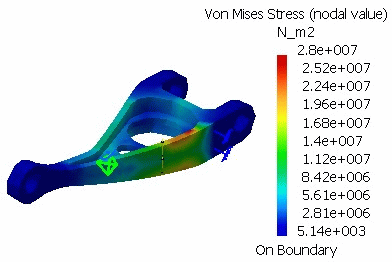
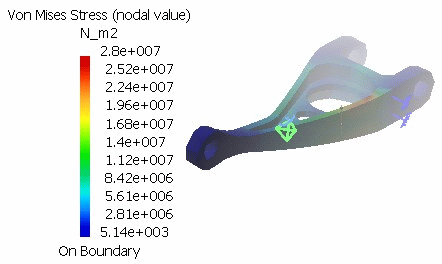
Editing the color map enables you to emphasize on particular values spread on
your model.
Double-click the color map either in the specification
tree or in the 3D view.
The Color Map dialog box appears.
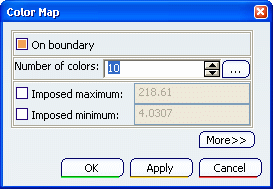
If you want to compute the colors according to the
boundary based on elements, select the On boundary check box.
In this case, On boundary is displayed under the color map to
indicate that this option is activated.
If you want to compute the colors according to the overall entities,
clear the On boundary check box.
Optional: In the Number of colors box, modify the number
of colors that you want to use in the color map. Optional: To modify the color
distribution, click
 . . The Colors dialog box appears. - If you want to use a discrete color map, select the Discrete
check box. This option is useful when the number of separate
values is not large. In this case the number of colors in
the color map is deducted from the number of separate values
(for example: material images, physical type images). The
Discrete option is available only if the
number of separate values is less than 30.
- If you want to smooth the colors, select the Smooth
check box.
- If you want to inverse the color order in the color map,
select the Inverse check box.
If you want to impose a maximum value, select the
Imposed maximum check box, and enter a value. If you want to impose a minimum value, select the
Imposed minimum check box, and enter a value. Optional: To modify advanced
parameters, click More>>.
The Color Map dialog box enlarges to give you access to
other parameters.
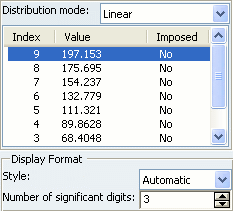
Optional: In the
Distribution mode list, select one of the following distributions: - Linear to distribute regularly the values
between the minimum value (computed or imposed) and the
maximum value (computed or imposed).
- Histogram to distribute values so that each
interval contains the same number of entities. The
Histogram distribution is not available if the
Imposed maximum and
Imposed maximum check boxes are selected.
- Logarithmic to distribute logarithmically the
values between the minimum value (computed or imposed) and
the maximum value (computed or imposed). The
Logarithmic distribution is available only if the
minimum value (computed or imposed) is strictly positive.
Optional: To impose or
release a particular value, right-click a line in the list and select
Impose or Release. Optional: To edit a
particular value, right-click a line in the list and select Edit....
The Edit Value dialog box appears
- Enter a new
value.
- Click OK.
The new value is taken into
account in the list, and this value is considered automatically
as imposed.
Optional: Modify the display
format. - In the Style box, choose one of the following
formats: Scientific,
Decimal, or Automatic.
- In the Number of significant digits box,
modify the number of digits you want to display.
Click Apply to apply the modifications. Click OK.

Move the Color Map
You can move the color map for a better display of your results.
Click the color map. The part
viewer is deactivated and the image visualization is shaded.
Drag and drop the color
map to the desired location. Click again the color map to fix it at the desired location.
|