Analyzing Sketched Geometry | ||||||
|
| |||||
Click Sketch Analysis
 in the Tools toolbar (2D Analysis Tools sub-toolbar).
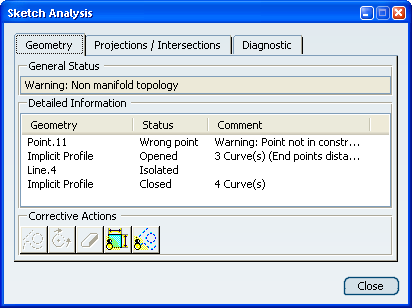
The Sketch Analysis dialog box appears. It contains three tabs: Geometry, Projections / Intersections and Diagnostic.
Note that some geometrical items and constraints are highlighted so that you can see them easily.
The Geometry tab displays information helping you know whether the sketch geometry is valid. In the Detailed Information table, select an item.
Select the Diagnostic tab.
The information on this tab displays a full diagnosis of a sketch geometry. It provides a global analysis of the sketch as a whole, and specifies whether individual geometrical elements in the sketch are under-constrained (under-defined), over-constrained (over-defined) or iso-constrained (well defined):
Re-open the Sketch Analysis dialog box and select the Diagnostic tab.
You can notice that the items you fixed are now iso-constrained.