Creating Three Point Arcs Starting with Limits | |||||
| |||||
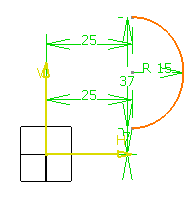
Click Three Point Arc Starting With Limits
 in the Profile toolbar (Circle sub-toolbar).
Repeat the operation to define the end points and then the second point, that is the point which the arc will go through).
- End Point (H:25mm and V: 7mm)
- Second Point (R: 15mm)
When done, the three point arc results as shown here:
Tip: Constraints are assigned to this arc on the condition that: - You activated Dimensional Constraints
 in the Sketch tools toolbar before starting the
scenario.
in the Sketch tools toolbar before starting the
scenario. - You entered coordinate values in the fields (you did not create the profile just by clicking)