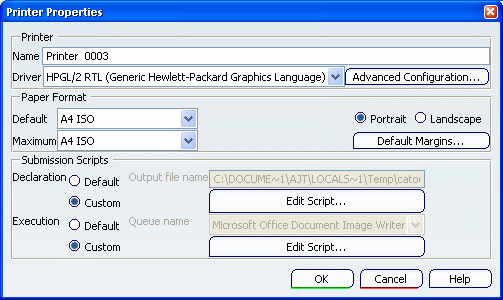
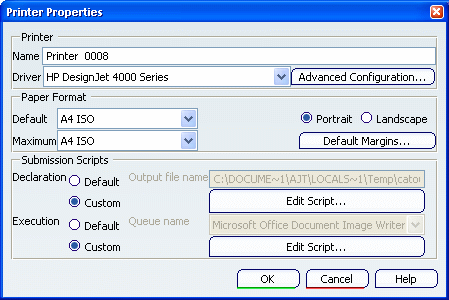
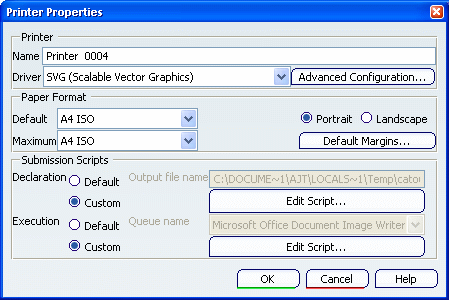
Access the Printer Properties Dialog Box
The Printer Properties dialog box can be accessed from .
Select .
The list of available printers is displayed in the Printer list
area:
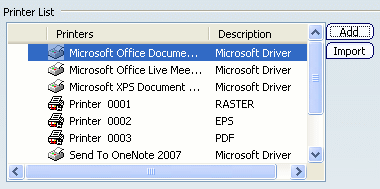
Right-click the printer of your choice then select
Configure (or double-click the printer name).
The Printer Properties dialog box lets you define the configuration to be used for the driver.

Configure a Raster Printer
You can define file format and compression options for Raster printers.
Right-click the RASTER printer in the list then select
Configure (or double-click the printer name).
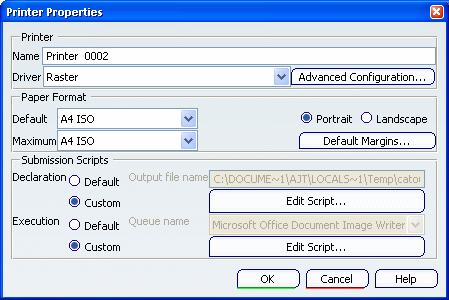
Click Advanced Configuration....
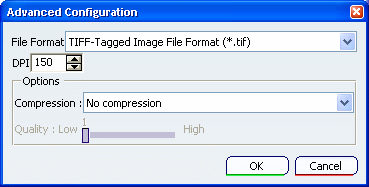
Select the format to be used from the Format list: TIFF, BMP, JPEG,
WMF, etc.
You can also set more precisely the desired DPI value using the
Dpi box.
In the Options area, select the compression type:
- No compression
- Packbits
- JPEG
- HUFFMAN
- Fax Group 4
If you choose the JPEG type, the Quality slider is
activated to let you specify the compression quality: the higher
the rate, the better the quality.
When finished, click OK to validate and close the
Advanced Configuration dialog box.
See also Raster Format for more information on line ends.
The Raster printer is configured.
Configure a PDF Printer
You can define text rendering and font substitution options for PDF printers.
Right-click the PDF printer in the list then select
Configure (or double-click the printer name) to access
the Printer Properties dialog box:
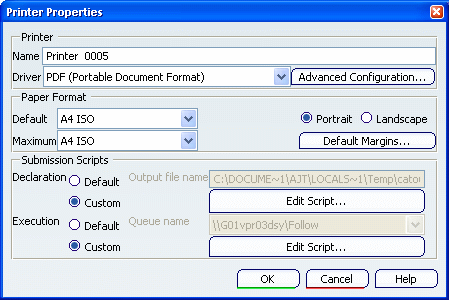
Click Advanced Configuration....
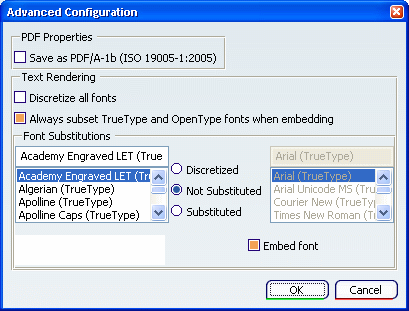
Optional: In the PDF Properties area, activate the Save as PDF/A-1b option to generate PDF files compliant with PDF/A-1b standards.
In the Text Rendering area, activate the appropriate options:
- Discretize all fonts: if this option is activated, all
text strings will be tessellated.
Activating this option grays out the options in the
Font Substitution area because they are not relevant in that case.
By default, this option is cleared.
- Always subset TrueType and OpenType fonts when embedding: if this
check box is selected, a subset of TrueType or OTF fonts is embedded in the PDF file.
The size of many TTF or OTF font files is huge, for instance when they define an entire range of Unicode or CJK characters. This capability lets you remove outline information about glyphs which are not displayed and thus, lets you significantly reduce the file size while keeping the same visual result. For more information about TTF and OTF fonts, see Infrastructure User's Guide: Customizing: Fonts: About Fonts. By default, this option is activated.
In the Font Substitutions area, select a font then set the property
of your choice by selecting the appropriate option: - Discretized: when the image suffers from a lack of
points, points are distributed to fill the gaps and ensure
linearity.
- Not Substituted: the font is kept as is, it is not
replaced by any font. The text with this font will be either
embedded (if the Embed font option is selected), or
linked (if the Embed font option is cleared) in the PDF
file.
- Substituted: lets you replace the selected font by a
suitable replacement font you select in the list displayed to the
right of the options. This list is activated as soon as the
Substituted option is selected.
Optional: Leave the Embed font option activated if you want the
font file to be embedded.
- If the check box is cleared, the font file will not be embedded but the font will be linked.
- If the text contains non-ASCII characters (e.g. Japanese characters), then the font file will always be embedded.
In case of font substitution, if the substituting font is one of
the following standard PS fonts listed below, then the font file
will not be embedded:
- Times-Roman, Times-Italic, Times-Bold, Times-BoldItalic
- Helvetica, Helvetica-Oblique, Helvetica-Bold,
Helvetica-BoldOblique
- Courier, Courier-Oblique, Courier-Bold,
Courier-BoldOblique
- Symbol, ZapfDingbats.
Note that if the Discretized option is selected, the
Embed font option is grayed out.
Click OK to validate and close the Advanced
Configuration dialog box.
The PDF printer is configured
Configure a PostScript Printer
You can define advanced PostScript generation options for PostScript printers.
Right-click the PostScript printer in the list then select
Configure (or double-click the printer name).
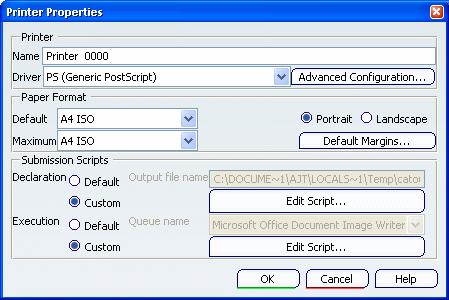
Click Advanced Configuration....
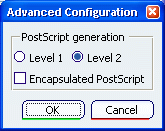
Choose the level for PostScript generation by selecting the
appropriate option. To use the EPS format, select the Encapsulated
PostScript check box.
EPS does not contain page description directives and is designed
for portable exchange between applications and platforms. It may
also be included in a larger PostScript document.
The PostScript printer is configured.
Configure an HPGL Printer
You can define pen options for HPGL printers.
Note that you can also configure an HPGL printer via the HPGL2 advanced configuration options.
Right-click the HPGL printer in the list then select
Configure (or double-click the printer name)
.
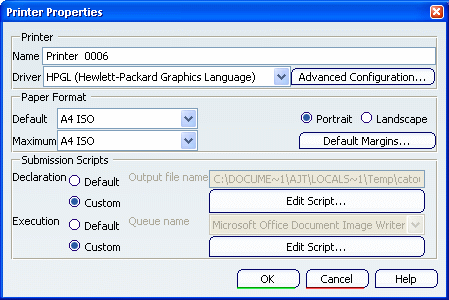
Click Advanced Configuration....
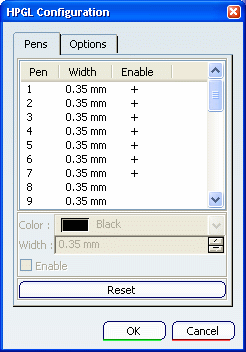
The Pens tab lets you create a mapping between the
original document and the result in HPGL format by defining the
width and color to be applied to pens that will be used. Each of
the pens is associated to a color (RGB) and a thickness (in
millimeters).
To do so, the pens to be used are selected using the following
priority order:
- First, by their color in order to use a color matching (exactly
or as close as possible) the one of the original document.
- Then, by their width. The width that is used corresponds either
to the real width (i.e. as defined in the model) of the element to
be drawn or to the width of the pen, depending on the option you
activate for Thickness
Printing.
The goal of this capability is to have the printing that best suits
your device specifications with respect to the limitations inherent
in HPGL printer language.
Note that the smallest units that can be supported by HPGL are 40
units per millimeter (1016 per inch). As the accuracy cannot exceed
this value, discrepancies might occur when comparing documents
(32-bit/64-bit, for instance).
Select a pen from the list.
As soon as a pen is selected, the other boxes displayed below are
activated and you can then specify the color and the width to be
applied to the selected pen.
By default, each pen you select is already assigned a color and a
width but you can modify them as needed using the Color
list and the Width box.
Select the Enable check box if you want the selected pen
to be used when printing. When a pen is active, it is identified by
a "+" sign in the Enable column.
Access the Options tab
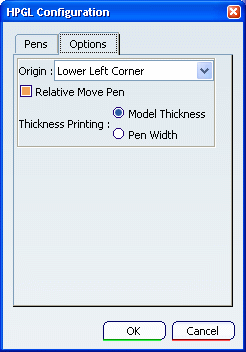
Indicate the location at which the pen will start using the
Origin list. Optional: Select the Relative Move Pen check box if you want the
pen to move relative to current coordinates (this is the default).
Optional: Select the thickness to be used for printing by selecting one of
these two options:
- Model Thickness to print according to the
model thickness (this is the default). Pens are parsed until a pen
with a thickness matching exactly the one of the model is found.
- Pen Thickness to print according to the pen
thickness. Pens are parsed and the first pen whose color
corresponds exactly or is as close as possible to the original
color, whatever its thickness, is selected.
For instance, if you define a pen as "Red" (RGB = 255-0-0) with a
thickness of 0.18 mm, then each red curve in the model will be
printed with a thickness of 0.18 mm and this, even though the
original curve thickness in the model is 5 mm.
Click OK to validate and close the dialog box.
The HPGL printer is configured.
Configure an HPGL2 Printer
You can define media type and quality level options for HPGL2 printers.
Right-click the HPGL2 printer in the list then select
Configure (or double-click the printer name).
Click Advanced Configuration....
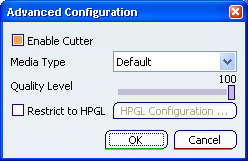
The Enable Cutter check box is selected by default and
means that the media is cut after printing.
Select the desired Media Type (i.e. the type of paper to
be used) from the list: paper, polyester film, etc.
Define the Quality Level using the slider.
Select the Restrict to HPGL check box if you want to use
the printer for HPGL data only.
Activating this option also activates HPGL
Configuration... which lets you access the HPGL Configuration dialog box.
When finished, click OK to validate.
The HPGL2 printer is configured.
Configure an HP DesignJet 1000 Series Printer
You can define media and quality options for HP DesignJet 1000 Series printers.
Right-click the HP DesignJet 1000 Series printer in the list then
select Configure (or double-click the printer name).

Click Advanced Configuration....
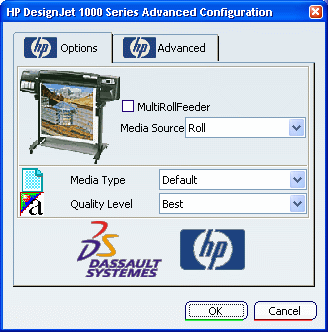
In the Options tab, specify how the printer will be loaded using the Media
Source list.
For printers with an integrated multi-roll feeder, you also need to
select the MultiRollFeeder check box option to specify
the roll to be used: to do so, select the desired roll number from
the Media Source list.
Use the Media Type list to indicate the type of media to
be used.
Select the Quality Level to be used. By default, Best
is selected.
Access the Advanced tab.
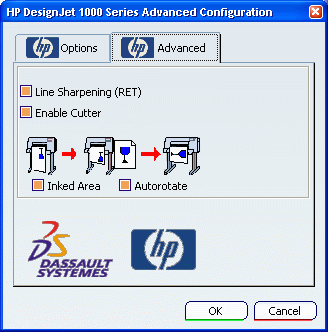
Optional: By default, all the options displayed are selected but you can
deactivate them if needed:
- Line Sharpening (RET) enhances detail in line drawing. It is especially useful for drawings with a lot of details.
- Enable Cutter activates the cutter mechanism which cuts the media after printing.
- Inked Area takes the first object encountered in the plot and places that object at the origin (0,0 coordinate). After the last object is printed, the printer adds the margin and the plot is complete. When this option is activated, white area around the plot, as well as page size information coming from the software is ignored. This option is recommended when using roll media and when centering is not important. This option also provides optimal paper usage.
- Autorotate lets the printer decide at print time which orientation requires the least media for your drawing based on the "roll media" that is loaded.
When finished, click OK to validate and close the dialog box.
The HP DesignJet 1000 Series printer is configured.
Configure an HP DesignJet 4000 Series Printer
You can define media and quality options for HP DesignJet 4000 Series printers.
HP DesignJet 4000 Series printer is now natively integrated in
Dassault Systemes PLM solution thanks to the support of a dedicated
driver.
HP DesignJet 4000 Series printers allow you to rapidly produce
higher-quality large-format prints, addressing demand for improved
printing precision, especially for technical drawings.
For detailed information, you can browse the HP Internet
site:
http://www.hp.com
Right-click the HP DesignJet 4000 Series printer in the list then
select Configure.
Click Advanced Configuration....
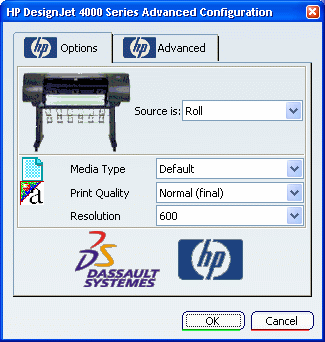
Specify how the printer is loaded using the Source is
list:
Use the Media Type list to indicate the type of media to
be used. Select the Print Quality to be used. By default, Normal (final) is
selected.
Indicate the Resolution to be applied. By default, 600 is selected. Access the Advanced tab.
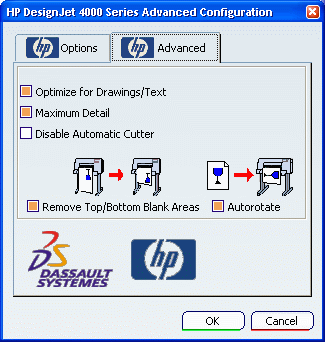
Optional: By default, some options are selected but you can deactivate them
if needed:
- Optimize for Drawings/Text enhances detail in line drawing. It is especially useful for drawings with a lot of details.
- Maximum Detail enables to view as much detail as possible by increasing both the printing and rendering resolution.
- Disable Automatic Cutter deactivates the cutter mechanism which cuts the media after printing.
- Remove Top/Bottom Blank Areas takes the first object encountered in the plot and places that object at the origin (0,0 coordinate). After the last object is printed, the printer adds the margin and the plot is complete. When this option is selected, white area around the plot, as well as page size information coming from the software is ignored. This option is recommended when using roll media and when centering is not important. This option also provides optimal paper usage.
- Autorotate lets the printer decide at print time which orientation requires the least media for your drawing based on the "roll media" that is loaded.
When finished, click OK to validate and close the dialog box.
The HP DesignJet 4000 Series printer is configured.
Configure an SVG Printer
You can define image storage, text rendering, and font substitution options for SVG printers.
Right-click the SVG printer in the list then select
Configure (or double-click the printer name).
Click Advanced Configuration....
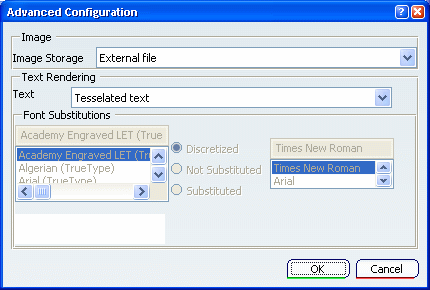
Use the Image Storage list to indicate if you want the
image to be stored in an external JPEG file (with links to the SVG
file) or to be embedded in the SVG document.
The Text list lets you specify whether the text should
be rendered as a tessellated text or using system fonts: - Tesselated text means that all glyphs will be
displayed as polygons. If you choose this option, skip the next
step.
- Use system font lets you replace the font of
your choice by another one.
If you selected Use system font in the Text
list, the Font Substitutions area is activated to let you replace
the font of your choice by another one. To do so, first select a
font in the list displayed to the left then select the appropriate
option:
- Discretized: means that when the image suffers from a
lack of points, points are distributed to fill the gaps and ensure
linearity.
- Not Substituted: means that the selected is not replaced
by another font, it is kept as is.
- Substituted: means that the selected font is replaced by
a suitable replacement font you select in the list displayed to the
right. This list is activated as soon as the Substituted
option is selected
.
When finished, click OK to validate and close the dialog box.
The SVG printer is configured.
Configure an EMF Printer
No advanced configuration options are available when using a EMF
printer.
|