Selecting Using the Find... Command in General Mode | ||||||
|
| |||||
Run a Quick Search for a Named Object
You can search for an object by its name.
Select Edit > Find... (or press Ctrl+F).
In the Find dialog box, click the General tab:
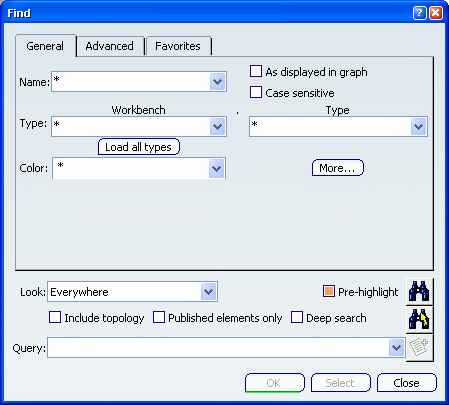
Enter the name to be searched for in the Name box, for instance sketch*.
Searching using the object name is particularly useful if you renamed objects in the Feature Properties tab using Edit > Properties, or the Properties contextual command. The list below Name stores the names you entered during previous searches so that you can select them. The names are stored only as long as the session is active: closing the session clears the list.
Important: - The search mechanism is based on the specification tree and as the specification tree shows only product instances (except for the root product which is a reference), it is not possible to search for part numbers. The value you enter in the Name box is searched in instance names only.
- The search for topology uses specific processes to improve performance for the most time-consuming queries. Therefore, the performance does not always depend on the scope size.
Click the Find
 button to run the search:
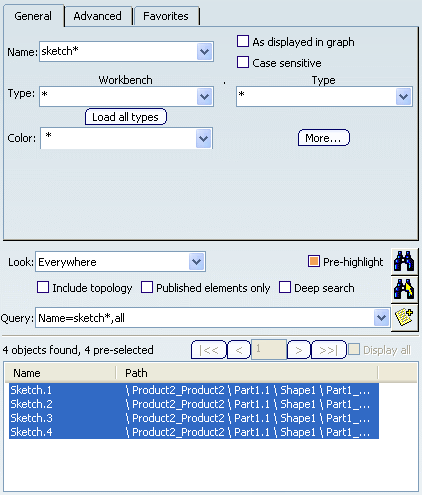
The Find dialog box is resized to include a list containing the search results at the bottom of the dialog box. You can:
- Click the corresponding column header (i.e. Name or Path) to sort the search results alphabetically.
- Deselect items in the list by clicking on them.
- Double-click an element from the search result list to edit this element. For instance, double-clicking an element of type "Pad" opens the Pad Definition dialog box to let you modify its parameters.
In addition to this, a query is generated in the Query list and the found elements are preselected in the geometry area:
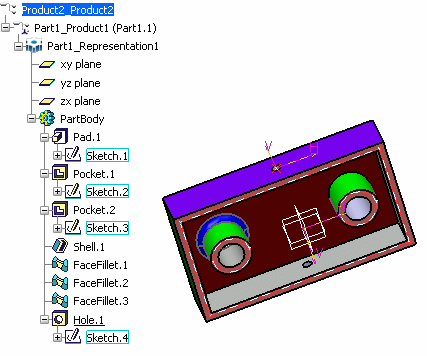
If several elements with the same name are found, whatever their type, a warning message is displayed.
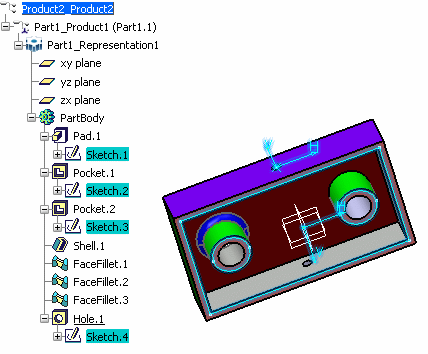
Click Select.
The found elements are selected:
Note: Instead of clicking Find
 then Select, you can also directly click the Find and Select
 button to run the search AND select automatically the objects that have
been found.
button to run the search AND select automatically the objects that have
been found.Click OK to exit search mode.
Tip: Clicking OK has the same effect as clicking both Select and Close. Run the Find... command once again by pressing Ctrl+F.
Optional: Display the Query list by clicking the down arrow:
The Query list displays the search query formulated in the search language. This helps you to become familiar with the Procedure for Finding Objects Using the Search Language, which can be used for searching without using the Find... command.
Previous search queries are also displayed and selecting a query in the list executes the search (with the same criteria and the same scope). Queries are stored across sessions because they are saved in the settings.
Tip: - You can also use the search language in power input mode. The object found is then directly selected.
- You can use the asterisk (*) as a wildcard. For example, entering sketch* selects all objects whose names begin with the character string "sketch".
![]()
Use the Navigation Options
You can browse the search results using navigation buttons.
Run the Find... command by pressing Ctrl+F.
In the Find dialog box, enter a query.
Click the Find
 button.
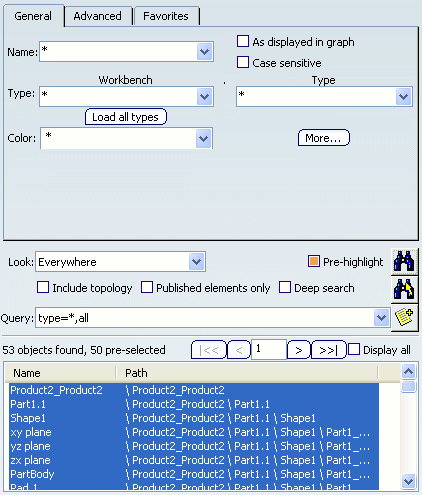
If the number of search results exceeds the value set in the Maximum Displayed Results option, the search results are not all displayed on the same page.
Click Next Page
 to display
the next page of the result list:
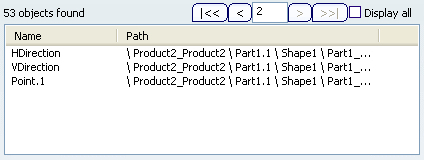
Keep on browsing the search results using the appropriate navigation button.
Optional: To display all the search results on the same page, click Display all.
![]()
Run a Quick Search for a Color
You can search for the color of an object as defined in its graphic properties.
In the Color list, select From Element.
As soon as From Element is selected, an acquisition agent is activated and the Find dialog box disappears:
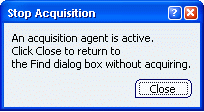
In the geometry area, click the object whose color you want to search.
In the Find dialog box, click the Find
 button.
Warning: Clicking in the geometry area means that the pixel color is used to perform the search, whereas clicking in the specification tree means that the search uses the color displayed in the object's graphic properties. Whichever method you choose, the Find... command always uses the color defined in the graphic properties. Therefore, if you click an object in the geometry, the search result might not be as expected. Optional: Instead of selecting a color in the geometry, select the color to be searched for in the Color list.
By default, * appears in the Color list. This means that the search is performed on elements of any color.
The first color in the list corresponds to the last selected color.
When you access the list for the first time, there is no last selected color and the first color in the list is "white". Therefore, you see two "white" colors in the list but the first color corresponds to *. In this case, selecting the first white color amounts to selecting *.
Optional: Click More Colors... at the bottom of the Color list.
This lets you access the Procedure for Defining Colors Through the Color Chooser in which you can select basic or previously custom colors, or add new custom colors.
Click the Find
 button.
Only objects with the color you specified are found.
Click OK to exit search mode.
![]()
Run a Quick Search for a Type
You can search for a specific object type.
Enter the workbench of your choice in the Workbench list and a type in the Type list. In our example, we choose the workbench Sketcher and the type Point.
Tip: - If you type only the first few characters of an object type, then press Enter, the system automatically displays the full name of the type. If several types contain the same characters, the first name containing these characters is displayed.
- The object type is NOT necessarily the name you see in the specification tree.
- If an object has several types, a random type is returned.
If you select From Element in the Type list, the Find dialog box disappears and an acquisition agent is activated:

Select a type in the geometry area: the Find dialog box reappears. If you do not want to select an object, click Close to stop the agent.
In the Color list, select From Element then select a point from the geometry area (or from the specification tree).
Click the Find
 button.
In our example, we are searching for all points having the same color than one of the points in the model (for instance, "Dark Green"):
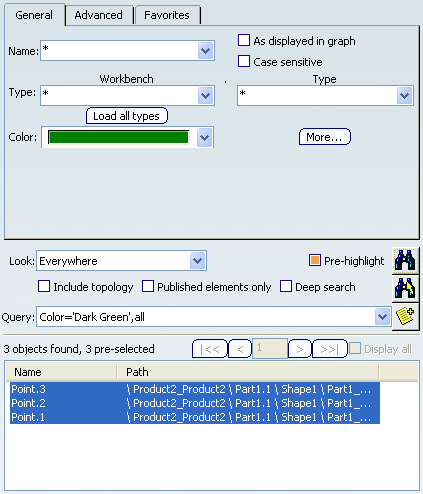
Click OK to exit search mode.
![]()
Run More Advanced Searching Using More...
You can search for a specific graphic property.
In the General tab, click More...:
The button changes to Less... and the Find dialog box looks like this:
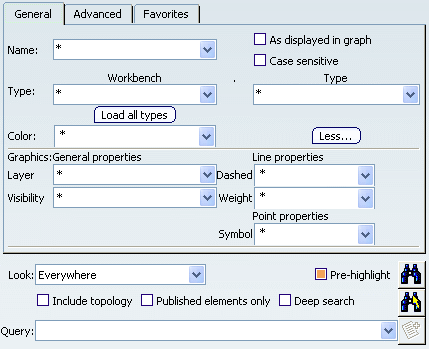
Define the General and Line properties to be searched for.
The Line, Point and Layer properties are identical to those available in the Using the Graphic Properties Toolbar toolbar.
You can also specify a visibility criterion. For more information on visible and hidden elements, see Hiding and Showing Objects.
Click the Find
 button.
The picture below shows an example when searching for the Dot symbol:
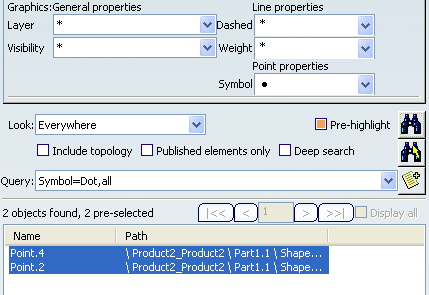
Click Less... to return to the original Find dialog box.
Click OK to exit search mode.
![]()
Search Using a Specific Search Scope
You can set a search scope to refine your search.
In the Find dialog box, click the General tab.
Enter *1 in the Name list.
Set the search scope in the Look list.
The search scope are:
- Everywhere: searches the whole specification tree from top to bottom, to find objects created using all workbenches ; if you are performing the search in a product structure document (in design mode), the search is performed throughout the whole product structure, inside all the documents integrated in the product structure (if these documents are accessible in design mode).
- In Element: the scope only locates objects belonging to "Element", and those that can be created using the current workbench, where "Element" is the name of the active object.
- From "Element" to bottom: searches the elements in the active "Element", to the bottom of the tree, regardless of the workbench used to create them.
- Visible on screen: searches for objects visible in the current window. Selecting this search scope means that elements that are not activated or not represented in the geometry area are not taken into account.
Elements that are not represented in the geometry area are, for instance, elements transferred to the No Show space, elements that are not in the current filter or not in the current mask, features used to build other features that appear in the specification tree but not in the geometry area (use of the Define in Work Object capability), etc.
When working in 2D mode, elements that are not in the active plane are excluded as well.
The scope is exactly defined by drawing a virtual trap on the whole visible screen, thus only first-level objects are searched for (as you can see if you draw such a trap by yourself: only first-level objects are highlighted in the specification tree). Elements which cannot be trapped cannot be searched for using this scope. Moreover, note that when using traps on Part Design elements (whatever the current workbench), you can only select the last feature you created and not the whole part.
This scope applied to topological elements does not search for visible vertice, edges or faces but for vertice, edges or faces which are part of a visible element as described above.
- From current selection: this scope searches inside the selected objects to the bottom of the tree. This is particularly useful when you know the object in which you want to search: you simply select the object, then search inside the object.
- From search results: the search is performed on the list of objects preselected in the list at the bottom of the Search dialog box.
- From last scope: this scope searches from the scope of objects used for the last search. This scope is especially useful when topological objects are involved.
Click the Find
 button.
Only objects included in the specified search scope are found.
Tip: When the object is selected in the search result list, you can also right-click and select Center graph or Center view. Click OK to exit search mode.