Activate Editability
A few actions must be carried out to be able to work in editability mode.
Select .
In the General Options area, select the Display a warning if read-only data is edited check box.
Editability is activated but it will be taken into account only after restarting your session. Restart your session. Open an object.
A warning message is displayed each time a read-only
object is modified by another user, or if you try to modify
a read-only object. However, read-only objects can be switched to edition mode and in that case, a certain number
of editability rules are applied to check if the object can be modified
in database:
- The user is the lock owner
- The object is in a modifiable maturity status
- The object belongs to the local site
- The object has not been concurrently modified because it has been
loaded in session.
The
areas covered by the editability check are described in the following
table:


Open Objects through Open in Editability Mode
The Open command lets you open objects in editability mode.
Let's take the following product ("ajtProduct1") as an example:
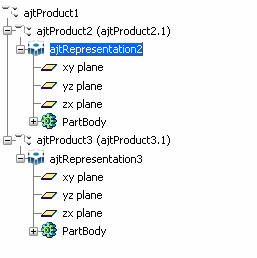
Select . Select the Display a warning if read-only data
is edited check box. Restart your session. From a Search Results window, select the object
("ajtProduct1" in our example) then click Open
 in the PLM Search toolbar.
The product opens in read-only mode, as indicated by the forbidden signs
displayed in the specification tree:
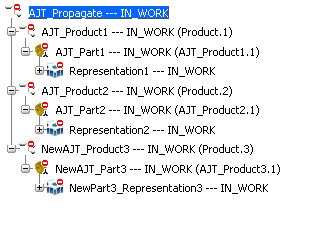
Access the different menu items or toolbars to check
that a certain number of commands are now grayed out to prevent
modifications.
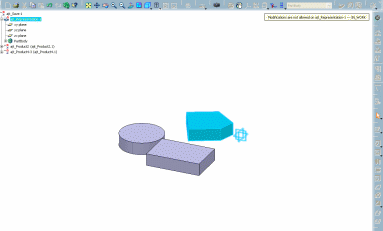
For instance, if we double-click "ajt_Representation1",
an easy warning is displayed to indicate that modifications
are not allowed on this object and you can see that some
commands in the toolbars are grayed out:
To be able to modify the object, click the desired object in the specification
tree or in the geometry area then select .
A check is performed to make sure that the object is editable in
database:
- If the object is not editable, the command fails and the object remains read-only (identified by a with forbidden sign).
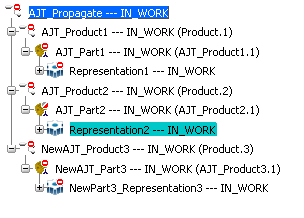
- If the object is editable, the forbidden
sign disappears and menu items and commands that were
previously grayed out are now available:
When
you select a node in the tree, the command retrieves the
objects to be switched to edition mode. The selected node can be
a reference, an instance and a reference node, a port, or a
connection.
In that case, the Switch to edition
dialog box is displayed to let you specify which elements should be
switched to edition:
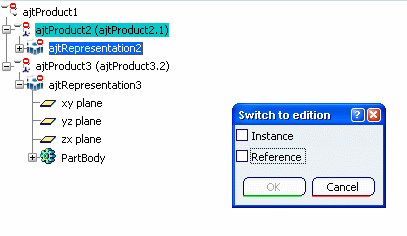
For instance, if you select Instance,
the instance of the selected object becomes editable and the mask
displayed in the specification tree is updated accordingly.
The table below shows the different masks that can be
displayed according to the editability status:
| Mask |
Editability Status |
|---|

|
No element is editable |

|
Reference is editable |

|
Instance is editable |
| No mask |
Reference and instance are editable |
To switch to the read-only mode,
select .
This command works like the Switch to
edition...
command.
Optional:
When an object is
selected, select
.
A detailed view of the errors encountered during the last
editability check is displayed:
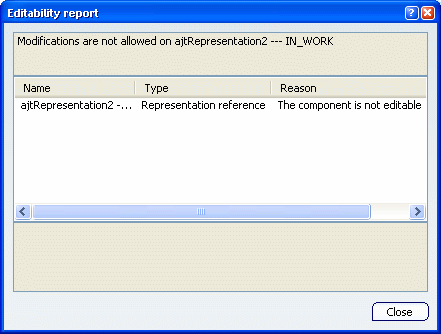
-
Name: displays the name
of the non-editable object. For features, the name of
the component including the feature is displayed.
-
Type: displays the
object type (i.e. part instance, representation
instance, etc.).
-
Reason: explains why an
error occurred when trying to edit the object.
-
Advice: explains how the
problem can be solved.
Optional: Select a row
in the report.
The referenced object is highlighted in the geometry
area (if found) and a more detailed analysis is displayed in
the text box at the bottom of the dialog box:
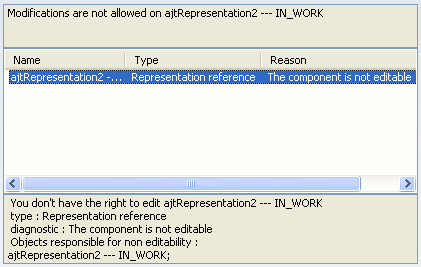
Click Close when finished.

Open Objects through Open Advanced...
in Editability Mode
The Open Advanced... command lets you open objects in editability mode.
Select then select the Display a warning if read-only data
is edited check box. Restart your session. From a Search Results window, select the object to
open ("ajtProduct1" in our
example) then click
Open Advanced...
 in the PLM Search toolbar.
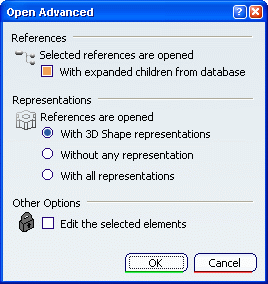
The Edit the selected elements
check box replaces the usual Lock the selected elements
check box. For more information about the other options
in this dialog box, see
Opening Objects from a Search Results Window.
In the Open Advanced dialog box: - Select the Edit the selected elements
check box to open the selected object in edition mode.
- Clear the check box to open it in read-only mode.
Selecting this check box lets you open
in edition mode the objects you intend to modify in a session globally set as in read-only mode.
This means that you can open a read-only set of objects
and an editable set of objects at the same time.
Click OK.
The selected object opens.
| Example 1 - Edit the selected
elements check box is selected and "ajtProduct1" is in
edition mode and you are allowed to modify it:
|
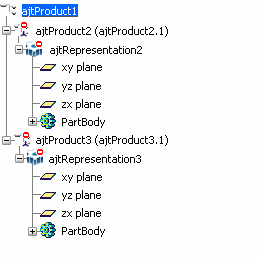
|
| Example 2 - Edit the selected
elements check box is cleared and "ajtProduct1" is in
read-only mode:
|

|
To be able to modify an object that has been opened
in read-only mode, use the
Edit >
Editability > Switch to
edition... command.
|