Viewing and Hiding Toolbars

You can display and hide toolbars either through the View menu, or through the Customize dialog box.

This task shows you how to:

Related Topics
About Toolbar Icons
Customizing a Toolbar by Dragging and Dropping

Method 1

This method shows you how to manage the display of toolbars by using the View menu.

  1. Select View > Toolbars.

    The list of all available toolbars for the current workbench is displayed. Currently visible toolbars are indicated by a tick symbol to the left of the toolbar name:
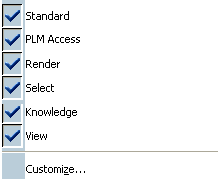
  2. In the list, click the toolbar you want to view or hide.

    Important:
    • You can detach toolbars from the application window border by dragging the double line to the left of the toolbar: you can drag the toolbar anywhere around the screen, then dock the toolbar in the same or in another location by dragging it onto the the application window border.
    • You can drag a tool icon from a workbench toolbar, and drop it onto a selected object: this is a quicker way to run a command.
    • You can drag and drop an object onto an object: for example, copy a fillet on a part.

The selected toolbars are displayed or hidden.

Method 2

This method shows you how to manage the display of toolbars by using the Customize dialog box.

  1. Right-click any icon in any toolbar.

    The list of all available toolbars for the current workbench is displayed. Currently visible toolbars are indicated by a tick symbol to the left of the toolbar name:

  2. Select Customize....

  3. In the Customize dialog box, click the Toolbars tab, then toggle the Hide or Show button.

The toolbar is hidden or displayed.